Sangheili ranger helmet wip

Status
Not open for further replies.

pbailey

New Member
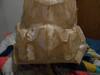
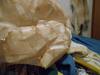
I have bin working of a halo elite ranger helmit for a copple of days before i had to shelf it here over the winter. the shed whare i build this lost its power over the winter. so i though it would be a good ideya to post thes pictures i have and see what kind of teckneeks i can use to help fill and sand down to make it smoth.

https://www.facebook.com/photo.php?fbid=376646135803194&l=cd3d3e7d4c

https://www.facebook.com/photo.php?fbid=376646112469863&l=a9bbe24e59

https://www.facebook.com/photo.php?fbid=376646072469867&l=dfc4461e3d

dispite it beeing scails down from my printer, it sead it was the rong sise of paper but looking back it was the same so i dont know why it scails down. it is still a massive helmet.
my futer goles are ambishus for the helm, i plan to puting a camra in to to see out of, the vioser will have a merror finish if i can manage it, and it has enoulf room inside to potenuley have a cramra guts iside to see ware im going.

~Patrick
feed back is mutch apreceated
 
I use the fiberglass polyester resin to help my helmets level out, then bondo and finally evercoat. I sand the spots with an 80grit sand paper, find the low spots, brush on the resin, sand and repeat until I have the area is close to the shape I want then the bondo. You could go straight to bondo after you harden the outside, but make sure you sand the area well so the bondo has something to grab as it cures. The 80grit takes off material quick, then switch to a 180 and a 220grit to help reduce scratches. Primer will also help to fill in smaller scratches. Just be sure to let each level cure properly before sanding and re-coating. Also remember to wear gloves. Your hands will dryout quick using the sanding paper and bondo products. Yea the Elite armor is massive. But they are a large species. Camera parts inside... like you said, there is plenty of room, but the small monitor being so close to your eyes, might be a bigger headache. You might try vaccuforming the visor, might be easier than the tech solution. Just do a search here and try youtube.
 
thank you for the typs. for me it will be hard to find bondo and some other things. i live in a varey icolated comunity.
as far as the helmit goes there are some parts that are bullged out that im not shure if i shuld bonto the inside of them and then sand them down liek that and then rezen over the bondo to maee it stay beder.
and looking at pictures of the helmit there are inconsitsancies from the pepakure file. so there will be kind of molding, would i be able to use bodo for that? or use a sculpters clay and bontdo over.
as car as the viser goes i have aboslutley no skill or know how to vacuform that big of an opject, besides that fact it will be a display pece on the wall.
 
Looking really good. Just some suggestions. I noticed that it looked like you were using tape for the pep. It will turn out better if you use super glue or hot glue. Also for the pics upload the to a site like photobucket. Then copy/paste them with the setting IMG (its a link). Otherwise lokking very good!
 
I see from google maps exactly what you mean by isolated. I have had only limited success with putting resin over bondo. And I would not put bondo over clay. With a couple of coats of resin on the pepakura, the bondo should stick just fine, just make sure you make the resined surface rough enough so it can grab. Also if you have weak areas on the pepakura, before you resin, you can always glue a piece of spare card stock to the section on the inside of the helmet to keep it from buldging and stiffen it up. I use elmers glue on my pepakura and on flat parts or edges I have used wood craft sticks or as we call them... popsicle sticks. The visor could be made by heating a thin piece of plastic with a heatgun and letting it melt over the visor shape, like cheese over a burger.?. Just some ideas. There are a couple of people that have used papermache to shape and strengthen the pepakura. The thinner paper would take a bit longer to build up due to the layers, but might give you a way to fix some problems.
 
the onley..for lack of a beder term "filler" i have acses to would be plaster for drywall tape. i have exstremley restricted options of matereals i can make this helm. i dont even have acsses to a heat gun.
the resis is hard enould, one and a half cans of resen i nand on it. i have a mouse sander but as i sead before. i have no place to work on ths untill the summer when the shed can have power.
thank you agen for your input. i could potanthuley use bndo if i had acsess to it.
 
I made a deathstar skirt and used drywall plaster. It is very soft, so it will flake off, dent...etc. but it is super easy to put on and to sand down. If you are wearing this piece, I would be very careful about using that. I had some success when I painted over it, as the paint seemed to hold the plaster together a bit better, so maybe a mixture of the plaster with a glue or resin?
I have never tried it, so definitely would be an experiment with many failures before the right combo is found.

Good luck, It is hard when access to the easy materials are not available. You have your work cut out for you, but you seem determined and that means you will succeed!

Nice build so far. Keep it up and keep posting pictures :)

an OLD generation auto body friend told me the old bondo they used was nothing more than fiberglass resin and a babypowder or talc (?) <---I hope I got that right... so maybe plaster and resin would work??
 
the onley..for lack of a beder term "filler" i have acses to would be plaster for drywall tape. i have exstremley restricted options of matereals i can make this helm. i dont even have acsses to a heat gun.
the resis is hard enould, one and a half cans of resen i nand on it. i have a mouse sander but as i sead before. i have no place to work on ths untill the summer when the shed can have power.
thank you agen for your input. i could potanthuley use bndo if i had acsess to it.
If you have a Walmart near by you have access to bondo
 
pbailey, I feel for you man! I just google mapped Norman Wells and realize just how hard it is for you to get materials. I would think the only way for you to get much of anything in the way of Bondo or things like it would be to either have it shipped directly to you (if that is even possible), or to have your local store order it for you. Many merchant stores will do this. I know it is a ways away, but do you think Field's would do that possibly? Just an idea.
 
i might be able to get a local hardware store ship stuff in im not shure. but i have this helm project on the back berner and im tryen to make a gaming entertainment system along with moding my pc, but thats besides the point. this evning ill make it a point to see if i can work on the helm by sanding it down.

thinking of it and looking at my helmet now, im not shure if i shuld remake it? its almost fine on one side but ther other is almost completley mullad. i have absolutley no ideya how to fix it and i dont think even bondo will fix it.
 
this is just an image update before i do anything and to beder show my conserns about this project.

DSCN0035_zps9e739f3e.jpg

DSCN0038_zps0dd66346.jpg
its just off leaning to the right just a bit.

DSCN0033_zps6ff32c77.jpg
the left under cheek is pushed in and just above it is pushed out where it shuld be concaved.

DSCN0031_zps5fd1fd9f.jpg
just a side view for sise coparison with the cat.
 

Attachments

  • DSCN0035_zps9e739f3e.jpg
    DSCN0035_zps9e739f3e.jpg
    47.4 KB · Views: 149
  • DSCN0038_zps0dd66346.jpg
    DSCN0038_zps0dd66346.jpg
    59.3 KB · Views: 138
  • DSCN0033_zps6ff32c77.jpg
    DSCN0033_zps6ff32c77.jpg
    57.1 KB · Views: 145
  • DSCN0031_zps5fd1fd9f.jpg
    DSCN0031_zps5fd1fd9f.jpg
    57.8 KB · Views: 132
I definitely see your concern with the symmetry being off. At this point, I think you have two options. One would be to rebuild the helmet using your experience from the first build as a learning phase. I know from my own builds that even though the excitement to progress in the build is great, I have to slow myself down and realize that each step I make is critical. Being sure the part is perfectly symmetrical before hardening it with epoxy is a must. When I built my Rogue helmet, I too had that problem where some of the parts on one side were pushed out, and on the other side they were pushed in. I took my time and used wooden craft sticks (popsicle sticks) cut to size and glued to the inside to equal everything out. Also, don't rule out having to make a cut and add just a tiny bit of cardstock to accomplish the same thing... perfect symmetry.

The other option you have now is not an easy one, but at the same time, what do you have to lose? You could cut the current helmet in key places and bend/fold/alter by adding new cardstock or removing a sliver to make it right.

Either way you go, I will reiterate with this advice... before hardening, make sure it is exactly how you want it to the best of your ability. A lot can be corrected with bondo, but why add weight and tons of time sanding when it could have been corrected earlier with a simple popsicle stick!? :)

Good luck on this build friend. I eagerly watch your thread to see updates.
 
That looks pretty cool, you're building these guys right?
I really liked their design and that of the kig yar in that level as soon as I saw their corpses floating by my crosshairs :p

From my experience, wanted and unwanted trials, I've found that if you heat up that section--and just that section, carefully--with a heat gun (maybe a blow dryer will work), the heat will soften it back up to a state like when it was still setting up.
It won't be tacky this time, but kind of like warm, soft leather. Be careful to just hit it where it needs to be heated, those broad flat shapes may kind of 'dent' or 'buckle' inward from the weight as it gets more pliable. (You can just heat them later and push them back out, but why do it again? ;))
At that stage you can manipulate it towards where it should be, unless the resin is super thick anywhere.

Wear good heat resistant gloves so you can comfortably work it back into shape and be able to hold it about where it should be while it cools off and hardens again. And wear your vapor mask since it sets off more fumes.
Good luck!
 
shure i can link thes fils if i can find themor uplode them if i can. shuld i do that on a pepakura file thred?

and eva thank you for your exspereance..i think what i just might do is re make the helmetwithout the vioser. there is just two mutch dent all around to patch new parts in...that sead, when i get time on this first one maybe i will try and detail concument heating, patching, and other techkneeks. who know maybe itl help other people who just started out like myselfe.
 
good afternoon. i canot for the life of me find a link to this pep file...but i do have the actual files on my computer. i dont know if i can uplode them here or not.

on another note regarding my helmet. i will be starting over since i have nothing but time now and i will be doing things difrentley. but still using tape lol if anyone reading this is intrested in this helm i will consider shiping it off too somone elce in the 405th who will take care of it and fix her up. due to my cureent sercumstances i will not be able to work on her untill the summer with is to long for idle hands. so i will be consintrating on making alother one using pepakura and tape once agen. but i plan on making the helm without its vioser first and stabalizing the ring with stick. depending on what i deside down the rode i will att the vioser.
 
DSCN0041_zps18ef9b37.jpg

well that happend.. me being over zellus once agen, tryed to take it out into the shed with a space heater. it was exsposed to -54f temprature for about..a copple minits. with an ever so light tap it shatterd. so to sum up my exspereance cold=bad...

once i have time i might recrate this helmet. if anyone would like to adopt it inbox me i do not wish to thow it out.
 

Attachments

  • DSCN0041_zps18ef9b37.jpg
    DSCN0041_zps18ef9b37.jpg
    40.4 KB · Views: 140
Status
Not open for further replies.
Back
Top