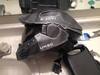
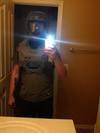
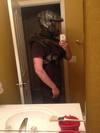
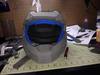
Thanks Guys! I am actually re-doing the visor, I alos made the dark stripes a bit more prominent. I've checked out your build Sepheus and it looks really clean! I love what you did with the ab plate! It gave me a few Ideas of my own, I plan on intergrating the spine armor into it as well. Here is Before and after on the helmet.
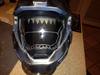
I like your shark visor, I was thinking of painting a shark face onto one of my many unfinished helmets in my garage... This makes me think that I should! Keep up the good work!
Hey man,
nice job with everything, it looks great! I like the way you made the helmet out of foam, i have never seen that before. Good luck in the future!
For some reason, I really like the way it looks with the yellow craft foam. Also, that neck seal looks good, but is is uncomfortable to wear? It might be better to make it out of breathable fabric or something, but that's just my two cents.
its actually surprisingly comfortable. It's not very tight so it does get some air, and you cant see it, but there is gaps that allow air flow. The only uncomfortable part is that it is a little high, makes it hard to look down, but the armor does that anyway
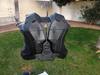
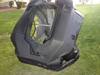
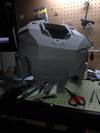
well I think i'm gonna have to scrap the entire torso and start over with it, the plastidip didn't work right, gave it a grainy/sandpaper like texture. Next one Im going to paint it with pva first i think.
well I think i'm gonna have to scrap the entire torso and start over with it, the plastidip didn't work right, gave it a grainy/sandpaper like texture. Next one Im going to paint it with pva first i think.
Plasti dip is very picky. If you are using spray can it doesn't yield much and has to be applied in perfect environment. I have been using it for years. First make sure it's dry no wind and don't apply in sunlight. I know it's weird but the spray has crystalline in it which reacts to natural sunlight find some shade. Second do light coats ft away sweeping back and forth. Rattle can for me takes three coats bare minimum. Most importantly don't apply next coat until dry. Usually 15 to 30 minutes, if not it coat was too thick.
I use Dip my car's kit it comes pre thinned and has a neat little sprayer. Best thing is it comes out way cheaper. I'm sorry if you're already aware.
I've used plastidip several times, and of the 3 cans I bought, it was the only one that came out different. I think i might have just had a bad can, in hind sight I should have just stopped there. It's for the best I guess, there were a few minor things I wanted to fix anyway.
well it occured to me to possibly re-coat it in plastidip, but I think I would lose to much detail. I wouldn't feel right selling it, it's not up to my standard.


")