Sewing Tutorial #1 - Basic Set up for Most Sewing Projects

Status
Not open for further replies.

FANGS

Commanding Officer
Community Staff
Division Staff
Over the next several days, electricknite, TurboCharizard and I will be taking lots of photos or video to show you what our basic set up is for sewing soft parts. Each of us is going to have a placeholder (this will be mine), and we'll add our tutorial for this topic as we are able to. We're excited to be showing you three very different set ups in terms of location and equipment so you see a wide range of options. We all at some point have used dining room tables and floors etc. so do not be discouraged if you see more than what you have available to you.
 
My sewing setup is really only putting my sewing machine and serger on my desk and setting up the ironing board and mannequin. I use the floor as my cutting table which means I also have to roll up my rug and move it out of the way. I like having my laptop and plan drawings handy for reference but since my desk isn't big enough for everything I use a little stool.

Plus side of having a sewing / gaming room is I can watch youtube at the same time.

1edit.jpg 2edit.jpg 3edit.jpg 4edit.jpg

Literally all my sewing tools and notions fit in the glass cube:
Seam ripper
Snips and scissors
Extra needles
Pins
White watercolor pencil (for marking fabric)
Thread/ bias tape/ boning/ snaps/ buttons/ velcro etc.

Ironing boards don’t seem important at first but trust me, there is not a more important tool, they make sewing a lot easier and cleaner for flattening seams and putting the fabric back into its natural position. Also I rely a lot on iron-on interfacing so it’s pretty important to me.

I have a Husqvarna Viking Emerald 116 sewing machine it has basic stitches but it can do automatic buttonholes. It’s a beginner level machine but it is built really well.

My serger is an old Pfaff Hobbylock 788. I’m not sure its still available but I really like it because it’s a beast and I know how to fix it usually..

My tips:

-Use so many pins, more pins the better.
-Use interfacing to keep spandex stable while sewing in a zipper
-If material is gripping the sewing machine (like pleather does) use painters tape to make it run smoothly
-Test stiches on scrap fabric before starting
-Know your construction order!!!(y)(y)(y)o_Oo_Oo_O i mean it !!!!!!
-Learn the right stitch to use: spandex needs to stretch so use a zigzag or a serger
-Don't use post snaps on stretchy fabric, use prong snaps instead
-Keep the rough side of velcro facing away from your skin UNLESS its used for attaching armour, then put the rough side on the armour.
-Velcro is good at attaching armour to clothing. sewing it down can be tricky but its worth it. Use a thimble to save your thumbs. you need those for gaming. ;)
 
Last edited:
My sewing setup has been a kitchen table for the last... forever. Recently our living arrangement has changed and I've started converting a large basement room into a Cosplay Dungeon. You may have seen some photos taken in the Cosplay Dungeon in various other threads but this is the current setup until I really put it through it's paces and find out where things naturally fit.

This is the Fabric Station, Streaming Station and Beats Factory. These three sewing machines are ones that are open use in our house.
DSC_2009.JPG


The Janome belongs to my sister and is probably the most versatile of all the sewing machines with dozens of pre-programmed stitches and adjustable everything. The Kenmore is a machine that was passed down to us from CplYapFlip's late grandmother and is a powerhouse that just needs a little bit of maintenance before it's up and running again. The Brother serger is the most recent addition to the collection and was bought to make the Spartan 068 under suit possible with all the stretch fabrics. There is a fourth machine that has shown up in the BotW Link build thread along with the kitchen table, it's the Walmart Singer special and I'd recommend that level of machine for a beginner who only periodically does sewing projects.
DSC_2010.JPG DSC_2011.JPG DSC_2012.JPG

This setup is by no means necessary, if anything it's overkill and the only reason it exists is to help facilitate crafting parties and three people that all cosplay living in one house. If you have a kitchen table and any sort of sewing machine you're kicking butt.

The most important piece of kit when sewing though is having enough pins and clips to keep your project nice and even when run through the machine. I like to use Wonder Clips because of my big dumb sausage fingers but sometimes pins are necessary.
DSC_2013.JPG


After pins and clips in order of importance in my opinion is to have an iron and ironing board to smooth out fabric and remove any folds, creases or any other bunching that'll form when it's left in storage for any period of time. Certain fabrics require different temperature and steam settings so always write down what you picked up at the store so you can look up care and handling instructions later on!
DSC_2015.JPG

Lastly, I'm still figuring out this storage situation but I like to keep things within close reach when working on something. Containers with smaller containers to hold sewing closures and notions are my jam. The fabric pile bin... well, that's one of several. We're still sorting out a system to organize that sort of material.
DSC_2014.JPG
 
Last edited:
This is very helpful to me. Thanks!

While my next project is primarily non-machinable leather, it will most likely require custom cloth sewing as well. Definitely will have to sew a Cape. If it's alright I'll post photos of my super noob set up.

For now I just have a duct tape dummy that I made:
20181118_220001.jpg 20181117_171724.jpg

First step is patterning.
Instead of wasting cloth to make patterns (or buying expensive pattern paper) My mother gave the suggestions to use the white side of Christmas wrapping paper. It's large and cheap.
 
Last edited:
This will come in handy for me, as I plan to really detail the undersuit to match what's seen on the HALO Reach armour.

A lot of it will be trial and error, as I've never sewn anything in my life, lol. But that's the plan anyway :p
 
I just want to remind everyone that I'm older than most of you so I've had a lot of time to gather tools etc. Don't be discouraged if you're sewing on the corner of a kitchen table. That is exactly where I started.

I'm going to start off with what I consider a very important part of sewing - IRONING. OMG how I loathe ironing regular clothes. I fully admit to more often that not using the steam feature on my dryer. But, there is something weirdly satisying about ironing while you sew.

There are all sorts of reasons for taking the time to do this properly, including just making whatever sewing skills you have look that much more professional. It also helps set the stitch and makes your seams lie nice and flat.

20190113_200650.jpg
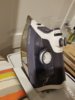
So that's my ironing set up. The only two necessities are some sort of ironing surface and the iron. The rest are just items I've discovered over the years that make it easier.

20190113_200707.jpg 20190113_200716.jpg 20190113_200713.jpg 20190113_200722.jpg 20190113_200729.jpg

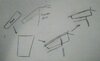
The wood items are amazing. The flat one helps flatten seams. You iron the seam flat and then press down with the block while it cools. The one with the narrower top is used when seams or things with points like collars. It can also be used for the same purpose as the other.

The blue stick things are used to help hold things down to keep your fingers out of the danger zone. The fatter one can slao be used to help with seams on some fabrics.

The Flatter spray help seams lie flat. Plus it smells yummy. The other spray is a starch. It helps give fabrics a little more body. Things like collars etc.

The measuring tools help when doing hems etc.

The baby ironing board is for sleeves. The cloths beside it are for two reasons. One is to clean the bottom of the iron if it gets gunky from interfacing. The thinner one is to put over fabrics that scorch easily. You can also see a mesh sheet below that can also be used for that purpose on some fabrics.

And the tartan fabric pillows are called tailors hams. They help when you have to iron anything with a curve. Different shapes and sizes help with different things.

My iron has an attitude. His name is Smaug and he's eaten people's projects. It is a Rowenta and an amazing iron, with an attitude. KNOW YOUR IRON. TEST ON SCRAP FABRIC. Pay attention to temperatures and whether or not steam is required. Make sure to know if your iron takes tap water or if it is prone to calcium build up. Check that your plate is clean before you burn some gunk to your project. Check for any brown discharge from the plate holes. It's easy to clean but not so easy to get off your project. The holder my iron is on makes it difficult for my cats to knock down. Make sure your ironing surface is padded with propper fabric that will help keep the heat in your project and your surface protected.

I'm sure you've already thought of some ways to make your own versions of things. I know I'd only have one of the wood tools since one does both things but I bought the other first just not knowing any better. My ironing board is really old. I just keep replacing the pads and cover. The hams can be pricey but you can make one yourself. Just take a look at one in store to see how they feel etc. The iron was pricey but I went through a lot of medioce irons that didn't last long before I bought Smaug. Some items are worth the expense when you factor in useage. I also have a travel steamer and a stand steamer that I waited to get on sale at Walmart. They help with completed projects that are difficult to wrangle on an ironing board.

Any questions?
 

Attachments

  • 20190113_200737.jpg
    20190113_200737.jpg
    1 MB · Views: 422
Hi Fangs,

So I suck at sewing and I need to make some huge changes to my under armor to make it look more realistic. Quiet frankly I'm tired of wearing the old leather jacket under it because it's just too hot. I saw the scuba hex material on another post that I thought looked cool but I also saw some compression arm sleeves on etsy that look cool to. The arm sleeves are a carbon fiber look but I don't know if I should buy them and sew them onto a compression shirt or not. I thought you might know how that would work.

Thanks
 
Hmmmm. Given that there wouldn't be enough fabric to do the sleeve cap - which is wider than the rest of the sleeve - I think you'd likely see the join. But I'd need to see what you're thinking first to really give you a solid answer. I don't want to steer you wrong.
 
So here is the material I found that I could sew onto the existing under armor brand compression gear I already wear under the suit.
https://www.joann.com/cosplay-by-yaya-han-stretch-fabric--black-scuba-hexagon/15469265.html

And then I found these really cool compression sleeves but I might just go with the material since I have to make it tight in some places and snapdex is not always a nice material to sew on from what I have heard.

But here are the arm sleeves.

Compress Arm Sleeve Novelty Streetwear Custom Design - Carbon Fiber
 
Nice! That fabric has been out of stock for awhile, dont wait too long if you want to use it!
 
You can buy YaYa Han fabric from places other that Joann's. They've been out of stock for months.

If you're worried about a seam, you could try splitting the sleeve seam and sewing it over the compression shirt in sort of a mock raglan sleeve. Then you'd have the the unaltered shirt underneath. I don't know how well it'd work, but it's an idea.
 

Attachments

  • WP_20190325_23_59_53_Pro (2).jpg
    WP_20190325_23_59_53_Pro (2).jpg
    1,010.3 KB · Views: 400
Status
Not open for further replies.
Back
Top