Props Ships and Halos and 3D Prints, Oh My!

Status
Not open for further replies.
CASTING TIME:
like i said above, everything is detailed, sealed, and ready to be casted! first up, making the floor and walls out of clay to hold part 1 of the mold:
IMG_20161025_132057908.jpg
IMG_20161025_134314287.jpg
IMG_20161025_145232366.jpg
IMG_20161025_150926973.jpg
IMG_20161025_151955044.jpg
IMG_20161025_162535872.jpg
Unfortunately, i didn't have enough smooth-on to do the rest, and had to go buy more, so the two half-molds were put away for the night to set properly:
IMG_20161025_165003905.jpg

And after a quick trip to pick up another 2-gallon set of smooth-on the next day, it was time to crack the set molds open!:
IMG_20161026_143442853_HDR.jpg
IMG_20161026_143833035.jpg
IMG_20161026_144124251_HDR.jpg
IMG_20161026_144258178.jpg
IMG_20161026_144600550.jpg
IMG_20161028_102151988.jpg

Everything looks peachy! so it was time to do part 2 molds on the first 2, and part 1 molds on the rest of the pieces:
IMG_20161028_105144471_HDR.jpg
IMG_20161028_110732181_HDR.jpg
IMG_20161028_112033156.jpg
IMG_20161028_112532615.jpg
IMG_20161028_115541298.jpg
 

Attachments

  • IMG_20161018_130419198_HDR.jpg
    IMG_20161018_130419198_HDR.jpg
    3.9 MB · Views: 253
  • IMG_20161021_105557436_HDR.jpg
    IMG_20161021_105557436_HDR.jpg
    4.1 MB · Views: 240
  • IMG_20161021_105806255_HDR.jpg
    IMG_20161021_105806255_HDR.jpg
    4.5 MB · Views: 251
  • IMG_20161021_111441772_HDR.jpg
    IMG_20161021_111441772_HDR.jpg
    4.6 MB · Views: 237
  • IMG_20161021_112317382.jpg
    IMG_20161021_112317382.jpg
    4.5 MB · Views: 234
  • IMG_20161021_125941415.jpg
    IMG_20161021_125941415.jpg
    4 MB · Views: 226
Post continued:
View attachment 33145
View attachment 33146
View attachment 33147
View attachment 33148
IMG_20161028_133629362.jpg
IMG_20161028_135133568.jpg

With everything set up, it was time to pour!
IMG_20161028_141711548.jpg
IMG_20161028_142555213.jpg
IMG_20161028_142847647.jpg

so, after that nice pour, i went to get some lunch (which was delicious by the way). by the time i got back, i was faced with this:
IMG_20161028_152244854.jpg
fuh...

So apparently the wall separated from the first part of the mold underneath the fresh pour, and allowed a lot of it to just drain out. this sucks even MORE because this was the last of the first batch (smooth-on 15 SLOW) and the second batch i had bought was Smooth-on 15 FAST, so i couldn't whip up another cup and pour it on! i ended up scooping as much as i could back into the mold and just hoping for the best.

next up was the Pillar of Autumn:
IMG_20161028_152255159.jpg
IMG_20161028_152513237.jpg
IMG_20161028_153348768.jpg
IMG_20161028_154011368.jpg
IMG_20161028_155400278.jpg
IMG_20161028_160018302.jpg

Thus ends a LONG day of mold making! everything was covered with trash bags and shelved to set over the weekend:
IMG_20161028_160023346.jpg
IMG_20161028_160848864_HDR.jpg

Next up: The UNSC INFINITY! i mentioned earlier in the thread that i had it all chopped up and ready to print, so it's up next! stay tuned.
 
It looks great so far! :D

And damn I CAN'T WAIT TO SEE THE UNSC INFINITY! :D

Ask and Ye shall receive, Palmer!
so while all this mold making action has been going on, i've been running the 3D printer pretty much 24/7 working on the Infinity. there was one real kick in the nuts where a print job that was doing three of the eight sections at once (an 80 hour print) mysteriously just stopped about 65 hours in. either way, i stocked up on more filament and started cranking out prints!
IMG_20161028_172948342_HDR.jpg
IMG_20161028_173614919.jpg
IMG_20161028_180125394.jpg

And, for reference, here's all the sections laid out in Mattercontrol. (it's since been scaled down by about 25%, because making a mold of it at this size would probably be upwards of $600 in smooth-on alone)
Screenshot 21.png

The ship is 8 sections, each one averaging to about 17 hours of print time each:
IMG_20161029_094012231.jpg
IMG_20161029_094308945.jpg
IMG_20161029_094338735.jpg
TDSugme.jpg
sl05cut.jpg
YgmFllJ.jpg
rDfbrmp.jpg
NasMwJt.jpg
2VzPmCn.jpg

And finally, some glamor shots of the ship rubber banded together!
KIiKPif.jpg
u6xnZ1P.jpg
7nmMsiM.jpg

Up next is a whoooole lotta belt sanding and bondo work. especially with the nasty build plate adhesion and lifting problems that occured during printing:
1vS8vPy.jpg

That's it for this update! next up: making the infinity look pretty, and round 3 of casting the other ships!
 
CPO mendez, I just wanted to say pics in your last post don't work. Can't see that Infinity. :(
 
Last edited by a moderator:
CPO mendez, I just wanted to say pics in your last post don't work. Can't see that Infinity. :(

I swear to god this damn picture upload is the most emotionally fragile thing in the world. it breaks all the links if you sneeze at it funny... either way, reuploaded everything, so let's hope its there now!


What do you use to glue your prints together?

i did a lot of research beforehand, even asking the 3D printer tech support what he would recommend, turns out just straight up superglue works best. at least according to my sources. in a real pinch, you can repair with hot glue/duct tape, which is what i did with my war machine helmet during this past RTX after dropping it on the show floor.

Anyway! onto the build! like i said before, all the infinity parts needed to be belt sanded and glued together:
43 - R3Yge6C.jpg
42 - ieaixAG.jpg

the belt sanding was a bit more rough than usual, mostly because so many pieces had to be CRAZY precise otherwise the ship was gonna be crooked. it came out pretty okay though, so gluing was next:
41 - nWSikws.jpg
40 - G9V4yLg.jpg
39 - DPF3tkc.jpg
38 - 27UMVxc.jpg
37 - GTbcRyp.jpg
36 - y9xjSqn.jpg
35 - iM6elpm.jpg

And that, boys and girls, is a FINISHED UNSC Infinity! time for the customary glamor shots:
34 - poO1AEs.jpg
33 - R0DcauT.jpg
32 - a4GeZWg.jpg

Even thought he infinity wasn't really my favourite, i'm glad ya'll encouraged me to make it, because damn is it just gorgeous to hold! however, like i said in the previous post, there was a LOT of issues with buildplate lifting and other stuff that left lots of gaps, and with 7 seams, its gonna be a lot of bondo work to get it looking nice. next up, part 2 of the second batch of molds, coming soon!
 
Last edited by a moderator:
whoo! looks great!

Who doesn't want a diorama of Halo?! I'd love one of those!:D

would make some excellent man-cave 'big-boy' toys:cool:lol
 
Oh, and I forgot to mention; CPO mendez could you post some files? I wanted to print the infinity:D.

It looks so AWESOME!!!
 
These are all so cool! I can't wait to see a giant Space diorama when you're all done:D

Yes, yes they would

oh you got no idea! you're not gonna be able to see the ceiling of my work space after i start pouring casts!

And speaking of the casts! time for an update on the mold making:

Last we left off, we had the first half of the 3 halcyon class cruiser parts and the second half of the frigate. next up, the second half of the halcyon:
31 - aYyRV2E.jpg
30 - SxNwqe3.jpg
29 - tw2wGDz.jpg
27 - rhsXUOj.jpg
25 - CV0Pija.jpg
23 - n5IufK1.jpg
22 - yqrpmPS.jpg
20 - YNmv9D6.jpg
19 - yAK2cwa.jpg
18 - okVwIMF.jpg
17 - dUcPd74.jpg

Take it from ol' Mendez: if you didn't make a huge mess and at least six mistakes, you just ain't doing it right!
15 - cYNhyaL.jpg
14 - dkckbcC.jpg
13 - UHwjMQZ.jpg

We started having leaks again, like with the Frigate's mold. although this time i was more on top of it and had big rubber bands ready!
11 - qER8nl9.jpg

Put em up for a night, then the next day it was time to break em out!
12 - NhEa3Ww.jpg
10 - hWW2xdX.jpg
09 - 5TQJQQA.jpg
08 - CeBiDyP.jpg
07 - ljDqvpw.jpg

Time for the money shot!
06 - 5bNISu9.jpg

The main part of the halcyon cruiser mold probably weighs about 50 pounds, and is ~$200 in materials alone!
05 - MyFnGMR.jpg
04 - Pm9OxE2.jpg

Well, that's about all i can fit here. next up is the infinity's detailing and casting! stay tuned!
 
HOW DID I MISS THIS!?!?!

Seriously some awesome work. I'm glad to see another space-ferrying fan of the Halo universe building these awesome ship models. Your prints are extremely well done. I love that you're molding them as well. I wish my printer would print with the same quality of yours. I apologize if you already mentioned this but do you use PLA or ABS? I've been a believer of using ABS but it just seems to be so finicky under certain conditions...
ANYway, keep up the awesome work. Can't wait to see more.
 
Your cast looks really good! Can't wait to see the infinity all finished up!

Coming right up!

HOW DID I MISS THIS!?!?!

Seriously some awesome work. I'm glad to see another space-ferrying fan of the Halo universe building these awesome ship models. Your prints are extremely well done. I love that you're molding them as well. I wish my printer would print with the same quality of yours. I apologize if you already mentioned this but do you use PLA or ABS? I've been a believer of using ABS but it just seems to be so finicky under certain conditions...
ANYway, keep up the awesome work. Can't wait to see more.

Glad to get such high praise from a veteran! but i gotta confess, the secret to the ships is just the "high quality" setting on my slicer's settings board. as for material, i've been using nothing but PLA. it's a tad cheaper, lower temp (which means less chance of clogging, like you mentioned) and makes my workspace smell like waffles when printing! (no seriously, polylactic acid (PLA) is a type of sugar)

Anyway! i've had to abandon the updating (NOT the project) temporarily while i got slammed by finals. but i've limped over the finish line and am ready to dump all the progress pics here! so, first off, at Frosty's request: the infinity!

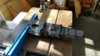
We left off with it being glued together, but in DESPERATE need of some bondo work along the gaping seams between the sections.


Finally, after about 3 or 4 passes of bondo and detailing, i decided to slap a bit of leftover primer onto it to see how well the seams blend into the rest of the model!
03 - rKL1qeQ.jpg
02 - CVWBmGn.jpg
01 - REmRcK7.jpg
IMG_20161201_120824184.jpg
IMG_20161220_113409162.jpg
IMG_20161220_113429429.jpg
IMG_20161220_124026862.jpg
IMG_20161220_132921871_HDR.jpg

Also, a fun little detail i noticed:

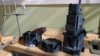
This MASSIVE hangar bay seen here (playable in Halo 4's Spartan Ops, IIRC)
H4-Render-LaunchBay-2.jpg

Is THIS little square in the ship's side:
IMG_20161220_132936241_HDR.jpg
IMG_20161220_132940562_HDR.jpg
IMG_20161220_132946477_HDR.jpg

So needless to say, the Infinity is a big ship.

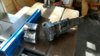
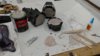
ANYWAY! back to the fun! Around this time, classes were winding down, and i decided to move my little mold-making outfit home, and set up an area by my workbench!
IMG_20161201_160025741.jpg

Got to learn a few important lessons, like how its NOT a good idea to roll clay on butcher paper...
IMG_20161201_130338965_HDR.jpg
IMG_20161201_130548493.jpg

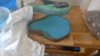
After THAT fun little couple hours of picking wet paper out of clay, the next ship up for casting is the Covenant Carrier!
IMG_20161201_130106819.jpg
IMG_20161201_130949720.jpg
IMG_20161201_131723601.jpg
IMG_20161203_100018181.jpg

Now, things were going a little TOO well at this point, so obviously i was due for a disaster. Now, to preface, all Smooth-On products are PLASTERED with warnings saying "do not use with any products that contain sulfur" because whatever chemical formula they use basically CANNOT work when sulfur is present. this applies mostly to oil-based clay, which contains sulfur! (this makes it so that it doesn't dry out in open air, makes it easier to apply and work with, and generally has lots of benefits over normal clay) So, part of moving everything to my own workspace meant i had to buy my own clay, since the stuff i've been using up until now has been provided by my school. When i went to a certain store that rhymes with "Bichael's" to see if they had clay, i found a few lovely boxes of CLEARLY MARKED "Air Drying" clay. i looked on every surface of the box looking for any warnings that said "hey CPO Mendez, this stuff contains sulfur and will RUIN YOUR LIFE for a day!" and i found no such warning. i even went up to one of the store clerks and double checked, and was assured that it'd be fine for my mold-making!

I'm sure you can see where this is going.

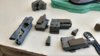
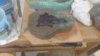
I come out the day after doing the first pour on the Covenant carrier, and peel the clay off to find THIS:
IMG_20161203_100326775_HDR.jpg
IMG_20161203_100635827_HDR.jpg
IMG_20161203_100640737_HDR.jpg

Now, it didn't show up very well on my camera, but basically about 40% of the mold was this sticky, gooey, completely unusable sludge. which is what happens when SMOOTH-ON PRODUCTS COME INTO CONTACT WITH SOMETHING CONTAINING SULFUR!

So, after cleaning up and throwing away about $50 of ruined mold (and cleaning off the sticky covenant carrier) i did what any angry consumer does in the 21st century... i got on twitter and publicly whined about it to the official "Bichael's" twitter account.
To make a long story short I have a $25 "Bichael's" gift card not too happy with "Bichael's" anymore...

Rant over.

Update part 2 coming soon!
 
Alright! we left off with a disaster and a long-winded rant. time to change gears!

So, the silicone rubber that i've been using to make these molds is, as you'd expect, very rubbery and bendy. this is GOOD for peeling the mold off of a cast, especially SUPER detailed ones like mine. however, it's BAD when you're pouring the cast and need to use something like clamps or straps to apply even pressure to the two halves of the mold to keep them together and prevent your resin from leaking out. In normal mold making, you create what's called a "mother mold" which is just plaster/cement poured around the rubber "inner mold" to give it that rigidity. That won't work for what i'm doing though, because the mother mold would need to come off completely so i could peel off the detailed rubber mold.

Solution? Plywood.

two pieces of plywood sandwiching the mold together will give it that even pressure that i need, and are easy to remove from the rubber mold when i need to peel it off! So, i traced the shaped of every mold onto paper and got to work:
IMG_20161205_170138576.jpg
IMG_20161205_171958232.jpg
IMG_20161205_172330466.jpg
IMG_20161205_172516982.jpg
IMG_20161205_173059934.jpg
IMG_20161206_133628031_HDR.jpg
IMG_20161206_142125172_HDR.jpg

They fit like a glove!
IMG_20161209_175254942.jpg

While this was happening, i had ordered some PROPER clay off of amazon and was waiting for it to be delivered (which was the plan in the first place, but i thought i could get to work faster if i went and got it at a local store...) And it arrived a couple days later!
IMG_20161207_185255296.jpg

so, we're back at square one with the covenant carrier:
IMG_20161207_185347898.jpg
IMG_20161207_191626818.jpg
IMG_20161208_125943301.jpg
IMG_20161208_131002872.jpg
IMG_20161208_132239174.jpg

Now, the back section of the carrier seemed fine. however, the FRONT section (on the right in the picture below) had me a bit worried. because of its shape, the walls i had to build were very high and a little bit unstable (this the little staked i pressed against the wall as supports). it seemed alright though, and as long as i kept an eye on it while it cured and plugged any leaks that might happen, we'd be fine.
IMG_20161208_134909604.jpg

So, i did the pour (and forgot to take pictures of the finished pour, of course:
IMG_20161208_142114609_HDR.jpg

Now, if you've picked upon the foreshadowing i've been doing, you can probably guess what happened next. i plugged a couple SMALL leaks and, feeling happy that it would hold, went inside to get a snack. Only to come out to find this:
IMG_20161208_145201886.jpg

To add insult to injury, i had emptied my last bucket of Smooth-on to make this mold. after some indiscriminate cursing and punching my chair a little bit, i came to 2 conclusions: 1: there was no way i was getting the spilled rubber back into the mold, and the only way to avoid an even bigger disaster cleaning u the spill was to simply let it cure and then peel the cured rubber off of the table, floor, bag of tools, and other affected things. and 2: the type of smooth on i was using had a 4 hour cure time, the store where i buy it from is about an hour and a half away (3 hours round trip) and it closed for the weekend in two hours.

So, like some kinda not-at-all-cool Jason Bourne, i jumped in the car and PEELED OUT, calling the store on my way. they had smooth on in stock and would have it waiting for me when i got there. after getting there, buying it, showing the clerk the above disaster pic so he could have a good cringe and laugh at my expense, and fighting through late afternoon Bay Area traffic, i made it back home with a fresh bucket before the remaining rubber left in the mold had cured! i had to do some Jean Claude Van Damme splits in front of the table since the massive spill was RIGHT in front of where i was working, but i managed to save half the mold!
IMG_20161208_183744520.jpg
IMG_20161208_184840888.jpg
IMG_20161208_201950439.jpg
IMG_20161208_202526766.jpg

And a got a nice souvenir of the experience too! a lovely mold of my cracked garage floor:
IMG_20161208_191728512.jpg

Damn, already hit the image limit! part 3 up next!
 

Attachments

  • IMG_20161210_131225794.jpg
    IMG_20161210_131225794.jpg
    3.9 MB · Views: 220
  • IMG_20161210_141010250.jpg
    IMG_20161210_141010250.jpg
    4.3 MB · Views: 214
So, after THAT little incident detailed in the last post, things (thankfully) calmed down a little. next up was the back half of the covenant carrier:
IMG_20161210_131225794.jpg
IMG_20161210_141144182.jpg
IMG_20161210_141010250.jpg
IMG_20161210_141307257.jpg
IMG_20161210_141356815.jpg

Next up, part 2 of both molds:
IMG_20161218_180142739.jpg
IMG_20161218_181611493.jpg
IMG_20161218_185336265.jpg
IMG_20161219_113702680_HDR.jpg
IMG_20161219_115922907_HDR.jpg
IMG_20161219_121613793_HDR.jpg

Front half done, time to pull it out!
IMG_20161219_151928245.jpg
IMG_20161219_152454833.jpg
IMG_20161219_153000724.jpg

No absolute disasters this time around! next up is the rear half:
IMG_20161219_153920834.jpg
IMG_20161219_154756283.jpg
IMG_20161219_161425832.jpg

Time to pull the back half out now:
IMG_20161219_184942116.jpg
IMG_20161219_185051873.jpg

another successful mold! this is it for today though, next up, actual casting with all these molds! the constant teasing is over! it's finally gonna happen!
 
Oh, man your stuff is amazing!

really great work! Can't wait to see the whole result. this is a real masterpiece!

what's next on the 'ships that I'm going to make' list?
 
Man these ships are incredible! Your picture with the hangar puts into perspective just how freaking big the infinity is! As usual, great work.
 
Status
Not open for further replies.
Back
Top