Those ships look so cool I have made a few ships my self but out of foam
You are using an out of date browser. It may not display this or other websites correctly.
You should upgrade or use an alternative browser.
You should upgrade or use an alternative browser.
Props Ships and Halos and 3D Prints, Oh My!
- Thread starter CPO mendez
- Start date
- Status
- Not open for further replies.
Those are some beautiful ships wish my cading was that good. cant wait to see what else you make!
Thanks man! i got LOTS more left to make! so keep checking it out!
Those ships look so cool I have made a few ships my self but out of foam
this is certainly way easier. that was my original plan on how to do it years ago before i even KNEW what 3D printers were.
also, i will be casting them soon, so if you REALLY like em, i'll be making copies to sell real soon!
Thanks man! i got LOTS more left to make! so keep checking it
this is certainly way easier. that was my original plan on how to do it years ago before i even KNEW what 3D printers were.
also, i will be casting them soon, so if you REALLY like em, i'll be making copies to sell real soon!
That sounds pretty cool
UPDATE:
this update brought to you by a laptop COVERED in bondo dust!
so the nose job went GREAT! it took a couple layers to get it nice and smooth with the bondo:


With that FINALLY done, it was time to epoxy it to the rest of the ship! Couldn't really rubber band this one like the other pieces, so duct tape had to do:


And the last piece is being printed as we speak. we're almost done with the big kahuna!
this update brought to you by a laptop COVERED in bondo dust!
so the nose job went GREAT! it took a couple layers to get it nice and smooth with the bondo:
With that FINALLY done, it was time to epoxy it to the rest of the ship! Couldn't really rubber band this one like the other pieces, so duct tape had to do:
And the last piece is being printed as we speak. we're almost done with the big kahuna!
- Member DIN
- S713
I totally adore your idea and crafting :3
This is going to be off the hook cool
you going to do led lights in it or something?
I totally adore your idea and crafting :3
Aw shucks, the both of you are gonna make me blush! to answer your question Spartan55, it's a solid maybe. everything i'm doing right now is sort of a practice run. so in the future i'll have higher-rez 3D models, probably a better slicer that can handle the detail better, better 3D modeling skills so i can actually make ROOM in the model for wires and lights, and all that. but, for now, it's time for the money shot!
UPDATE TIME:
So, it's time for the last section! it had some issues printing properly, but after wrestling it into submission a bit, i got it printing correctly!


Look at that purty lil thang!
Now we just gotta stick it on...

OH HEY LOOK AT THAT IT WASN'T SIZED CORRECTLY!
GREAT!!!
Second attempt went.. well...

But hey, third time's a charm! i also threw a tiny cruiser in there that's more to scale with the Carrier:

NOW its time to break out the epoxy and rubber bands!


Left it all banded up to dry overnight, and once it was nice and solid, it was time for some bondo action!


And once that was dry, it was time to sand down:


and... that's it! building done! ROLL THE GLAMOR SHOTS!!


Lookin good! Update part 2 below.
Alright! with the building done, now it was time to paint! i certainly have LOTS more ships to print, but unfortunately i've run out of filament, at least for now. so, instead of letting this thread die, i thought i'd move on to practice airbrush painting!
and, i just so happened to have a WHOLE BUNCH of failed prints that i could practice on!

I also have the little tiny cruiser. apparently my printer REALLY doesn't like small ships. this one kinda came out terribly, but it still has the general shape, so why not give it a paintjob:


Anyway, onto priming the pieces!


aaand as it turns out my old airbrush is gunked up and clogged, so now we need to wait for the acetone bath to do its thing...

that's about it for the tail end of this update. i'll be bumbling my way through learning how to airbrush, so stay tuned for LOTS of hilarious entertainment to come.
and, i just so happened to have a WHOLE BUNCH of failed prints that i could practice on!
I also have the little tiny cruiser. apparently my printer REALLY doesn't like small ships. this one kinda came out terribly, but it still has the general shape, so why not give it a paintjob:
Anyway, onto priming the pieces!
aaand as it turns out my old airbrush is gunked up and clogged, so now we need to wait for the acetone bath to do its thing...
that's about it for the tail end of this update. i'll be bumbling my way through learning how to airbrush, so stay tuned for LOTS of hilarious entertainment to come.
Have you ever tried hobbyking for filament because they sell it cheap
I'll definitely check it out, but after some shopping around on amazon there seems there seems to be a set price on filament at around 30 bucks for a 1kg reel.
anyway, it's been FAR too long since i did an update!
So, when we last left off, i had an old, kinda garbage airbrush sitting in an acetone bath, a BUNCH of failed prints to practice on, and no more filament.
Turns out, there really was no saving that airbrush, so i had to order one that WASN'T complete trash. also, more filament (obviously)
AND GUESS WHAT SHOWED UP YESTERDAY:


We're back in business! this is (obviously) gonna be another double update, so i'll save the new ships for the second post. for now, you get to watch babby's first airbrushing session. Strap in!
So, while looking up reference pictures for the covenant ships, i stumbled upon a tutorial video on how to airbrush covenant ships from Halo Fleet battles:
so i kinda had my guess-work done for me! i did a bastardized version of this guy's method, involving a more metallic, opaque purple over the silver instead of a purple wash:

And it was, SURPRISINGLY, not a total disaster! one might even say it looked kinda nice!
However, it looked a little too bright to me, so, since there weren't really any details and cracks to put the dark wash into, i decided to put it to use and mix a little directly into the metallic purple to achieve a darker shade, and got to work on the cruiser:


There it is! my first completed, painted, (mostly) detailed 3D printed ship! now, obviously this is all practice, since the casting process is most likely going to ruin the paintjob of the ships, but hey! It means i can mess up without ruining anything permanent. next up, however: the Big Kahuna.
First a layer of primer:


Now, the practice pieces were amateur hour. i don't wanna brag or anything, but i quickly got my workbench kitted out with a state of the art airbrush studio set up!
As you can see, the place where the magic happens: the painting area with super hi-tech fumigation hood to catch any over-spray:

And within arms reach is the airbrush itself, in its super ergonomic, ultra hi-tech holster:

I know, i know, it's awesome. Just try not to be TOO jealous, guys!
Anyway, once the primer was done, it was time to paint the Carrier!
Same as the cruiser, first up was a layer of metallic silver:


However, about halfway through, the airbrush started giving out on me. it wasn't spraying, despite all attempts to thin the paints. I thought it was ANOTHER clog for the longest time! that is, until i decided to take a look at the compressor...

It's the same compressor i got YEARS ago in the $20 combo pack with the airbrush. turns out, it has close to a 60% 1-star rating on amazon, with tons of people saying it works for a few days then just gived up, or doesn't have enough pressure to push paint through an airbrush.
Great.
So, my airbrushing career began and ended over the course of a single afternoon. I found a much better compressor on amazon for about 60 bucks, so hopefully that'll put an end to my painting woes.
Last edited by a moderator:
UPDATE PART 2:
Time for some more ships! with the covenant ships getting the paint treatment, it seemed high time to give the UNSC a little love. now, as you'll recall, i TRIED to print a tiny frigate, but for whatever reason my 3D printer really doesn't like tiny, high-detail stuff. so it seems like i'll have to throw a proper scale canon out the window and make the ships as small as my printer can handle, and as large as my filament budget can handle.
I started off easy with the Pillar of Autumn (Halcyon-class cruiser) and Forward unto Dawn (Frigate-class). The Autumn got sliced up into 4 sections, and the Dawn got sliced into 3 small sections:


And the Dawn:


Started off with the Autumn, in black (which, as it turns out, doesn't show very much detail against a black glass build plate when being photographed... oops)


The printer handled the angular details quite well! however, as expected, all the little turret barrels and antennae were too tiny to handle. they can easily be replaced with some plastic tubing though:


Section 1 is finished, and section 2 is printing as we speak! updates should return to daily/close to daily

Time for some more ships! with the covenant ships getting the paint treatment, it seemed high time to give the UNSC a little love. now, as you'll recall, i TRIED to print a tiny frigate, but for whatever reason my 3D printer really doesn't like tiny, high-detail stuff. so it seems like i'll have to throw a proper scale canon out the window and make the ships as small as my printer can handle, and as large as my filament budget can handle.
I started off easy with the Pillar of Autumn (Halcyon-class cruiser) and Forward unto Dawn (Frigate-class). The Autumn got sliced up into 4 sections, and the Dawn got sliced into 3 small sections:
And the Dawn:
Started off with the Autumn, in black (which, as it turns out, doesn't show very much detail against a black glass build plate when being photographed... oops)
The printer handled the angular details quite well! however, as expected, all the little turret barrels and antennae were too tiny to handle. they can easily be replaced with some plastic tubing though:
Section 1 is finished, and section 2 is printing as we speak! updates should return to daily/close to daily
Maybe not in the near future, but how much would you charge for the UNSC Infinity? Convenant cruise ships are looking very pleasing to thee eyes!
Maybe not in the near future, but how much would you charge for the UNSC Infinity? Convenant cruise ships are looking very pleasing to thee eyes!
You must be psychic or something, because i had JUST finished slicing up the Infinity because i had nothing better to do, and barely five minutes later i got an alert with your reply!
Anyway, here it is all sliced up:

As you can see, it's gonna be a BIG sucker. however, like i said, i don't know the prices yet because i need to calculate how much resin it takes to make each one, along with paint costs and other little bits and pieces. however, i can safely say that a very rough estimate would be under $200. and that's pretty high just for safety. Infinity was always kinda "meh" to me personally, which is why it hasn't gotten as much love in this thread, but if there's interest for it, i can certainly add it to the fleet.
Me psychic? Nah. I don't know, I really like the look of the Infinity compared to previous unsc cruise ships.
MEGA UPDATE:
Alright, yours truly has been chugging away on the Pillar of Autumn and am eager to show it off!
So i left off with section 1 completed and section 2 still printing:


That's section 2 done, time for epoxy, rubber bands, and glamor shots!


Next up was Section 3, the biggest section (clocking in at 40 hours of printing time), which i unfortunately didn't get many pictures of during printing.


Epoxy and rubber band time! (this one was actually big enough to snap a few rubber bands)


Finally, it was time for section 4, the big fat engine block:


And with that, we have ourselves a COMPLETE Halcyon-class Cruiser!


Well, just hit the image limit, so look below for more glamor shots!
Alright, yours truly has been chugging away on the Pillar of Autumn and am eager to show it off!
So i left off with section 1 completed and section 2 still printing:
That's section 2 done, time for epoxy, rubber bands, and glamor shots!
Next up was Section 3, the biggest section (clocking in at 40 hours of printing time), which i unfortunately didn't get many pictures of during printing.
Epoxy and rubber band time! (this one was actually big enough to snap a few rubber bands)
Finally, it was time for section 4, the big fat engine block:
And with that, we have ourselves a COMPLETE Halcyon-class Cruiser!
Well, just hit the image limit, so look below for more glamor shots!
MEGA UPDATE PART 2
So, once everything was dry, i decided to bust out the fishing line and make my own little battle diorama, now that i had human AND covenant ships:


However, there was still some work to be done. the seam between section 3 and 4 was big and ugly. and to make things even MORE complicated, there were panels with large air gaps on both sides, which meant just pasting bondo over them wouldn't work. so, i used some blue painter's tape as a backing, which gave the bondo something to properly smear onto:

Gap filling time!


And that's that! next step of my master plan is to start practicing with casting the 3 ships i have (which is gonna be a nightmare with the amount of detail they have). so if anyone with a TON of casting and molding experience wants to weigh in, i'm all ears!
So, once everything was dry, i decided to bust out the fishing line and make my own little battle diorama, now that i had human AND covenant ships:
However, there was still some work to be done. the seam between section 3 and 4 was big and ugly. and to make things even MORE complicated, there were panels with large air gaps on both sides, which meant just pasting bondo over them wouldn't work. so, i used some blue painter's tape as a backing, which gave the bondo something to properly smear onto:
Gap filling time!
And that's that! next step of my master plan is to start practicing with casting the 3 ships i have (which is gonna be a nightmare with the amount of detail they have). so if anyone with a TON of casting and molding experience wants to weigh in, i'm all ears!
HOO BOY! it's been a while! so there's good news and bad news going on. Bad news is the start of the semester kinda kicked my ass a bit, which is why i haven't updated in ~2 months.
HOWEVER! the good news is, i didn't stop working on the ships during the absence. and EVEN BETTER NEWS: i enrolled in a casting/mold making class for this semester. so i'm getting college credit for this now! woo!
Anyway, onto the juicy details. first thing's first, FINALLY got that sweet new compressor:

And here it is next to the piece of junk its replacing

So that means more snazzy covey paintjobs!


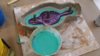
anyway, that was fun and all, but now for the REAL progress! after some consulting about the models with my professor, it was decided that the covenant cruiser would be the easiest one to cast and the best one to start with. So, i bought the recommended Smooth-On Mold Star 15 mold making silicon rubber

and started with the first half of the mold:


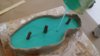
24 hours later, it's dry! now time to flip it over, remove all the clay walls, build up another clay wall around the other side, then pour the other side of the mold!


The little clay pillars are holes for me to pour the resin into the mold. there are 3 because the head, middle, and rear of the ship all have humps that are around the same height, so three holes were made to avoid trapping air bubbles in any of the humps
And time to bag it up (to preserve the clay from drying out) and leave it for another night!

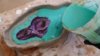
TIME FOR THE MONEY SHOT! next day, same thing. time to pull all the clay off, and peel the mold apart:


It looks
SO
DAMN
GOOD!
Next up, ANOTHER SHIP PRINT!
HOWEVER! the good news is, i didn't stop working on the ships during the absence. and EVEN BETTER NEWS: i enrolled in a casting/mold making class for this semester. so i'm getting college credit for this now! woo!
Anyway, onto the juicy details. first thing's first, FINALLY got that sweet new compressor:
And here it is next to the piece of junk its replacing
So that means more snazzy covey paintjobs!
anyway, that was fun and all, but now for the REAL progress! after some consulting about the models with my professor, it was decided that the covenant cruiser would be the easiest one to cast and the best one to start with. So, i bought the recommended Smooth-On Mold Star 15 mold making silicon rubber
and started with the first half of the mold:
24 hours later, it's dry! now time to flip it over, remove all the clay walls, build up another clay wall around the other side, then pour the other side of the mold!
The little clay pillars are holes for me to pour the resin into the mold. there are 3 because the head, middle, and rear of the ship all have humps that are around the same height, so three holes were made to avoid trapping air bubbles in any of the humps
And time to bag it up (to preserve the clay from drying out) and leave it for another night!
TIME FOR THE MONEY SHOT! next day, same thing. time to pull all the clay off, and peel the mold apart:
It looks
SO
DAMN
GOOD!
Next up, ANOTHER SHIP PRINT!
Attachments
UPDATE PART 2
alright, so after my very first mold, i decided to print the UNSC frigate. the poor Pillar of Autumn was lonely and outnumbered by the two covenant ships, so i made him a buddy!


Now, i learned from my previous mistake of fully assembling the ship, which, given how complicated these models are when it comes to making 2-part molds, makes things much harder. so i'm gonna be leaving it in 3 pieces, probably more since i'll need to chop certain bits off and cast them seperately. for now though, i need to take a belt sander to the messier flat surfaces still covered in support material:

smooooth

With that done, it was time to prepare the carrier for its casting!
...unfortunately this means cutting it in half because there was no way to cast it properly as one piece.


next up will be the casting of this big guy, which will probably happen next tuesday. however, in the mean time, i think the UNSC Infinity is up next for 3D printing. Stay tuned!
alright, so after my very first mold, i decided to print the UNSC frigate. the poor Pillar of Autumn was lonely and outnumbered by the two covenant ships, so i made him a buddy!
Now, i learned from my previous mistake of fully assembling the ship, which, given how complicated these models are when it comes to making 2-part molds, makes things much harder. so i'm gonna be leaving it in 3 pieces, probably more since i'll need to chop certain bits off and cast them seperately. for now though, i need to take a belt sander to the messier flat surfaces still covered in support material:
smooooth
With that done, it was time to prepare the carrier for its casting!
...unfortunately this means cutting it in half because there was no way to cast it properly as one piece.
next up will be the casting of this big guy, which will probably happen next tuesday. however, in the mean time, i think the UNSC Infinity is up next for 3D printing. Stay tuned!
Alright! it's been a BUSY couple of weeks casting and making more ships! so gird your loins for a massive update!
To start off, the poor lil frigate had to be chopped up for casting. pretty simple stuff, just had to cut off the nubs at the front and the big engine blocks:
View attachment 33069
View attachment 33070
View attachment 33071
after that, had to plug the holes so the smooth-on doesn't flow INTO the model and ruin, well, everything:
View attachment 33072
Speaking of chopping up ships... the Pillar of autumn was next. there are SO many little cracks and crevices that make it impossible to cast easily, so it had to get chopped up into a few pieces to make it possible:
View attachment 33073
View attachment 33074
View attachment 33075
View attachment 33076
And, like before, gotta plug up those big holes:
View attachment 33077
finally, the main body of the frigate could be put together, with the help of a little bondo, of course:


That's about as much as i can cram into this part. Next update: TONS of casting!
To start off, the poor lil frigate had to be chopped up for casting. pretty simple stuff, just had to cut off the nubs at the front and the big engine blocks:
View attachment 33069
View attachment 33070
View attachment 33071
after that, had to plug the holes so the smooth-on doesn't flow INTO the model and ruin, well, everything:
View attachment 33072
Speaking of chopping up ships... the Pillar of autumn was next. there are SO many little cracks and crevices that make it impossible to cast easily, so it had to get chopped up into a few pieces to make it possible:
View attachment 33073
View attachment 33074
View attachment 33075
View attachment 33076
And, like before, gotta plug up those big holes:
View attachment 33077
finally, the main body of the frigate could be put together, with the help of a little bondo, of course:
That's about as much as i can cram into this part. Next update: TONS of casting!
- Status
- Not open for further replies.
Similar threads
- Replies
- 7
- Views
- 292
- Replies
- 2
- Views
- 537
- Replies
- 3
- Views
- 1,061
Similar threads
- Replies
- 2
- Views
- 537