Tiny set of MKV

Polofour

New Member
Hey all,

Thought I would start a thread so I have somewhere to shout for help!

This build came about as My Daughter and I were playing Halo and then a few days later she asked if she could go to a local CON in Cosplay, of course i said yes (expecting to have to buy something from Amazon...) she then declared she wanted to go as Master Chief... :oops:

While I love her trust in me that I could pull this off, a quick google for off the shelf stuff found junk. So an epic internet rabbit hole later I ordered a load of foam and am going for it.

Joined here and got the files for foam and pep MK V armour. and threw some foam in the laser cutter. using pepakura 5, Inkscape and my laser cutter software i managed to convert the files into ones i could drag straight into the cutter.

initially tried in 10mm foam, but the focal zone of the laser made wide cut lines that looked junky, it was useful to check the scale though.

53664086258_83f023c9ce.jpg


then had a few days on holiday so made a Pep front plate to get an idea of the shape.

53664086023_f68bee07d6.jpg


turns out Pepakura is just a craft where you stick bits of paper to your fingers alot......

then ordered 6mm EVA foam (low density) and went for it again. you get a sense of how small this suit is when you see my hand!!

53664226259_a8d46795a9.jpg

53664085738_7836aaa1b9.jpg

53664228074_41cdc96b05.jpg


I am not going for an ultra accurate build, she's 10 and is growing. my set may be different.

Open for any tips anyone is willing to share! she wants it ready for the 12 May 2024!!!!! :eek: no sure i can pull that off but will try, i am maybe 8 hours in so far for the work above. we will see.....
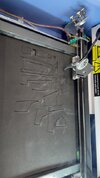
 
That’s an adorable chest plate! I assume this isn’t your very first cosplay build from how well you’ve put the armour together so far.

Also for only 8 hours you’re doing great!
Best of luck with the deadline!
 
That’s an adorable chest plate! I assume this isn’t your very first cosplay build from how well you’ve put the armour together so far.

Also for only 8 hours you’re doing great!
Best of luck with the deadline!
Thanks!

This is actually my first ever cosplay or foam build, the only thing i have used foam for before is lining tool draws.

the laser is 100% responsible for it coming on so well. :D
 
Thanks!

This is actually my first ever cosplay or foam build, the only thing i have used foam for before is lining tool draws.

the laser is 100% responsible for it coming on so well. :D
This is your first time using foam???
Obvisously we're all missing out on the laser cutter!

Either way, excellent job so far. I'm very curious to see how the helmet especially comes out as foam is usually not used for helmets due to how inexact it can be. I'd imagine the laser would make it considerably cleaner.
 
in todays update....

Torso is finished!! :cool: see below for glorious images!

53666891163_034dec604b.jpg

53666676176_02943ed641.jpg

53666675851_aa292424a9.jpg

53665809497_b2cd8c877e.jpg


seams are all glued up inside it too. the tongue depressors are for keeping the back plate straight, it started to fold where i must have put too much pull on one piece.

53666707133_79fde5e941.jpg


I do have some things I need advice on though:

1. where is the best place to cut the torso to attach Velcro?
2. whats the best way to pack it with foam to fit it?
3. do i need to reinforce any parts of it to help with wear-ability?

Will focus on a few quick smaller pieces next, i need to get more foam on order...

and clean this heap up ( I know I know, I wasn't very efficient with the layout on the foam, this is very much a speedy build...)

53666707123_5702e7492b.jpg
 
hopefully someone will give advice on the questions I asked in the last post above. I am thinking I am going to have to cut into one of the under arm section on the torso to be able to put Velcro in.

today I made a forearm out of the remaining foam I have in the garage. amazon says the next pile of foam will be with me today by 10pm...

I was really confident that after the torso the forearms would be easy... the small scale is making it pretty awkward to be honest.

laser in action. (not sure what the rules are on videos in posts... MODs - if it needs to come down DM me and I will bin the video(y))

<a data-flickr-embed="true" href=" " title="Untitled"><img src="https://live.staticflickr.com/31337/53668869718_7833cf3e48_b.jpg" width="576" height="1024" alt="Untitled"/></a><script async src="//embedr.flickr.com/assets/client-code.js" charset="utf-8"></script>

this is what the laser chucks out for me to pick and prep.

53668858848_9bf410ced6_z.jpg


some glue and angle cuts and its done.

53668996709_607166a8a7_z.jpg
does anyone know what these little frogs legs are? i am probably going to cut them off.
53668858573_5cdd392352_z.jpg
and then did some filling to check this acrylic caulk will work.
53667772892_9ee1608de8_z.jpg

when this is dry and sanded I will test the Plasti dip on it and hopefully there will be no reactions.
 

Attachments

  • 53668869718_7833cf3e48_z.jpg
    53668869718_7833cf3e48_z.jpg
    52.9 KB · Views: 8
Last edited:
PROBLEMS

the acrylic filler I used hasn't dried hard, its still super flexible and doesn't sand :( I am glad I didn't do the torso.

anyone have any suggestions on what is better to use (in the UK)

Aaaaand the plasti dip seems to have a really weird texture?? I am hoping its settles down as it dries?
 
Last edited:
1. where is the best place to cut the torso to attach Velcro?
2. whats the best way to pack it with foam to fit it?
3. do i need to reinforce any parts of it to help with wear-ability?
For my suit, I cut both sides under the arms and used velcro to attach it. See this picture where the cut is. It is cut on both sides.

InkedIMG_0649_LI.jpg

I didn't pack mine with foam. It's completely empty on the inside. It stays in place just by sitting on my shoulders, and with the help of an elastic band that holds the chest piece to the ab wrap at the front.

You're basically doing exactly what I did in terms of strength. I glued my foam pieces together with contact cement, and then heavily reinforced the seams on the inside with hot glue. If you find that there's a part not holding it's shape well, then you can reinforce it by adding layers of foam to the inside. For the most part though, I find foam holds its shape pretty well.
the acrylic filler I used hasn't dried hard, its still super flexible and doesn't sand :( I am glad I didn't do the torso.

anyone have any suggestions on what is better to use (in the UK)

Aaaaand the plasti dip seems to have a really weird texture?? I am hoping its settles down as it dries?
For filling the seams I used kwik seal. It's a caulking often used for bathrooms. It takes a while to dry and dries rubbery, so it can't be sanded. If you're using a similar product, make sure that when you apply it you dip your gloved finger in some water and spread the caulking so it's smooth. This way it will dry smooth and not require and sanding.

Plasti dip will smooth out when it dries. I know, that texture it gives when it goes on can make me nervous too!
 
N8TEBB thanks, I will try some more caulking this afternoon, its pretty hard to find QuikSeal in the UK. the closest I have found it is in belgium!
Any kitchen and bath adhesive caulk will work. It's the same stuff you'd use for a tub or whatever. Kwik seal is just the brand that's available in a squeeze tube in the US and Canada
 
So I didn't do a project update yesterday, the issues I was having with both the sealant and the Plasti-Dip were winding me right up.

But on reflection, I did get some good stuff done yesterday.

made a shoe. it does look a bit like a croc though...

53673279331_0cb2b6feed.jpg


and also got more layers of plasti dip onto the Torso. I think I am just being too cautious with the amount I am putting on. With the heater on in my little garage it cured really quick so to get some motivation back I did this.

53673494608_f2c034c732.jpg


The undersuit parts are very grey (that's the correct spelling...) but will be darkened with some washes.

the torso fits her really well. N8TEBB - i took your advice on where to cut and put a velcro tab in, she can get into and out of it pretty well now. thanks for that dude.

53673493403_cfd584381f.jpg


53672395142_c15c7d4b1c.jpg
53673729495_8cd5781a19.jpg

Then today I made the other shoe and used more advice from N8TEBB and smoothed the caulk with a wet finger. Once its dry I will plasti-dip it and get it base coated.

53673730605_eb23eeff96.jpg

53673494853_e70edcc95d.jpg

Portsmouth Comic-Con is 18 days away and I have to go back to work tomorrow.... will see if the wife will give me permission to live in the garage for the next few weeks....
 
oh my days, i think i just found something else i had forgotten prior to paint, i hadnt been heat selaing the foam pieces
That's alright! While it's a good idea to heat seal the foam, I've gotten away with skipping it. This chief suit was never hit with a heat gun and turned out alright!
halochristmas2022-61 (2).jpg
the torso fits her really well. @N8TEBB - i took your advice on where to cut and put a velcro tab in, she can get into and out of it pretty well now. thanks for that dude.
why you're welcome! glad it works!
 
what a week....

I have been my own worst enemy this week, I am rushing as the Con is super close now (like 2 weeks away) and I am making silly mistakes.

The visors have turned up now so I will track down some foam helmet files and get those cut tonight.

I am having real trouble with the legs though. I have been lucky (read: Lazy) so far and have been able to scale straight up and down in Pepakura, but my daughters legs don't match those scales :( so I will actually need to scale them properly or scratch build something and use some of the detail pieces in the PDO file to make it look legit.

I will update this post later with (hopefully) some photos of progress.
 
turns out Pepakura is just a craft where you stick bits of paper to your fingers alot......
This is so accurate! :lol: Also, wow do I ever want a laser cutter now!

I love how this is turning out, and I didn't realize the scale of it until the pic with your hand in it. It's adorable! I hope you're able to get it done (enough) in time!
 
Your doing great so far mate, keep up that drive to get it done for the con! As for sealing, I use selleys no gaps bathroom sika. It's almost exactly like quick seal, and it dries well and can be sanded and painted. Just make sure you leave it for a day or so, as thick blobs of it take a while to cure.
 
This is so accurate! :lol: Also, wow do I ever want a laser cutter now!

I love how this is turning out, and I didn't realize the scale of it until the pic with your hand in it. It's adorable! I hope you're able to get it done (enough) in time!
The bits that are done are really good. but they have been a bit of a faff. I think the foam unfolds assume a thicker foam so I get alot of weird gaps and edges that don't meet up properly. I have told my daughter if she wants another set she has to make it herself :lol:


Your doing great so far mate, keep up that drive to get it done for the con! As for sealing, I use selleys no gaps bathroom sika. It's almost exactly like quick seal, and it dries well and can be sanded and painted. Just make sure you leave it for a day or so, as thick blobs of it take a while to cure.
Thanks, I think N8TEBB 's tip of wetting my finger before smoothing seems to have done the trick, I have one of the over shoes Plasti-dipped up and its much better than the forearm I attempted.

To prevent me making the wrong part again I decided to make something that only needs a singular bit. The helmet.

found some really good unfolds in the armoury and took them through Inkscape and onto the laser.

A few hours of gluing and cursing later and it looks ok. its a pretty close fit, it may be awkward with the visor in it when she wears it, but i will burn that bridge when i get to it.

53685105405_f76d940ea8.jpg


53684873653_bc9b1e3de7.jpg

and this one made me smile.....

53685018429_9acd98e80d.jpg


I will look to sneak out of work early tomorrow and get some more of this done.
 

Your message may be considered spam for the following reasons:

If you wish to reply despite these issues, check the box below before replying.
Be aware that malicious compliance may result in more severe penalties.
Back
Top