Visor for helmet

Status
Not open for further replies.

Halod One

New Member
Hello All,

As you probably guessed, I am new to Pepakura and the 405th. I am starting my Halo Mark V suit and I have a couple questions.

1. How do you make a great looking visor for the Mark V helmet? Or does a standard motorcycle fit (cut down obviously) Basically, I want to make sure I get that nice smooth curve but I haven't the slightest on how I would make one if I had too.

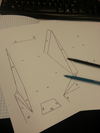
2. How big of a problem is it when a part doesn't fit on a single sheet of card stock? My first two attempts at printing the helmet have resulted in the helmets being too small. BUT, I cannot print it any larger without making several parts extend onto more than one piece of paper? I guess, if I have to print a single piece onto multiple sheets, what is the safest and easiest way to position it or is there another option?.

Just a summary of my project:

Building the Halo Mark V Armor (Pepakura).
I will be integrating some LED's into the armor
The armor will have a custom metallic red with black carbon fiber paint job (hydro-graphics to be more precise)
Shooting for October 26, 2013 to be finished, but I feel is unlikely.

Where am I at currently in the project?

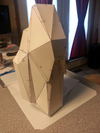
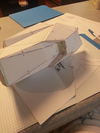
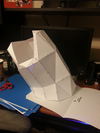
I have left bicep armor and chest rig built.

Thanks for all the info you guys can provide!

- Halo'd One
 
Welcome to the 405th.
Any motorcycle visor will work, and as you mention will have to be cut down to fit.
Your second question, if you have Pepakura designer, you can use the "Join/disjoin" feature wich will allow you to break up the pieces, and to arrange them on the page better. Hope this helps.
 
To answer your questions...

1. Most just use a motorcycle helmet. This is one of the better/cheaper ones I've seen and should fit a Mk V well...

http://www.cyclegear.com/CycleGear/...usion-Circuit-Helmet-Faceshield/p/41498_59426

and this one is a little more expensive, but will fit a wider visor opening...

http://www.cyclegear.com/CycleGear/...usion-Circuit-Helmet-Faceshield/p/41498_59426

and for installing your visor, check this tutorial...

http://www.405th.com/showthread.php...mp-Detail-your-visor?highlight=visor+tutorial

2. If, during resizing the model, some of the parts move off the page, you can always move them back onto the page. If they grow too big, use the "Join/Disjoin" tool to separate them into smaller parts. Make sure you're using Pepakura Designer, and not Viewer.

Make sure you get some pictures up of your build.

Good luck!
 
Awesome, thanks for the links. I will try to get some pics up tonight as I am working on it. Again, thank you so much for the helpful info!
 
Thanks, I can definitely get my hands on a motorcycle visor, but I will check out all my options for the best result.

To use the "join/ dis-join" feature, will I need to select the part that needs "dis-joined" or will it just do it automatically to any pieces that need it? I am at work at the moment, so I cant physically try it yet. :)

Right click on the right half of the screen, and you'll notice it you have a choice between "Select & Move, Rotate, Disjoin" and a few more.

Before you try disjoining, try rearranging the pieces, I've scaled up before and like you I couldn't print, but I didn't need to disjoin, by right clicking and switching between "Move" and "Rotate" you can grab any piece and move it around to make space. Just think of it as a really complicated game of Tetris, you just gotta get all the pieces to fit on the pages by rotating and moving. If you literally have no room, you can add more pages by dragging a piece off the borders to the right, I mean it'd use more cardstock but there's nothing stopping you from printing one piece per page.

-S420

Edit: The downside of joining/disjoining is that it requires more folding, cutting and glueing in the long run, so you may be better off with just moving the pieces.
 
Thanks for heads up, I couldnt figure out how to rotate the pieces but with that information I should be able to. I will give a shot tonight and see what I can get figure out.

One other questions for everyone:

Since I am doing fiberglass and bondo, to add the LED's should I cut the holes in the armor after I bondo it or should I pre-cut the holes and try to bondo around them? I know the obvious answer is cut or drill the holes after as it would be easier, but I am not experienced with this stuff, so I would like insight.

Again, thanks to everyone for the help!

- Halo'd One
 
Wow, I just took a look at your armor, and that is pretty amazing, its essentially what I am going to be doing, with a few exceptions. My wife's uncle has a hydrographics business so I am going to have him dip all my armor in metallic red and black carbon fiber. And for anyone who doesn't know what hydrographics are, its a process of dipping and item in ink and water and the pattern adheres to the object permanently unless dipped again. I am going to add various LED's but I am curious as to how I will power them. I am thinking just some simple 9v LED's with a hidden 9v battery in the suit. I wish there was a way I could centralize one switch for the whole suit but I will be okay having to manually turn on each piece. I am going to post pics of my progress today.

Any thoughts on powering LED's for the suit or any thoughts on what size LED's to use? I was thinking 9v.
 
Here is my progress, first piece MArk V Left Bicep completely pep'd and ready for resin

20130924_181933.jpg
20130924_172642.jpg
20130924_132753.jpg
 

Attachments

  • 20130924_181933.jpg
    20130924_181933.jpg
    89.7 KB · Views: 138
  • 20130924_172642.jpg
    20130924_172642.jpg
    91.6 KB · Views: 149
  • 20130924_132753.jpg
    20130924_132753.jpg
    45.9 KB · Views: 141
Progress update .... as of 09/25/13

I resinned the left bicep and chestpiece and I got the left thigh pep'd .... pic below. I will put a pic on tonight of the the resinned pieces.

20130925_214440.jpg
20130925_172856.jpg
 

Attachments

  • 20130925_172856.jpg
    20130925_172856.jpg
    93 KB · Views: 133
  • 20130925_214440.jpg
    20130925_214440.jpg
    80.7 KB · Views: 148
Thanks again for the links, I am trying to build my fourth helmet now. The first 2 were too small and the 3rd was HUGE so hopefully I get it right this time.
 
Update:

Finished pep'ing the forearm armor, and backpack and about halfway done with pep'ing the helmet. Will post pics ASAP.

I am going to wait to get all the armor fiberglassed then bondo'ed before I do the hydrographics and add LED's.
 
Just a heads up: I will post the progress of the helmet on this thread for the purposes that this thread is about the visor. But, I am going to move all my progress on the rest of my build to a new thread in the appropriate forum. It will be titled "My first build: Mark V Hybrid Armor ~ Pepakura"

If anyone is interested in following the progress here is the link:
http://www.405th.com/showthread.php...k-V-Hybrid-Armor-Pepakura?p=681435#post681435


Thanks!
 
UPDATE:

I am almost done constructing my 5th helmet. Its slow progress because I am losing motivation and now its starting to look like it is going to be too big again. If it is, I am going to wait and do a helmet last because I am tired of doing them. I cant seem to get the scale right. First 2 were too small, 3rd was too big, 4th was Barely too small and now the 5th is looking too big again. Ugh, Ill try to post a pic tonight.
 
Status
Not open for further replies.
Back
Top