Zdruck07 and friends' first builds (Scout, EOD, Noble six)

Status
Not open for further replies.

zdruck07

New Member
Hey everybody! My previous thread was for my first attempt at making a set of scout armor, but I encountered some problems, got frustrated, and got a night shift job, so it went without any update for at least three weeks. Since then, I have completed peps of a new EOD helmet, Noble Six Helmet, and Scout helmet, each for a separate build the three of us are doing. I have been trying to bondo my practice helmet (MK V) but have been having trouble, as when I sand, lots of divots and holes appear in the finish. I layer again, fill those holes, then sand and it happens all over again. Posting progress pictures as well as a link to my previous thread. Any help or suggestions are appreciated, the first issue being what I should do with the bondo situation. I have been dry sanding with 100 grit sandpaper, and can post more pictures of the MK V if need be. I decided to start a new thread because the old one didn't really explain my plans or my situation, and I'll try to do a better job of posting/elaborating in this one.

Link to previous thread: http://www.405th.com/showthread.php/41239-zdruck07-s-Halo-4-Scout-build-(and-problems-along-the-way)

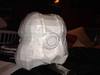
Scout helmet pictures:
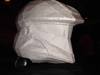
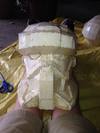
F2EF588B-4666-4C0D-B6A1-15AB729641F4_zpsrfue6vlv.jpg

077ACB82-2CB6-4BF5-BD41-E502ABA238A4_zpsjdftzzpd.jpg

Noble Six:

0C877439-A453-43BD-9739-1273425BE272_zpsopqnlyeg.jpg

D16AD6F2-F5FB-478B-8FF0-F4521E15D157_zpsdq1mscji.jpg

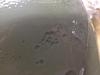
EOD (adding resin, though may be using it too thickly)
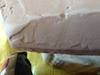
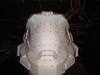
E97AD13B-5B04-4EA5-AC3F-F9889040AA5E_zpsj2ayplbg.jpg

MK V

A79A93B0-5AAD-4D50-94A5-C853F21D4FA2_zps4jveuhyk.jpg
 

Attachments

  • F2EF588B-4666-4C0D-B6A1-15AB729641F4_zpsrfue6vlv.jpg
    F2EF588B-4666-4C0D-B6A1-15AB729641F4_zpsrfue6vlv.jpg
    43 KB · Views: 112
  • 077ACB82-2CB6-4BF5-BD41-E502ABA238A4_zpsjdftzzpd.jpg
    077ACB82-2CB6-4BF5-BD41-E502ABA238A4_zpsjdftzzpd.jpg
    42.1 KB · Views: 125
  • E97AD13B-5B04-4EA5-AC3F-F9889040AA5E_zpsj2ayplbg.jpg
    E97AD13B-5B04-4EA5-AC3F-F9889040AA5E_zpsj2ayplbg.jpg
    67.4 KB · Views: 125
  • 0C877439-A453-43BD-9739-1273425BE272_zpsopqnlyeg.jpg
    0C877439-A453-43BD-9739-1273425BE272_zpsopqnlyeg.jpg
    14 KB · Views: 135
  • D16AD6F2-F5FB-478B-8FF0-F4521E15D157_zpsdq1mscji.jpg
    D16AD6F2-F5FB-478B-8FF0-F4521E15D157_zpsdq1mscji.jpg
    34.4 KB · Views: 123
  • A79A93B0-5AAD-4D50-94A5-C853F21D4FA2_zps4jveuhyk.jpg
    A79A93B0-5AAD-4D50-94A5-C853F21D4FA2_zps4jveuhyk.jpg
    14 KB · Views: 133
your work looks great on all the helmets :D

are your friend going to make a suit as well or jjust helmets?
is that the h4 scout or the palmer one? i am unable to help with bondo because i have been working on getting a job to fund my first build. but good luck and i hope to see more!:D
 
Yes! We're planning on full suits! Been pepping some other pieces today as well as trying to get bondo to work. And it is H4 scout, I just love the smaller/sleeker design.
 
Good work so far on the Pep work, Spartan, though I might suggest using a slightly heavier cardstock and taking your time with the work to prevent buckling and warping. Otherwise, very impressive start to the project, and I'm glad to see my files are getting some good use.
 
I've been using 110 lb, so I don't think that the paper is the issue. The Noble Six was one of my first pep attempts though, and that one is pretty warped, so I might just need to rebuild a new one, possibly with a different file, the one I used had a few spots that were left open in the back with no cover.. I'll look around. The scout doesn't seen quite as warped, and the places that are bent out of shape can be popped into shape pretty easily, so I'm thinking it should be okay. Thanks for the input!
 
Also: Got some pictures from bondo, give you guys a better perspective on what I'm dealing with here.

00708D9C-C6C7-41AE-8C69-DEC996E7903B_zpskkefg3w8.jpg

2F2469A4-0962-442B-87B1-A23CF159CC1F_zpstjg5vwx4.jpg

This could very well be me just not using enough hardener or something, but I just don't have the experience to make an educated guess.
 

Attachments

  • 2F2469A4-0962-442B-87B1-A23CF159CC1F_zpstjg5vwx4.jpg
    2F2469A4-0962-442B-87B1-A23CF159CC1F_zpstjg5vwx4.jpg
    84.8 KB · Views: 124
  • 00708D9C-C6C7-41AE-8C69-DEC996E7903B_zpskkefg3w8.jpg
    00708D9C-C6C7-41AE-8C69-DEC996E7903B_zpskkefg3w8.jpg
    45.1 KB · Views: 133
Small update! I've been working on a new pep for Noble 6, and started sanding using a block, which helped my issues with smoothness IMMENSELY. Things are going much better now, should have bondo done in the next few days, and have it started on EOD. Next question though, what are your opinions on using spot putty and wet sanding after bondo? I've seen one video that talks about it, but don't really understand why.
 
Spot putty and wet sanding are absolutely essential if you want to get a perfectly flat, smooth finish. I'd advise you practise on a spare/scrap part though, and develop your technique and understanding before jumping into it fully. Experiment and become familiar with your different grades of sandpaper, and how to use each to find your desired finish.

I'd also suggest looking into filler primer for your final coat - this is a spray-on primer combined with a fine solution putty, which helps to seal up any final pin-hole imperfections in your piece when combined with a high-grit wet sand.
 
All right, sounds good. I'll do some practice with it. Thank you, happy to have your continued help and input, and I'll look into filler primer.
 
Happy to help, Spartan. We're all here to help each other take our creations as far as they can go - Armour, Honour, Unity.
 
I will add to this. Spot (glazing) putty should only be used for the most minor of defects, like pinholes. Never should it be used to build up anything or add detail. It will simply let you down as it dries on the surface too quickly and crumbles, but if it is thicker, it never seems to harden below the surface. Personally, I try to avoid using it whenever possible.

My tip to you on the bondo process is: Do small sections at a time and work them until they are near completed. If you bondo a large section, you start to loose reference points in your pep work, which will result in confusion where exactly angles and details are supposed to be.

Wet sanding, to me, is a pleasure to do. I like it because it kicks up no dust, removes very little material - but at the same time - gets rid of imperfections quickly, and will give you a smooth-as-glass surface when done. Just be sure you purchase wet/dry sandpaper :)

So are you saying I should wet sand the bondo itself? I suppose everyone does it a different way. Do you not use spot putty? Because I was under the impression I needed a spot putty covering to wet sand effectively.
 
Quick update! Finally got bondo working better, adding a topcoat of the primer+filler to fill in minor imperfections and to better point out the more than minor imperfections. Here are a couple pictures.

DF283755-B892-4397-9921-A7864AD866AE_zpsmhrlrum1.jpg

580BFBE2-E258-4E42-AFDF-2A73B0B8C893_zpsih46mpfg.jpg
 

Attachments

  • 580BFBE2-E258-4E42-AFDF-2A73B0B8C893_zpsih46mpfg.jpg
    580BFBE2-E258-4E42-AFDF-2A73B0B8C893_zpsih46mpfg.jpg
    14 KB · Views: 108
  • DF283755-B892-4397-9921-A7864AD866AE_zpsmhrlrum1.jpg
    DF283755-B892-4397-9921-A7864AD866AE_zpsmhrlrum1.jpg
    14 KB · Views: 127
Hey! this is my first post on giving advice.

For a first build everything looks good, keep it up and you will learn very fast.

You can wet sand the bondo, there is no need for spot putty. Like EVAKura said, only use spot putty for small, on the go fills. I never really liked spot putty, it never dried as fast as the body filler (my be just me)

I like to use 60 grit on a block for my initial take down, it works very fast and it will take down any high spots in no time.

Also if you keep cutting through you paper model, i'll suggest filling the backside/inside with some bondo and then sanding it down. You may have to sand it down a little more then you want so you can fill it again, that way the paper surface wont be on the outside.
 
Well, wet sanding is done, and I think we're ready for paint, unless I find any other easily fixed bumps in my next rubdown. Otherwise, going classic green and black after a bottom coat or two of stainless steel.

A few pictures of the helmet after primer/filler and spot putty round 2 and wet sanding:

1500EB13-EF2A-46C6-8555-ABAF613137E6_zpsyzyrn585.jpg

204E3FB6-7123-48BE-8D4C-73AFF8F3FF13_zpsozjsqbjx.jpg

Looks much better from further away, trust me. But the few little scratches and bumps I had a hard time getting rid of will make for good battle wounds.
 

Attachments

  • 204E3FB6-7123-48BE-8D4C-73AFF8F3FF13_zpsozjsqbjx.jpg
    204E3FB6-7123-48BE-8D4C-73AFF8F3FF13_zpsozjsqbjx.jpg
    14 KB · Views: 111
  • 1500EB13-EF2A-46C6-8555-ABAF613137E6_zpsyzyrn585.jpg
    1500EB13-EF2A-46C6-8555-ABAF613137E6_zpsyzyrn585.jpg
    14 KB · Views: 106
Now that I'm about to start paint, I figured it would be about time for me to start thinking about a visor. I've seen lots of people do this in lots of different ways, but I was wondering about how to do a cheap and easy gold visor. Doesn't need to look fancy, just fit in the hole and be gold/yellow.
 
Quick update on paint: Started the black over the initial silver, and realized that I've made a horrible mistake. The metallic paint I used doesn't seem to allow paint to stick on top of it. My black paint just beads up and looks awful. Starting to sand off the metallic finish tomorrow, then will add silver showing through as a top layer instead of bottom with a brush, much like what I'll be doing with shadows and mud. I'll post some pictures once I have the green and black layers on, probably later on this week.
 
More paint problems (and I thought this would be the easy part!). The kind of paint Imm using, krylon colormaster, is beading and running HORRIBLY. I put on a layer of the green after dealing with the black, and it refuses to stick on the first coat, it all just beads up and runs off the sides. So I'm planning on lightly sanding this down after the first coat to even it out and then put on a second and hope it sticks better (this seemed to work with the black paint.
 
Not working. Paint refuses to stick no matter how it's applied. Holes appear and refuse to allow paint into them. Might just have to scrap and chalk it up as a failed practice run...

68CC4621-C80F-4240-9B8C-8A91D35ACA9E_zpsqltfu9qr.jpg

This is happening EVERYWHERE. No idea what to do. Any help please?
 

Attachments

  • 68CC4621-C80F-4240-9B8C-8A91D35ACA9E_zpsqltfu9qr.jpg
    68CC4621-C80F-4240-9B8C-8A91D35ACA9E_zpsqltfu9qr.jpg
    39.1 KB · Views: 116
Status
Not open for further replies.
Back
Top