Well I'm not great at posting things as I go - I'm a little better at posting things when they're already almost done. Not a great habit but hey -
Anyway, this is my third attempt at a costume. I did Mickey from ODST via fiberglass/bondo, a Hunter from Destiny and now Emile from Reach.
Here goes!
I'm not great with foam yet. I'm impatient, and perhaps too accustomed to pepakura-ing my way to accuracy. That said, I tried to get as accurate as I could based off of the game theater, pepakura-files-turned-foam-templates, and a handy Emile toy I have.
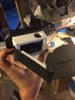
I started off by turning out a lot of foam pieces before I went forward with anything else. I also stuck to my pepakura roots and used that method for the helmet as you can see here

I went with pretty standard stuff, 3/8" foam from Amazon/Harbor Freight, 6mm and 2mm foam from Joann's Fabric, wood glue for sealing (I like it over PVA), plasti dip for a flexible base and a variety of color spray paints including a few automobile paints and flat enamels.
Here are some of the pieces with wood glue, drying

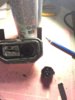
After some light sanding, plasti dip treatment is applied to all the parts. Here's a Kukri!

My favorite part of costuming is the painting. I paint for my job quite a bit so it's liberating to be able to paint what I want for once. Here are a couple of pieces after some paint. I like to use some of the small model enamels for the detail paint. I have a multitude of brushes - most of them very bristle-y and wirey to apply a more natural feel as opposed to slops of caligraphy-esque strokes. I do a few coats of base paint and let it dry overnight before I do detail work typically. I find it's best to wait a day for things to dry if you have the time. I have had the experience of trying to wipe some detail paint across a section and it pulled a section of plasti-dip up. Patience is some kind of virtue!

Skip forward a few weeks and most of the parts are coming along. A few are still taped up, the chest needs some glue and plasti dip yadiyada and a lot of lights need to get put in. But here's where I was at a few days ago and I'm almost done. I'll be a little more thorough and have some better pictures when it's done!
.jpg")
Last time I made a post I was a little wordy and over explained a lot of things. This time around I'll keep it simple and if there are any questions or anything like that, I would be more than happy to answer! Lastly, as a bonus, since I plan on wearing Mickey to PAX, it means my roommate who is a similar size gets to wear Mickey. I'm glad these things are capable of fitting more than one person. (nevermind that he put the legs and shoulders on opposite sides, and forgot the balaclava)
edit: I'm not sure why this picture insists on posting rotated... sorry!

I look forward to posting the final product soon!
Anyway, this is my third attempt at a costume. I did Mickey from ODST via fiberglass/bondo, a Hunter from Destiny and now Emile from Reach.
Here goes!
I'm not great with foam yet. I'm impatient, and perhaps too accustomed to pepakura-ing my way to accuracy. That said, I tried to get as accurate as I could based off of the game theater, pepakura-files-turned-foam-templates, and a handy Emile toy I have.
I started off by turning out a lot of foam pieces before I went forward with anything else. I also stuck to my pepakura roots and used that method for the helmet as you can see here
I went with pretty standard stuff, 3/8" foam from Amazon/Harbor Freight, 6mm and 2mm foam from Joann's Fabric, wood glue for sealing (I like it over PVA), plasti dip for a flexible base and a variety of color spray paints including a few automobile paints and flat enamels.
Here are some of the pieces with wood glue, drying
After some light sanding, plasti dip treatment is applied to all the parts. Here's a Kukri!
My favorite part of costuming is the painting. I paint for my job quite a bit so it's liberating to be able to paint what I want for once. Here are a couple of pieces after some paint. I like to use some of the small model enamels for the detail paint. I have a multitude of brushes - most of them very bristle-y and wirey to apply a more natural feel as opposed to slops of caligraphy-esque strokes. I do a few coats of base paint and let it dry overnight before I do detail work typically. I find it's best to wait a day for things to dry if you have the time. I have had the experience of trying to wipe some detail paint across a section and it pulled a section of plasti-dip up. Patience is some kind of virtue!
Skip forward a few weeks and most of the parts are coming along. A few are still taped up, the chest needs some glue and plasti dip yadiyada and a lot of lights need to get put in. But here's where I was at a few days ago and I'm almost done. I'll be a little more thorough and have some better pictures when it's done!
Last time I made a post I was a little wordy and over explained a lot of things. This time around I'll keep it simple and if there are any questions or anything like that, I would be more than happy to answer! Lastly, as a bonus, since I plan on wearing Mickey to PAX, it means my roommate who is a similar size gets to wear Mickey. I'm glad these things are capable of fitting more than one person. (nevermind that he put the legs and shoulders on opposite sides, and forgot the balaclava)
edit: I'm not sure why this picture insists on posting rotated... sorry!
I look forward to posting the final product soon!


.jpg")