First ODST helmet build

ODST Kona

New Member
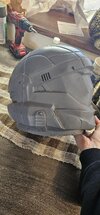
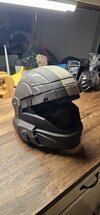
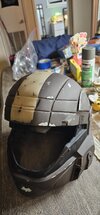
Hey everyone my packages showed up early so I decided to start cutting and refining my helmet. I'm definitely intimidated but super excited! I'll keep posting on this forum with updates over the weekend!!
20240316_170928.jpg
20240316_172811.jpg

For the seams I just started with a 150 to bring it down and blend than a 220 to smoothen it. I found some little sander sticks I use to use on my gundams to get into the tough spots!
20240316_173739.jpg
 

Attachments

  • 20240316_170932.jpg
    20240316_170932.jpg
    1.5 MB · Views: 14
Looks great! <3
...Also, we own that bike too. 10/10 would peddle again.
Thank you so much!! I can't wait to show you all my vision in the end, also my wife had thay before she met me and it's all rusted so thats my next project to restore it back to glory now that my project car is at a standstill haha
 
My goal today is to start adding layers of scratches and dents along with possibly some dimples. I'm no pro at this and this will be my first attempt but it's okay!

I'm still going off a multi cam theme with a flat dark earth base with a khaki stripe.
I'll be using a 2 inch wide painter tape to be a guide for the stripe.

My end goal is by the end of the week to have paint and weathering done, the helmet will take around a month or 2 just because I need a new visor thanks to me destroying the one I got because I was too excited.


I think I'm going to try and find some STL files for my 3d printer for helmet accessories such as a UA system
 
So it begins! I am now starting my weathering for the helmet. My goal is to create a very worn look ill update here with techniques I use or loop holes to things.
20240317_225957.jpg

The first thing to do is to take more than one photo before going to work.
For this side I used a combination of dry brushing and speckled. I really wanted to sell the point of this helmet was used running in woods and seeing combat. Which my first attempt wasn't a failure but it wasn't good it feels off.
 
You know it would probably help if I actually took photos, I'm sorry I got a little caught up, I used a 2 inch blue tape to mask my stripe than layed more tape on both sides so I had a perfect 2 inch line, I used a earth khaki to really make it pop
20240318_214039.jpg

I ended up also using blue tape to rip off layers of paint for the chopped effect along with using 60 grit sand paper to make it look like I was setting the helmet down and getting cut up by trees since my idea is a forest based ODST.
20240318_225847.jpg

I did four washes with grey, black, mud and orange to mimic the colors we have in NC to really give it the feel that I have been in this area for some time. I think I'm going to alcohol wash it to give it the droplet effect as well.
20240318_234212.jpg

I know I still have alot more to do and weather but it looks great!
 

Attachments

  • 20240318_213137.jpg
    20240318_213137.jpg
    1.5 MB · Views: 14
  • 48f5db09-2986-4ef2-bd78-e7a17b951f87.jpg
    48f5db09-2986-4ef2-bd78-e7a17b951f87.jpg
    1.2 MB · Views: 15
THE WEEKEND IS HERE, As soon as I got off patrol last night I came home and added some writing to it. My goal was to make it look like it was scratched into the helmet.
I wanted to incorporate my old motto from my time in the army as a infantryman. Our motto was "High angle hell death and destruction from above"
20240323_131424.jpg
 
Hey everyone! I like to be as transparent with my build and show when I make mistakes, I was working with my 3d printer (which is now broken thanks to me lmao) I wanted to add some flair. I purchased my files from galactic armory and after a night of printing but anyways
20240320_212122.jpg

I started with this and tried to lay some spot putty which I failed at which is why I got this horrible texture now which I have zero clue how to fix. But as you can also see I took a dremel tool and created a dimple to add a almost melted plasma burn on the casing.
20240323_212429.jpg

I'm hoping maybe I can either a find a new way to lay my spot putty so it comes out more like paint or maybe just completely scrap the idea.
But like I said above I don't like the texture it has because of how bad my prep work was.
I used hot glue to full the hole to give it that melted look!
 

Attachments

  • 20240323_212431.jpg
    20240323_212431.jpg
    1.2 MB · Views: 8
Since the TAC Willow does work with a HUL unit I had printed a Flamingo just in case I like the idea, here's my current update and paint with it while I figure what to do with my printer. This time I used a 2 to 1 ratio of filler putty and acetone which made a perfect smooth ish layer. Which I than sanded with a 220 and 320 to give it thay oomph. I absolutely love the turn out now its just time to grime it up! I also started with adding some details rounds lodged into the helmet for that war torn feel!
20240327_002014.jpg
20240327_002019.jpg
20240326_213426.jpg

Today is also my birthday and was nice to take some quiet time and just build my heart away!
20240327_010343.jpg
 
Last edited:
Let me paint a picture in your head to show what im going for, you and your platoon receive small arms fire and indirect fire, the smell of rotten egg of how close IDF is hitting you your buddy infront of you gets hit as soon as he falls rounds Crack past your head you're panicked because your best friend just got shot you finish the fight but you know he's bleeding out, you buddy carry him to cover take off your helmet to give him the first assessment and realize more enemies are coming, your grab your helmet with your bloody hands and continue.
20240327_091732.jpg
20240327_091738.jpg
20240327_091743.jpg

I laid my helmet on the ground and covered my hands in fake bloods to creat the grabbing aspect, so it's more natural rather than just smearing some on. I like how it captured the highpoints and slightly covering the writing.
 
It's been a while! I'll be posting a new thread starting this week! The rest of my Sean bradley kit showed up and I have never been so excited. I am more than willing to help anyone if they have any questions on this helmet but the full build starts today!
 

Your message may be considered spam for the following reasons:

If you wish to reply despite these issues, check the box below before replying.
Be aware that malicious compliance may result in more severe penalties.
Back
Top