You are using an out of date browser. It may not display this or other websites correctly.
You should upgrade or use an alternative browser.
You should upgrade or use an alternative browser.
Lazarus's Halo 5 Centurion project
- Thread starter Lazarus215
- Start date
- Status
- Not open for further replies.
disaster has struck....
while I was test fitting a buckle system for the bottom straps on the chest, it became VERY evident that they weren't going to fit correctly around my wide rib cage. And because the straps were 3Dprinted, there's absolutely zero give as far as flexibility... so I had to cut them off....I'm going to be replacing those straps by using some EVA foam so its got some more flex. only thing is, I've never worked with EVA, so this will be.... exciting (frustrating probably) if anyone has any tips or hints for me, I'm all ears. This whole ordeal is going to set me back at least a week probably...
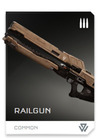
is slightly better news, I've got the weathering done on the railgun. Only thing was the black paint I was going to use for the recessed detail REALLY didn't want to wipe away, so I ended up using a brown paint used for camo painting. (lays on light initially and can be built up in color) but even then, if I tried to wipe it off, it would take all the paint down to my basecoat off. so I just layered it on... it doesn't look how I wanted it to, but it looks like its been through hell and back a couple of times over..

- Member DIN
- S713
It looks really great! o.o I love it.
Also, as for weathering, if you want to give it another try for the wash with black paint - use black acrylic paint thinned with water. It won't interact with the paint and will do.
But if not - I think it looks great! You can always do some scratches and weathering with silver paint.
As for the chest piece - oh damn, it really sucks. ;_; But how did it happen?! You did so many photos with the finished chest piece that I was sure you had it tried on you. O_O
The only thing I did myself, when I was hardening my chest piece I hardened it from outside first on a mannequin that I made to resemble my body and it fits great. ;_; Sadly, you can't do it with the 3D... OR you can measure your rib area and modify the 3D file to print only the pieces you have to modify?
- Member DIN
- S713
Also as for the railgun, again. If you want to lighten it a bit, you could try to brush the lighter paint on. It make the gun lighter while it'll give it the effect that it is dusty and dirty, but I really think it's great! 

Also, if you want to change it, you can always add there pattern:

Also, if you want to change it, you can always add there pattern:
Attachments
Make bigger chest piece? Sounds like you have a deadline, that wouldnt be feasible. Or maybe where the areas if the chest are supposed to attach makes some extensions longer to go in between them. Might need to make some adjustments in a 3d modeling program though. I'd imagine you would be 3d printing the extensions though?
The issues with the 3D model would be that the straps would either need to be angled out more (stretching faces and moving vertices) or be flexible. now I COULD reprint the sections using a filament called NinjaFlex, but its pretty expensive, and Id need a good bit of it... at this point, it seems like foam is going to be the fastest and cheapest fix. as for the railgun, I had thought about an Arclight or Whiplash paint job, but at this point I'm so sick of masking tape, I'm saying screw it. its growing on me in its current state... just a little..
also, the issues with the fit was trying to add a strap and buckle so it would stay "closed". The prior pictures, if you could see the side, you would see the straps either not connecting to the thruster packs, or barely making contact and the magnets I have just aren't that strong. so add a buckle, and sizing issues become very apparent... CURSE MY GENETICS FOR GIVING ME A MASSIVE CHEST!!
also, the issues with the fit was trying to add a strap and buckle so it would stay "closed". The prior pictures, if you could see the side, you would see the straps either not connecting to the thruster packs, or barely making contact and the magnets I have just aren't that strong. so add a buckle, and sizing issues become very apparent... CURSE MY GENETICS FOR GIVING ME A MASSIVE CHEST!!
Ya buddy, I hear ya on the genetics. My problem is that my son and i are too dang skinny. So when I have been scaling his suit to the right lengths, the widths and diameter have been too big. But if I change those too he will look like a tiny anorexic chief. So lots of padding in his under suit is going to be the answer to that. Me, well I'm hiding inside of a huge hunter to help with my skinnyness.
But on a serious note, I think the foam idea that you have will be the best fix for the issue you have. That will be a lot quicker and easier than printing something in ninja flex.
But on a serious note, I think the foam idea that you have will be the best fix for the issue you have. That will be a lot quicker and easier than printing something in ninja flex.
My railgun is done. (really as done as I care to make it for now.) check out the sticky to witness its majesty
Knees are done, but need a hefty amount of clay work due to warping off my print bed. (didn't have enough glue on apparently).

Shins are solidified, and going into modelling now. (kill me....)
And I picked up some foam for the chest piece (as well as a bunch more painters tape to replace the deficit I made on the Railgun)
Let the games begin.

I'll just be over here.... sobbing into some foam.

Shins are solidified, and going into modelling now. (kill me....)
And I picked up some foam for the chest piece (as well as a bunch more painters tape to replace the deficit I made on the Railgun)
Let the games begin.

I'll just be over here.... sobbing into some foam.
Alright, so I've finally managed to make these shins printable and able to have hardware installed, but I have one issue that's perplexing me...
So I took the file of the shins, cut them in Netfabb, and then imported them into Inventor. Now all of them seemed fine except for one quarter of the shin. This one section, for whatever reason, apparently has a bunch of Face Orientation issues (Read Normals facing the wrong way.) and an overlapping face, and a self intersecting face... only thing is, is that NONE of these are apparent in Netfabb, so the repair function in that software isn't fixing it. Inventor has a repair function, but its.... complicated.... to say the least.... I've attempted to fix these issues in Inventor to absolutely NO avail, and I cant modify the rogue section without these errors fixed... now the spot for the hardware COULD be manually roughed out of the print, filled with a putty or even Bondo, and then have the hardware installed in that, but that is a headache and a mess to say the least...
So if any of you know the inner workings of Inventor and can use the repair script, PLEASE PLEASE PLEASE GOD PLEASE either inbox me or drop your wisdom in here... this is literally THE only thing standing between me and a completely printed set of armor.
Here's a screen shot of the issue in Inventor.
 Highlighted problem area
 Inventor saying "There is nothing you can do, lol, feed me your tears"
So I took the file of the shins, cut them in Netfabb, and then imported them into Inventor. Now all of them seemed fine except for one quarter of the shin. This one section, for whatever reason, apparently has a bunch of Face Orientation issues (Read Normals facing the wrong way.) and an overlapping face, and a self intersecting face... only thing is, is that NONE of these are apparent in Netfabb, so the repair function in that software isn't fixing it. Inventor has a repair function, but its.... complicated.... to say the least.... I've attempted to fix these issues in Inventor to absolutely NO avail, and I cant modify the rogue section without these errors fixed... now the spot for the hardware COULD be manually roughed out of the print, filled with a putty or even Bondo, and then have the hardware installed in that, but that is a headache and a mess to say the least...
So if any of you know the inner workings of Inventor and can use the repair script, PLEASE PLEASE PLEASE GOD PLEASE either inbox me or drop your wisdom in here... this is literally THE only thing standing between me and a completely printed set of armor.
Here's a screen shot of the issue in Inventor.
 Highlighted problem area
 Inventor saying "There is nothing you can do, lol, feed me your tears"
-snip-
Blender is pretty good at resolving normals issues, but intersecting faces and whatnot are a different ballgame entirely.
So after staring at like a million triangles, I finally figured it out (Thanks Chernobyl!) I ended up having to do a MASSIVE mesh reduction to the affected areas since the mesh basically looked like a bunch of tiny little pick-up-sticks all over the cut edge. Progress is continuing, first shin should be done printing by tomorrow
I'm not able to see the scaling issue. Looks good to me. I can agree that maybe decreasing the length. But increasing would get in the way of your boot armor. Or, unless it already is touching the boot armor.
The position I have it in is about where it will sit with boot armor. It needed to get lengthened by about 70mm
- Member DIN
- S713
- Status
- Not open for further replies.
Similar threads
- Replies
- 3
- Views
- 436


