Update.
I haven't written as much as I wanted lately, but I did get to do some printing done and some basic strapping attached to the right arm.
Strapping
I took some spare webbing and looped it through the buckles, then used contact cement to glue the loop flat. I then took that loop and glued it to the inside of the upper-inside face of the bicep and forearm. The bicep female-buckle will connect to a narrower black webbing. That strap component will then attach to a wider webbing at the crest of my shoulder. That wider webbing will run down my arm to the forearm, hiding under all the other layers. Here's to praying that it doesn't chafe against my skin. The buckles I found were rounded center press, which should mitigate some potential binding.


.jpeg")
I also printed off the shoulder-bicep tabs. I took Moe's model and added to rungs inside. The narrower black webbing - which will connect the bicep to the larger harness system - will run through these pieces. This should keep that tab formed to my arm, while also hiding most of that webbing. In essence, there are two webbing lines (a wider hidden one that goes down to buckle at the forearm, and a shorter narrower one that buckles to the bicep) that will be sewed/glued together at a hidden point on my shoulder and finished with a buckle. The buckle of the combine line will attach to the wider harness. I hope I've over explained that enough. I can see it in my head, but I'm not sure I've articulate it.


Print and Mount
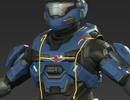
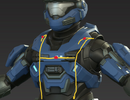
I printed the Nerdforgedesign security shoulder pad (as of 12-5-23, the file is no longer posted). Printed in PLA+ (black by Sunlu, blue by Elegoo) on a N4 Plus using Klipper at .28 layer height from a .4 nozzle. I did have a print failure earlier in the process. My solution was to immediately stop the print, then measure the z axis of how much printed. I went to orca slicer and performed a cut to the model to remove the portion already printed, then started a new print with the remainder. I then glued the two lower pieces back on. I attached one cockeyed, but sadly the super glue and accelerator bonded too tight. I left it as is, fearing damage if I wacked it any hard with a hammer. I will clean this up with putty and sanding later. The sucker is heavy for prop armor, so I'd probably bring the infill down to 8% (which I will do for the gungnir pad I am printing next).


The print was too snug for it to properly sit on the bicep. I did upscale both the Nerdforgedesign bicep and pad 102 &102.1 respectively. To attach the two, I then printed a block with a space for a stack of two 3/4" magnet to sit in. I temporarily glued a 3/4" to the bicep. To figure out where to put that one, I put a few dots of paint on the shoulder magnet in the pressed the two pieces together. The magnet held the weight for the most part, but I am going to add some more that will be recessed into the bicep for extra stability. I will also carve out a spot for the bicep magnet to sit in. Sadly, that will alter some of the game accurate details.

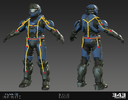
Seeing it all together made me feel very confident about the scaling and flexibility. I ran a temporary strap through the pieces and needed to bite down on it to hold it in place to get the selfie. I hot glued the hand armor on to a proxy glove just to see how it all looked together.

Hopely I'll be in the mood to write again soon. For now, I'm going to print off the gungnir pad which will most likely need to be heavily modded so it mounts where I'd like (I'll explain when I post about it). Maybe I'll also get around to some sewing too. I want to finish both arm assemblies before moving to the boots. Still looking for some lifted shoes that will possibly give me an additional 2" of height.
I haven't written as much as I wanted lately, but I did get to do some printing done and some basic strapping attached to the right arm.
Strapping
I took some spare webbing and looped it through the buckles, then used contact cement to glue the loop flat. I then took that loop and glued it to the inside of the upper-inside face of the bicep and forearm. The bicep female-buckle will connect to a narrower black webbing. That strap component will then attach to a wider webbing at the crest of my shoulder. That wider webbing will run down my arm to the forearm, hiding under all the other layers. Here's to praying that it doesn't chafe against my skin. The buckles I found were rounded center press, which should mitigate some potential binding.
I also printed off the shoulder-bicep tabs. I took Moe's model and added to rungs inside. The narrower black webbing - which will connect the bicep to the larger harness system - will run through these pieces. This should keep that tab formed to my arm, while also hiding most of that webbing. In essence, there are two webbing lines (a wider hidden one that goes down to buckle at the forearm, and a shorter narrower one that buckles to the bicep) that will be sewed/glued together at a hidden point on my shoulder and finished with a buckle. The buckle of the combine line will attach to the wider harness. I hope I've over explained that enough. I can see it in my head, but I'm not sure I've articulate it.
Print and Mount
I printed the Nerdforgedesign security shoulder pad (as of 12-5-23, the file is no longer posted). Printed in PLA+ (black by Sunlu, blue by Elegoo) on a N4 Plus using Klipper at .28 layer height from a .4 nozzle. I did have a print failure earlier in the process. My solution was to immediately stop the print, then measure the z axis of how much printed. I went to orca slicer and performed a cut to the model to remove the portion already printed, then started a new print with the remainder. I then glued the two lower pieces back on. I attached one cockeyed, but sadly the super glue and accelerator bonded too tight. I left it as is, fearing damage if I wacked it any hard with a hammer. I will clean this up with putty and sanding later. The sucker is heavy for prop armor, so I'd probably bring the infill down to 8% (which I will do for the gungnir pad I am printing next).
The print was too snug for it to properly sit on the bicep. I did upscale both the Nerdforgedesign bicep and pad 102 &102.1 respectively. To attach the two, I then printed a block with a space for a stack of two 3/4" magnet to sit in. I temporarily glued a 3/4" to the bicep. To figure out where to put that one, I put a few dots of paint on the shoulder magnet in the pressed the two pieces together. The magnet held the weight for the most part, but I am going to add some more that will be recessed into the bicep for extra stability. I will also carve out a spot for the bicep magnet to sit in. Sadly, that will alter some of the game accurate details.
Seeing it all together made me feel very confident about the scaling and flexibility. I ran a temporary strap through the pieces and needed to bite down on it to hold it in place to get the selfie. I hot glued the hand armor on to a proxy glove just to see how it all looked together.
Hopely I'll be in the mood to write again soon. For now, I'm going to print off the gungnir pad which will most likely need to be heavily modded so it mounts where I'd like (I'll explain when I post about it). Maybe I'll also get around to some sewing too. I want to finish both arm assemblies before moving to the boots. Still looking for some lifted shoes that will possibly give me an additional 2" of height.
Attachments

Last edited: