New member - Destiny warlock Helmet and costume build.

Status
Not open for further replies.
So, two things I learned last night. Using scissors to cut out the main pepakura pieces is faster and easier on my hands than an exacto blade, and Pritt stick Strong is MUCH better and simpler than glue gun!

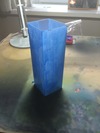
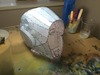
Remade the top of the helmet peak and its much smoother and neat, glue holds well and gives time to play about with pieces.

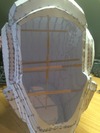
Hopefully finish the pep build on sunday to see if it fits!
 
Got half way through the rebuild using pritt stick and PVA glue and found the helmet is too big, it wasn't far off but big enough to look a bit silly once side panels were on (largest single pieces).

Re printed at smaller scale, this may mean making a removable panel at the back to get it on my head, but we will see.

If I don't have to cut out any more paper for a while, that would be smashing!
 
Have you used the "measure distance" option in the Pepakura program for scaling? For helmets I've been using it to check the measurements around the neck hole to make sure it will at least fit around my head, and the projected measurements always look like they'll fit well (it is, after all, a helmet, so it's going to add some significant size to one's head, plus you have to factor in space for padding, etc.). Just right-click in the 2D window or pick it from the drop-down menus at the top, pick two points, and check if the distance fits what you need. Certainly reduces the guesswork, not to mention the cost of wasted paper and ink for reprints.
 
Hi, yeah I've been using it and it's very helpful, I think in this instance I was too generous with the extra space for padding etc and it extrapolated too much.

this will fit over my head but will need a removable panel like iron man helmets etc.
 
Almost finished the helmet, took 3 attempts, First one used hot glue and it warped and didnt give good work time\precision, tried again with pritt stick and PVA, but after assembling about a third realised it was way too big, made an error adding size for padding.

Third one was correct scale, made with scenic glue\thick pva applied with a wooden thin spatula, gave time to align properly, and relatively fast drying.

It will need a panel cut out to fit my head in but it fits correctly before i made the lower pieces preventing it from going over my head.

Just left side 'ear' pod to do then first fibreglass resin only coat :)

That took a long time!

61C3AC38-64E6-48A3-A58C-C5A4B6C04623.jpg
 

Attachments

  • 61C3AC38-64E6-48A3-A58C-C5A4B6C04623.jpg
    61C3AC38-64E6-48A3-A58C-C5A4B6C04623.jpg
    71.7 KB · Views: 216
tried again with pritt stick and PVA,

Save yourself some money and hassle - any Poundland or generic pound shop will sell UHU All-Purpose. Comes in a yellow box, black writing. That stuff is a damned miracle to work with, once you get used to it. Also, B&Q do some good snap-off blades, which should save you a lot of money.

Also, may I ask which file you're using? You've gotten me very curious and I'd like to attempt a build like this myself, if you wouldn't mind sharing a source for the file.
 
Hi, The glue i already had so could have used that in the first place, i just thought PVA would take too long to dry but it worked fine.

File wise, it is Remraf from this board's. File name is 'Chroma Vow'
 
Hi, The glue i already had so could have used that in the first place, i just thought PVA would take too long to dry but it worked fine.

File wise, it is Remraf from this board's. File name is 'Chroma Vow'

Ah, jolly good, then. I don't see it in the File Archive - I'll work on that later. Thanks for the point-out!

Also, I have family in Dyce and Montrose, so... Aberdeen's a place I know quite well :p
 
Ah well, just down the road. I live west of aberdeen outside inverurie, but work just south of town.
 
I am about to start resin coating the helmet but a thought struck me.

I am going to use standard poly fibreglass resin, the stuff you use on normal FG matting to make boats\roof repairs etc.

However i know it gives off a lot of odour\fume, and being in scotland, doing it outside is a laugh.

Can Casting urethane resin be used with a filler such as micro ballons? I have both but have no idea if its suitable for brushing on.

I am comfortable using fibre glass poly resin, but as we all know its rather pungent and i value my man parts that the mrs would likely remove...:(

Any one any idea if using casting resin as a pepakura hardener is feasible?
 
Any one any idea if using casting resin as a pepakura hardener is feasible?

Depending on the type, it should be. I've seen a lot of people around here use Smooth-On urethane as a 'hardener' after a coat or two of resin to stabilise the Pepakura shape. However, it does have a rather odd working time, which is why most people prefer fibreglass resin.

Speaking honestly, though, normal fibreglass resin should be fine as long as you work with it outside and have somewhere away from the home to store it. If you have an outside shed or something similar, that's a viable option - you may want to also consider a small bicycle store-box from Argos or the like.
 
This is the issue, i dont have an outside, i live in a flat, its out in the country side but being scotland its raining and cold, so using something like smooth on 320 (In my case its Polycraft SG2000).

I dont mind the fast work time so much as its just a case of doing small batches and working away being careful, as id rather not make the helmet again :)

I realise normal fibreglass would be fine, its more just not fumigating my own house while i do it hehe

Should add, nby resin coat, i mean the first layer of resin onto the cardstock, not on top of already hardened paper :)
 
Made up a simple cardstock box and made up a (far too large! lol) batch of casting urethene resin. I added a pigment to make it easier to see what i have coated.

Measured out the resin on scales:

07B19F60-B718-472E-90ED-63EDB8394036.jpg

Then coated the cuboid shape:

BD1EF35C-2F2A-40A8-911D-16F4A42B3CEE.jpg

Solidified excess resin, now know roughly how much needed to do one coat over the helmet is about half what i made up, so about 20grams total. The sponge brushes i had from years ago i thought id try as they cost pennies and they work very well :)

031F4586-4FD2-489B-99A9-F6E48276108F.jpg

Helmet pep stiffened with wooden strips and hot glue. Fingers crossed this works :)

D04CE66A-E43E-45CA-87D5-990EA84B9E87.jpg
 

Attachments

  • 07B19F60-B718-472E-90ED-63EDB8394036.jpg
    07B19F60-B718-472E-90ED-63EDB8394036.jpg
    261.7 KB · Views: 123
  • BD1EF35C-2F2A-40A8-911D-16F4A42B3CEE.jpg
    BD1EF35C-2F2A-40A8-911D-16F4A42B3CEE.jpg
    211.8 KB · Views: 123
  • 031F4586-4FD2-489B-99A9-F6E48276108F.jpg
    031F4586-4FD2-489B-99A9-F6E48276108F.jpg
    224.3 KB · Views: 112
  • D04CE66A-E43E-45CA-87D5-990EA84B9E87.jpg
    D04CE66A-E43E-45CA-87D5-990EA84B9E87.jpg
    238.9 KB · Views: 115
Very nicely done, indeed. Very cleanly-hardened, and I don't see any warping at all - I only hope this trend continues on.

I see you bought your products from MB Fibreglass - how much were the products you used?
 
Thanks Chern.

That's just the first brushed on coat of resin, need another one i think and internal with some fibreglass tissue.

The stuff from MB was 5 KG of Tin Cure RTV silicone, some thickener, some thinner, resin dye and 2kg of Resin was about £160.

I went for tin cure as i wont need the mold to last for ages and a couple of pulls will do, so saved about £50 over the same order with platinum cure.
 
I added a coat internally and added some fibreglass tissue matt, however I tested the tissue first and it doesn't soften with this resin, obviously not designed for it, but it worked on the two 'cheek' panels as a strengthening sheet wetted n resin.

The helmet will need something to strengthen it internally, and I am in 2 minds. Do I go down the Rondo slush cast option, or do I pour in some pouring resin and slush cast a thicker coat? I have 2kg of resin so I have loads.

The issue I have with Rondo idea is that it may react with polyurethane resin I have hardened the helmet with. Can anyone confirm if polyurethane resin is compatible with Rondo (Body filler and Polyester resin mix)?

As slush casting Rondo is easier as I can do it outside and leave it in the hallway as its separate from the flat and it will go off quickly. Doing fibreglass matt would take time and fume up the flat.

Cheers for any tips on this last bit before I start filling and sanding :)
 
Slush cast 3 coats of PU resin into the helmet last night, helmet is now very stuff but a tiny bit of flex, which is fine for the next phase of body filler smoothing and adding in details and gribbly bits before final topcoat primer and the silicone moulding stage.

Mainly glad it hasn't melted into a puddle and I haven't set the house on fire if I am honest, bit terrifying using all these things for the first time!
 
Some progress, but stalled by **** poor Black and Decker quality.

Got the first coat of Filler onto the helmet and sanded it down but the mouse sander broke in the first hour of use, thin plastic lugs holding on the sanding plate are a bad design, M'kay!

So layered on second coat of knifing putty this time (less fumes and no need to mix) and got sander replaced with a better cordless one, but only get 45 minutes a time at sanding before a 40 min charge, but got the shape defined and now on to sanding with sandpaper glued to tongue depressors to start getting the hard edges back and finer control.

Going to smooth on some green putty into the pitting areas and smooth again then put a guide coat of red plastic primer to see what the smoothness and flatness is like, as its hard to gauge when I have about 4 colours on the helmet with the various putties, resin and paper showing in places.

Slightly soul destroying doing the sanding, but needs must.

Then get out the pattern to start the coat....where I have not a jot of an idea what I am doing....pressure makes men great yes?
 
Status
Not open for further replies.
Back
Top