You are using an out of date browser. It may not display this or other websites correctly.
You should upgrade or use an alternative browser.
You should upgrade or use an alternative browser.
New member - Destiny warlock Helmet and costume build.
- Thread starter Rick1138
- Start date
- Status
- Not open for further replies.

- Member DIN
- S009
I'm liking the helmet.
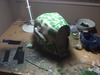
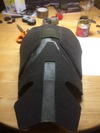
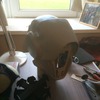
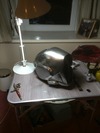
First guide coat of primer on yesterday as it was 21'C!!! in Scotland!
Found few pin holes and some rough areas still need flattening such as where I have sanded through to the paper so need to smooth that, but I am also aware of the time issue of only have about a month and a half so Really good over Perfect is the order of the day.
I am away on holiday next week in the north of England (Lake district) so no updates but the good lady has said weekend we are back is no plans so I can basically just do the cosplay!


Attachments
Hi Folks,
Well after a rather busy and exciting week off on holiday a few things happened.
First off, I got engaged to my lovely fiancée who said yes")
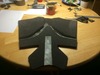
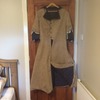
Secondly I started on the coat part of the costume and basically sat at a table all day pinning and cutting out cloth, interfacing and lining materials.
Sewing machine is getting used tonight...I'm not gonna lie, I'm scared!

Well after a rather busy and exciting week off on holiday a few things happened.
First off, I got engaged to my lovely fiancée who said yes
Secondly I started on the coat part of the costume and basically sat at a table all day pinning and cutting out cloth, interfacing and lining materials.
Sewing machine is getting used tonight...I'm not gonna lie, I'm scared!

Attachments
demonkiller77
New Member
Wow really good job! Good luck with the rest of it!
Well, i am getting there, though i keep forgetting to take pictures, but it takes ages so i want to crack on.
I now have everything i need to complete the cosplay i think.
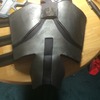
Helmet is now needing a final smoothing before filler primer and 2000 wet n dry sand for the gloss black to go down for the alclad lacquer base Chrome layer.
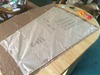
Coat wise, the outside of the coat is finished in terms of putting panels together, the time consuming bit is quilting the lining to give that diamond pattern so iconic of the Warlock outfit, but about 1/2 done now. Once its done all the lining parts are to be sewn together and then join the 2 sections, as a first timer, its slow as i dont have time to make a mistake
Boots i found a very good EVA foam pattern for cosplay stuff, think it was the foam cave or foam vault. So using that as a basic template but modifying it with my own design ideas, basically to save time over designing something from scratch, i ordered sheets of foam from a industry supplier so hopefully arrive soon.
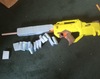
The rifle is a nerf bullpup, with extruded polystyrene sections to carve out and some metal and plastic tubing, plus gribblies. This has yet to be started but will be doing so next week.
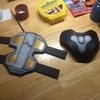
Bracers and gloves are started with the use of some BMX gloves sewn into bracers made from foam and metal with velcro strapping.
Then its a case of modifying some belts into a bandolier and adding all the pouches etc.
I will get some pics up tonight hopefully.
I now have everything i need to complete the cosplay i think.
Helmet is now needing a final smoothing before filler primer and 2000 wet n dry sand for the gloss black to go down for the alclad lacquer base Chrome layer.
Coat wise, the outside of the coat is finished in terms of putting panels together, the time consuming bit is quilting the lining to give that diamond pattern so iconic of the Warlock outfit, but about 1/2 done now. Once its done all the lining parts are to be sewn together and then join the 2 sections, as a first timer, its slow as i dont have time to make a mistake
Boots i found a very good EVA foam pattern for cosplay stuff, think it was the foam cave or foam vault. So using that as a basic template but modifying it with my own design ideas, basically to save time over designing something from scratch, i ordered sheets of foam from a industry supplier so hopefully arrive soon.
The rifle is a nerf bullpup, with extruded polystyrene sections to carve out and some metal and plastic tubing, plus gribblies. This has yet to be started but will be doing so next week.
Bracers and gloves are started with the use of some BMX gloves sewn into bracers made from foam and metal with velcro strapping.
Then its a case of modifying some belts into a bandolier and adding all the pouches etc.
I will get some pics up tonight hopefully.
Hi Folks,
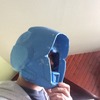
Busy weekend and made decent progress. Main work this weekend was EVA foam boot covers to add a bit of bulk to the calf boots i have. Pattern parts were from The Foam Cave website

I was also able to sew the first coat lining arm to the bodcie piece.
Hoping to be able to silicone coat the helmet buck this weekend.


Busy weekend and made decent progress. Main work this weekend was EVA foam boot covers to add a bit of bulk to the calf boots i have. Pattern parts were from The Foam Cave website
I was also able to sew the first coat lining arm to the bodcie piece.
Hoping to be able to silicone coat the helmet buck this weekend.


Attachments


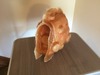
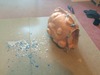
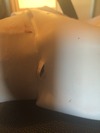
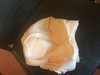
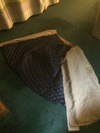
Well today was the day.
I got my mother mold finished yesterday out of fibreglass, turned out the fibreglass i had bought about a year ago but never used had gone thick, causing headaches, but new stuff was much thinner and more like how i am used to, the tissue type fibres were too springy and wouldn't conform well at all, so i used chopped strand matt instead, with much more success.
I got the 3 sections made and parted after a bit of persuasion (and swearing) however this lead to 2 small punctures in the silicone however it wasn't in a critical area and were small.
After removing the master model i inverted the silcone and reattached the mother mold and screwed it all together.
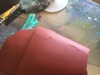
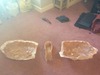
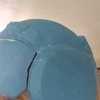
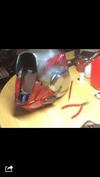
Then i poured 4 layers of polyurethane resin, adding blue colouring then no colouring etc. This was to see what i had missed or thin sections.
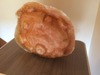
After i had let it sit for an hour i pulled my first cast.
it came out pretty well but had 3 depressions where it must have moved slightly in the glove mold, however i may be able to straighten them out immersing the cast in hot water as i have done with resin before.
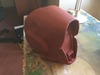
I removed the back panel of the helmet with a dremel, and tried to see if my melon will fit!
It does....just!
So need to repair the issues with the cast, or make a second helmet.
Then pad it out for comfort and so it sits correctly, then paint it.
sewing the last of the costume tomorrow too hopefully.
Pics of progress:


Quilting this was fun.....

I got my mother mold finished yesterday out of fibreglass, turned out the fibreglass i had bought about a year ago but never used had gone thick, causing headaches, but new stuff was much thinner and more like how i am used to, the tissue type fibres were too springy and wouldn't conform well at all, so i used chopped strand matt instead, with much more success.
I got the 3 sections made and parted after a bit of persuasion (and swearing) however this lead to 2 small punctures in the silicone however it wasn't in a critical area and were small.
After removing the master model i inverted the silcone and reattached the mother mold and screwed it all together.
Then i poured 4 layers of polyurethane resin, adding blue colouring then no colouring etc. This was to see what i had missed or thin sections.
After i had let it sit for an hour i pulled my first cast.
it came out pretty well but had 3 depressions where it must have moved slightly in the glove mold, however i may be able to straighten them out immersing the cast in hot water as i have done with resin before.
I removed the back panel of the helmet with a dremel, and tried to see if my melon will fit!
It does....just!
So need to repair the issues with the cast, or make a second helmet.
Then pad it out for comfort and so it sits correctly, then paint it.
sewing the last of the costume tomorrow too hopefully.
Pics of progress:


Quilting this was fun.....

Attachments
-
 759CA1F1-9822-4F36-A626-A274207B49DA.jpg149 KB · Views: 120
 -
 B111D937-145B-4FA6-A89B-E7D86FD76F00.jpg187.6 KB · Views: 116
 -
 E7E13364-1F22-4234-94D9-DC0D7A46ABF0.jpg146.4 KB · Views: 117
 -
 8A28717D-9844-4A37-BFC5-E85C9BE56FA1.jpg212.5 KB · Views: 114
 -
 7C6CDE12-5DD8-4CE2-8F7F-92D02BF68F57.jpg206.7 KB · Views: 117
 -
 1EA2D460-AA22-4E42-8F6A-A20A51040E96.jpg170 KB · Views: 128
 -
 85F488D1-C3BA-4FA7-97AA-9C7318DA1742.jpg310.2 KB · Views: 117
 -
 613AB374-0FCD-435E-87DA-42D7F5941B1E.jpg276.3 KB · Views: 128
your work is awesome and I like the helmet I made one out of foam. but any way if you are still looking for a way to seal your foam armor I use a thing called tacky glue it is thicker then normal pva glue but I don't know if there is anything like it over there.
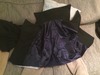
Sewing machine #2 is go.
The tunic is sewn together and turned inside out, sleeves of lining to join to attach to arms and sleeve detail to put together, turn up and show quilting.
almost done


The tunic is sewn together and turned inside out, sleeves of lining to join to attach to arms and sleeve detail to put together, turn up and show quilting.
almost done


Attachments
Hi folks,
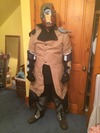
getting it all together now.
The coat is together and has the fasteners fitted and final stitching to do by hand.
The foam armour has been painted and final coats to be done. The helmet has had the back piece attached with velcro, as magnets were going to cause fit issues in the time i have to work out the method. its primer micro filler has been sprayed on, then to smooth it down and apply gloss black before the alclad colour.
Its getting there but a lot to do in the 2 days i have left after a business trip this week. I may not do the gun as time is tight.


Attachments
-
 011D7E8E-89B0-40C4-BE73-15488F27AABF.jpg197.7 KB · Views: 117
 -
 53A9A12A-1025-44FD-89FC-2C2673B4C5A7.jpg229.4 KB · Views: 106
 -
 97EC6ACC-5FA5-4D00-A181-E957A0C60A77.jpg176.7 KB · Views: 108
 -
 AE704BE0-502E-47E1-84BA-FB7F936CBD98.jpg225.3 KB · Views: 121
 -
 5EF94CEE-BBE1-4FF0-999F-1060605B505E.jpg218.4 KB · Views: 99
 -
 214B87F2-60EC-4C60-87A9-AD8B32BEDE56.jpg244.2 KB · Views: 119
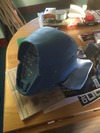
Well folks,
The day came and as i only had a couple of days after a business trip i haven't updated since last week.
The last few bits to do were to fit the armour parts to the coat, and paint the helmet and make the rifle.
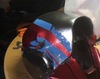
All was going well with the helmet, being painted with pri,er and then glass black before a coat of Alclad Lacquer Chrome.:

This was then very carefully masked as the surface was showing some signs of lifting, and red lacquer was appled with some liquid mask in places to rub off later as battle damage.
upon removing the mask, disaster!

I have never seen paint lifting so badly in my life, so i had a bit of a moment to myself (sulk) then had at it with freehand airbeush metallic acrylics and a high gloss varnish.

Turned out okay in the end.
The screen is clear 3mm acrylic with window anti glare film added to it, gold colour 2 way like a mirror.
I added more length and some parts to the NERF gun, but i only had about 4 hours to do this so in the end it was servicable but not what i wanted but ah well:

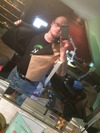
Test fit of the main parts:

Rocking out with Iron Man (a fellow RPF member but as we could hardly hear with our helmets on, didnt get your name buddy!

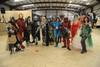
Group photo of the finalists

It was a great event and for the first of its kind of this sclae in Aberdeen the turnout of over 3000 people who had to queue in the rain for 3 hours+ was amazing.
Looking forward to 2 day event and tickets next year.
The day came and as i only had a couple of days after a business trip i haven't updated since last week.
The last few bits to do were to fit the armour parts to the coat, and paint the helmet and make the rifle.
All was going well with the helmet, being painted with pri,er and then glass black before a coat of Alclad Lacquer Chrome.:

This was then very carefully masked as the surface was showing some signs of lifting, and red lacquer was appled with some liquid mask in places to rub off later as battle damage.
upon removing the mask, disaster!

I have never seen paint lifting so badly in my life, so i had a bit of a moment to myself (sulk) then had at it with freehand airbeush metallic acrylics and a high gloss varnish.

Turned out okay in the end.
The screen is clear 3mm acrylic with window anti glare film added to it, gold colour 2 way like a mirror.
I added more length and some parts to the NERF gun, but i only had about 4 hours to do this so in the end it was servicable but not what i wanted but ah well:

Test fit of the main parts:

Rocking out with Iron Man (a fellow RPF member but as we could hardly hear with our helmets on, didnt get your name buddy!

Group photo of the finalists

It was a great event and for the first of its kind of this sclae in Aberdeen the turnout of over 3000 people who had to queue in the rain for 3 hours+ was amazing.
Looking forward to 2 day event and tickets next year.
Attachments
-
 BA91ED24-DD42-4451-8CB4-08A8CC256722.png313.3 KB · Views: 118
 -
 D4A9DD09-77E7-40DA-9C32-7BA965A4D8C9.jpg97 KB · Views: 113
 -
 34E986AF-2516-4E58-B0FC-85C5B70E4B10.jpg236 KB · Views: 109
 -
 3D846A05-57C1-4CB5-90D2-DC78763CAE67.jpg117.1 KB · Views: 124
 -
 9AFECB72-ADA4-4A85-89B9-E9102CE592C1.jpg281.8 KB · Views: 132
 -
 comic%20con%201.jpg107.1 KB · Views: 107
 -
 comic%20con%202.jpg95.2 KB · Views: 121
- Status
- Not open for further replies.
Similar threads
- Replies
- 24
- Views
- 1,449