Ah! I suspected that's what you were referring to. Yeah, I didn't realize that at the time (my favorite color is green). Well, I will have a knife, so I guess I can be CQ
Thanks That's what I thought. I wasn't sure if there was some canon that I hadn't read that indicated what the different colors represented. Wasn't going to lose too much sleep over it either way. Main costume will be done this week, working on backpack and accessories tonight. Hope to have the pics uploaded in the next week or two!
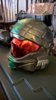
The next steps in my project were to pick which visor color I wanted to roll with (silver or red - going to get a custom green visor in the future), and to install some CPU fans in the helmet to help exhaust the heat. I also needed to install foam in the helmet to make it wearable. My lovely fiancée was kind enough to do the soldering for me. Finally, did some test placement of the fans and switches. Now I just need to create some Velcro enclosures for the batteries and replace the place holder screws with some shorter screws.
I'm really happy with the way that the helmet turned out! Now all that is left is to replace the screws, paint them, secure the fans, and install my Drift action camera on the helmet
Thanks, I really appreciate it! She's actually the one that got me into cosplay. I always did elaborate Halloween costumes before, but she helped me graduate to full cosplay
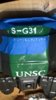
After securing some connection points to the back of the chest plate, I primed/painted it. Look how beautiful the second picture is! I hate to mar it...but I must. I forgot to take a picture, but between two and three, I masked off what I wanted to stay gunmetal and I put down several coats of nickel paint. I then used toothpaste as a resist on all of the places where I wanted scratches. I then painted green over all of that, let it dry some, and peeled the paint off. After the paint was more dry, I scraped the toothpaste off to let the silver show through. I then added my ODST vinyl logo and used a stencil to hand paint the lettering on. After weathering the stencil and letters to take some of the brightness out of the white, I painted the knife, then oil washed the silver logo to make it look more worn. Final step was to attach the knife to the chest plate (with velcro). Tada!
Now to start on the tools of the trade! I bought a couple of unfinished resin kits online. Focused on the SMG first. I had cut off any excess flashing from the gun, then sand out any imperfections and seam lines. I then filled any air bubbles with Bondo and miliput, and sanded those smooth again. Rinse and repeat. We then built a frame to hold the barrel in straight, and used carboard shims to even it out. I glued barrel to the gun with 5 minute epoxy, as well as the reflex sight on top and the flashlight down below. I then painted the whole thing black, glued on the magazine and attached the foregrip with a chicago screw. I also added a single point sling to help take the load off at long cons. I still have detail work and weathering to do, but so far so good! Still need to get started on the pistol with only a month to go!
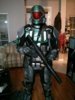
Added some cloth wrapped foam inserts into the bracers to make them fit better/feel more comfortable. Also, did the first test fitting of the whole armor tonight! It fits really well! I have a few adjustments to make (including extending the single point sling on the gun and tightening up the knee pads) but I'm super thrilled overall!
")