Strix3D
New Member
Started a foam ODST medic build a month ago and figured I'd start a thread for it. It's for PAX AUS 2023 in Melbourne, so at the time I'm writing this, I've got around 2 weeks to finish it. This is my first ever proper foam cosplay, so feedback is well appreciated.
The colour scheme comes from this mini I found on r/halo. By the time I actually thought of asking the guy for permission, I had already ordered the visor and painted the helmet. He never got back to me either way.

Funnily enough, this foam build started out with a 3D printed helmet. The task of making a helmet solely out of foam was rather daunting since I hadn't really worked with the stuff ever. I actually used the helmet files I got from TnG R1ckx's ODST thread. The rest of the files I bought off heroes workshop. The helmet itself I printed in 4 parts. Mainly because I was scared if I printed it in one piece a small imperfection would waste tens of hours and filament.

Now, most people probably already know this, but DO NOT PUT SPOT PUTTY ON A RAW 3D PRINT. You can probably tell just by looking at it, but it got all in the lines on the top. It took me 2 straight days of blisters and a pack of toothpicks to get it clear. Not to even mention the sanding.

I eventually got it all clear and did a few coats of rustolieum filler primer followed by a wet sand, followed by silver primer. You can still see the massive seam lines on the helmet, but it's whatever.

Now to put in perspective, that last image and this next one have around 3 months in-between them. I'm a big procrastinator, but I was also waiting until my commissioned visor was done. I bought some liquid latex from big w, did the paint chippings, and did a coat of either satin or matte white. I can't remember. Kinda regretting not doing gloss, but I have a can of clear gloss lying around in the garage that I bought ages ago so I'll probably do that soon.

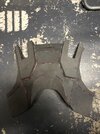
Okay now for the good part, I started work on the main torso piece roughly a month ago. I think I took this photo to show what a difference a good knife makes. The section of the left was cut by a trojan snap blade I got from bunnings for like 5 bucks. And the one on the right was cut by some box cutter I found lying around.

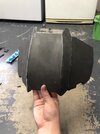
This was my first big victory with the foam. The seams were shotty, but it's seriously the best thing I had made with the stuff up until then.

I got the torso done after around 2 days of labouring. You can kinda see the straps falling apart which I fixed the day after this photo. I made the chest plate absolutely ages ago and I happened to find it when going through my cupboard. It looks... okay to say the least. It fits and so it shall be used.

Next up was the shoulders. I'm not good at cutting foam on an angle. At all. So I went with the landfall shoulders. I made the template roughly 6 months ago in case the 3D printer gave out. (which it did).

After hanging out with some cool halo peeps at OZ comic con in brizzy, I got a rush of motivation and threw these together the following day. The thighs are rakshasa in case you're wondering. And the darker foam on the stomach plates are lumins workshop's 4mm hardlite foam.

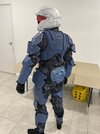
And the very next day, I got the knees done. Played around with scoring the inside of the foam and I think it turned out pretty good. Not entirely sure where these templates are from, I just asked for some knees online and promptly received some.

Looks mighty rad with the thighs.

These are the shoes I'll be wearing with the armor. Just some regular black boots.

And for the clothes I bought a black ribbed turtleneck, and some black cargo pants.

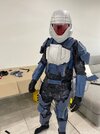
So, this is where I'm currently at. With pax 2 weeks down the road, I have forearm, shin, boot, belt, and glove armor to make. Again, feedback is very well appreciated.
The colour scheme comes from this mini I found on r/halo. By the time I actually thought of asking the guy for permission, I had already ordered the visor and painted the helmet. He never got back to me either way.
Funnily enough, this foam build started out with a 3D printed helmet. The task of making a helmet solely out of foam was rather daunting since I hadn't really worked with the stuff ever. I actually used the helmet files I got from TnG R1ckx's ODST thread. The rest of the files I bought off heroes workshop. The helmet itself I printed in 4 parts. Mainly because I was scared if I printed it in one piece a small imperfection would waste tens of hours and filament.
Now, most people probably already know this, but DO NOT PUT SPOT PUTTY ON A RAW 3D PRINT. You can probably tell just by looking at it, but it got all in the lines on the top. It took me 2 straight days of blisters and a pack of toothpicks to get it clear. Not to even mention the sanding.
I eventually got it all clear and did a few coats of rustolieum filler primer followed by a wet sand, followed by silver primer. You can still see the massive seam lines on the helmet, but it's whatever.
Now to put in perspective, that last image and this next one have around 3 months in-between them. I'm a big procrastinator, but I was also waiting until my commissioned visor was done. I bought some liquid latex from big w, did the paint chippings, and did a coat of either satin or matte white. I can't remember. Kinda regretting not doing gloss, but I have a can of clear gloss lying around in the garage that I bought ages ago so I'll probably do that soon.
Okay now for the good part, I started work on the main torso piece roughly a month ago. I think I took this photo to show what a difference a good knife makes. The section of the left was cut by a trojan snap blade I got from bunnings for like 5 bucks. And the one on the right was cut by some box cutter I found lying around.
This was my first big victory with the foam. The seams were shotty, but it's seriously the best thing I had made with the stuff up until then.
I got the torso done after around 2 days of labouring. You can kinda see the straps falling apart which I fixed the day after this photo. I made the chest plate absolutely ages ago and I happened to find it when going through my cupboard. It looks... okay to say the least. It fits and so it shall be used.
Next up was the shoulders. I'm not good at cutting foam on an angle. At all. So I went with the landfall shoulders. I made the template roughly 6 months ago in case the 3D printer gave out. (which it did).
After hanging out with some cool halo peeps at OZ comic con in brizzy, I got a rush of motivation and threw these together the following day. The thighs are rakshasa in case you're wondering. And the darker foam on the stomach plates are lumins workshop's 4mm hardlite foam.
And the very next day, I got the knees done. Played around with scoring the inside of the foam and I think it turned out pretty good. Not entirely sure where these templates are from, I just asked for some knees online and promptly received some.
Looks mighty rad with the thighs.
These are the shoes I'll be wearing with the armor. Just some regular black boots.
And for the clothes I bought a black ribbed turtleneck, and some black cargo pants.
So, this is where I'm currently at. With pax 2 weeks down the road, I have forearm, shin, boot, belt, and glove armor to make. Again, feedback is very well appreciated.
 silly question, are you planning to bevel the edges of the armor or keeping them sharp? Just getting an idea for when I start my build