Sepheus 13's Forging of a Mk V. (Foam)

Status
Not open for further replies.
I can tell this is going to be an interesting build. The camera and screen idea is beyond genius.... Good job on thinking outside the box bud!
 
We still don't know the effects or circumstances for this, I think it is best to research these products beforehand and what conditions they are suitable for. If this works, it will be amazing.
 
I love the screen Idea but i foresee the eye strain being a big deal. you can disassemble the screen case and that should push it back just a little to make it slightly better.
the second issue with the glasses is the input. it looks like most of these are running off Bluetooth and i don't see any way to get RGB connections to it so unless you have a BT camera that might be hard without a little DIY.

Alternatively if you have any programming experience, or a friend with it you might be able to Arduino it. That should save you on weight from the components and the replace the DC Charger with a simple battery pack Housed in the back of the helmet to help balance it out.

Secondly about your foam build are you Free handing the shapes or possibly printing out the Pep and laying it on top?

you've got a gorgeous build going on right now and i love the bulk that this gives to the armor that might be a little lacking with Pep.
 
like everyone has said so far haha, its so clean!!! When I get to my own chest piece I will likely try your taping method :D
 
WOW! Thanks guys! I'm absolutely loving all the feed back I've been receiving. it's Fantastic.

I don't have much progress, I was working on my costume for about a week and a half straight. For most of my free time everyday. So I've slowed down for a while. I'll give my fingers some rest. (they were cramping up as I was using my razor blades)


Lerris Galiron
What about something like this for a display? Don't know how you would connect it all together, but they would probably solve the eye strain issue.

http://www.amazon.com/virtual-Displa...+video+glasses

I found a pair that has an A/V adapter.
http://www.amazon.com/Virtual-Eyewe...652&sr=1-2&keywords=virtual+screen+glasses+AV\
But the battery run time is only 2-3 hours.. I would definitely have to draw power off of another source but these might work for my purposes, But I would have to shell out the money for this thing, and that there reaches 140$+ just to be able to see.. and why should I do that especially when pioneers like Roxy have done it so basic. I'm just over complicating things. Is it cool? Yes. Is it Effective? eh, could be. and is it worth it? As of now, No. I'll just go for a more basic route. but in the future if I change my mind and have the money for it. I'll install it.

DYSTORTED INC
Uhhh, CLEAN, CLEAN, CLEAN. And that's about all I can say!​
Motion26
like everyone has said so far haha, its so clean!!! When I get to my own chest piece I will likely try your taping method :D
TheReconSpartan
I can tell this is going to be an interesting build. The camera and screen idea is beyond genius.... Good job on thinking outside the box bud!​

Thanks everyone, All this feedback is great. I like hearing what people have to say for my work. I wont disappoint you with the final product!

Viridiana.Sovari
I love the screen Idea but i foresee the eye strain being a big deal. you can disassemble the screen case and that should push it back just a little to make it slightly better.
the second issue with the glasses is the input. it looks like most of these are running off Bluetooth and i don't see any way to get RGB connections to it so unless you have a BT camera that might be hard without a little DIY.

Alternatively if you have any programming experience, or a friend with it you might be able to Arduino it. That should save you on weight from the components and the replace the DC Charger with a simple battery pack Housed in the back of the helmet to help balance it out.

Secondly about your foam build are you Free handing the shapes or possibly printing out the Pep and laying it on top?

you've got a gorgeous build going on right now and i love the bulk that this gives to the armor that might be a little lacking with Pep.​

My work follows the Pep very closely, But when I get the general shape I'll feel free to do some free hand. I feel that doing a free hand piece can sometimes leave it uneven, and won't achieve some of the depth that you may need. unless you take that into account when you are sketching the templates. The way I see it, Why re-invent the wheel when you can just improve on it.

And I'm loving this bulk! Before, with the Spartans I've made (two of them) a MK. VI and a MK.V from foam. I always sized them down, and it was really slim. ( it never really looked right) But this time I'm hoping to achieve this bulk. After all, Spartans are tanks. and I want to get that feeling.


Thanks as always for the feedback!
Josh/Sepheus 13
 
Last edited by a moderator:
I'm BACK!!! :D


I've been gone quite a while guys and gals, Sorry about that. Should I just get onto the pictures already?

vlcsnap-2013-09-26-14h57m59s96.png

vlcsnap-2013-09-26-14h59m19s107.png


vlcsnap-2013-09-26-15h00m45s141.png

vlcsnap-2013-09-26-15h01m18s169.png

vlcsnap-2013-09-26-14h58m32s167.png

vlcsnap-2013-09-26-15h01m52s123.png

I've still got a range of movement, even leaning over, and leaning back.
vlcsnap-2013-09-26-15h03m41s188.png

The way the front and back of the COD piece are attached with buckles, they are attached to a piece of foam which act as the "Strap" you can see, the back covers up an ugly eye sore on the back of the ab piece, the sides of the COD are hotglued to the Ab piece making it one big piece.

I don't have much to say, Sorry for the lack of an in-depth view, I'll get to that tomorrow, I'm calling it a night tonight. I'm hard at work on the thighs.

With regards!
Josh/Sepheus 13

vlcsnap-2013-09-26-14h57m59s96.png


vlcsnap-2013-09-26-14h59m19s107.png


vlcsnap-2013-09-26-15h00m45s141.png


vlcsnap-2013-09-26-15h01m18s169.png


vlcsnap-2013-09-26-14h58m32s167.png


vlcsnap-2013-09-26-15h01m52s123.png


vlcsnap-2013-09-26-15h03m41s188.png


vlcsnap-2013-09-26-14h59m19s107.png
 
Last edited by a moderator:
I'm BACK!!! :D


I've been gone quite a while guys and gals, Sorry about that. Should I just get onto the pictures already?

The way the front and back of the COD piece are attached with buckles, they are attached to a piece of foam which act as the "Strap" you can see, the back covers up an ugly eye sore on the back of the ab piece, the sides of the COD are hotglued to the Ab piece making it one big piece.

I don't have much to say, Sorry for the lack of an in-depth view, I'll get to that tomorrow, I'm calling it a night tonight. I'm hard at work on the thighs.

With regards!
Josh/Sepheus 13


Whaaaaaaaaat. This is amazing! How did I miss this thread!
Amazing work dude, everything looks so clean and crisp.
You using pepakura templates or scratch-building?

Thanks!
-S420

Watching this thread from now on.

EDIT: Oh my god that sticky tape idea. Yes. You are a genius. That should be made into a stickied tutorial, such a good tip, I'll definitely be doing that.
 
Last edited by a moderator:
Dude sweet work may I consider getting some Sun glasses or this small tinted goggle like sunglasses to lessen the strain on your eyes or stretch a thin price of cloth over the screen to also lessen the brightness. Ik you've stopped considering using the camera idea, but just wanted to give you some pointer that I think may work, again sweet work!
 
So, here's the update I promised, I had it all ready to be posted and then a storm hit, causing... delays..

So, I'm going to go into depth on the Cod and Ab piece, because they are pretty much one and the same. and I haven't really gone into depth on them.

here it is just the Ab piece with the sides of the Cod.
IMG_9288.jpg

Here is the buckle system of the Cod
IMG_9315.jpg
IMG_9313.jpg

And now attach a side!
IMG_9289.jpg

and now the other side!
IMG_9293.jpg

and BAM! A easy quick release system for male spartans when those moments strike, (sorry ladies)
IMG_9295.jpg

NOW this is the back side (I need to clean up some glue messiness.)
IMG_9299.jpg

and same system on the back, (maybe this could work for those spartan ladies in some way or another)
IMG_9302.jpg

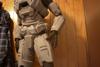
so, this is how I have my ab system set up, I wanted to make sure I could still twist, lean over and back. So I used elastic from an old pair of athletic shorts that no longer fit.
IMG_9310.jpg


Whaaaaaaaaat. This is amazing! How did I miss this thread!
Amazing work dude, everything looks so clean and crisp.
You using pepakura templates or scratch-building?

Thanks!
-S420

Watching this thread from now on.

EDIT: Oh my god that sticky tape idea. Yes. You are a genius. That should be made into a stickied tutorial, such a good tip, I'll definitely be doing that.

Thanks dude! I'm using the foam pepakura files from the 405th pepakura pack. but I've learned that pepakura will only get you so far before you have to improvise.

and I'll redo the tutorial on the clean edges and post it, Cause the pictures I have for it now are pretty much garbage. I just saw your tutorial on removing messy glue. pretty awesome. I think we should collect foam methods and compose them into tutorials. get it known to everyone.


Thank you everyone for all the support you've been giving me. It means a lot in the long run, and really gives me a standard to live up to.

Thanks, Until next time.
Josh/Sepheus 13

IMG_9288.jpg


IMG_9315.jpg


IMG_9313.jpg


IMG_9289.jpg


IMG_9293.jpg


IMG_9295.jpg


IMG_9299.jpg


IMG_9302.jpg


IMG_9310.jpg
 
Last edited by a moderator:
I just saw your tutorial on removing messy glue. pretty awesome. I think we should collect foam methods and compose them into tutorials. get it known to everyone.
That's a good idea man, I had considered instead of making a thread for that tutorial, making a thread for the posting of general foam mini-tutorials. As there are alot of little improvisation tips and tricks to be shared. We should definitely consider that at some point.

Nice update man, that quick-release system is slick. And your ab-cod hybrid looks great.

-S420
 
This. Exactly. Yes.

You should go ahead and start one when you repost your tape-trick. That's certainly a good tip to start the thread off on. When you do I'll help out and post a few tips too. This is good thinking man, great minds definitely think alike.

Also, thanks for the compliment on my build. I'll be watching yours too, I've already picked up a good pointer or two from watching this, plus your suit so far is just really nice to look at. It's just so clean.
 
Late night update! The thighs foam work is done! well excluding foamies.

IMG_9331.jpg

sorry about all the blurred pictures I always put up. It's hard to run solo in this sometimes.

I'll update my thread soon with more pictures of the thighs.

Until next time!
Josh/Sepheus 13
 

Attachments

  • IMG_9331.jpg
    IMG_9331.jpg
    57.7 KB · Views: 233
Very nice! Cant wait to see some paint on it!

Which file did you use for the ab wrap? Or was it free hand?
 
Status
Not open for further replies.
Back
Top