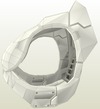
My new detail piece looks good on the forearm - it would have been a lot easier for me if it was modeled in like that instead of my custom hack. (How did you resolve the bi-leveled top without including the stepped top line?) I would ask that you include a text note within the PDO file giving me credit for that detail area since I spent quite a bit of time researching and modeling it.
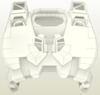
I can tell you that on my own build this entire recessed area will be cut out and replaced with foam for a more-comfortable fit around the neck. I would include the detail and people can decide individually whether to pep it or use it for foam templates.
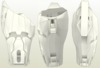
Coming up in my own build is a missing indented "ramp" on the forearm that I can't see if you've added because it's on the view not included in your image (you have 3 of the 4 sides shown).
Now don't take this the wrong way because your models are looking fantastic, but in my opinion some of the finer details you're adding would be difficult to pep. You might consider offering 2 versions of the files - full detail (or full frustration, depending on the builder), and another with details separated as templates for those people who prefer to add them later or differently. Even if I built your files as they look now, I'd be modifying the printed cardstock to replace some of the parts with mat board for strength and easier building. Your files are what I was hoping to find when I started downloading HD files months ago and I'm anxious for you to upload them so I can start using them for my build. They'll reduce the time I'm spending adding missing details to the armor.
Yes, I really do like that detail piece. What you made for your build on the top left of the detail is sort of what I did for both sides. The top area is stepped back just a bit from the outer edges. Since I still have to add the detail area to the back that might change on the right side of the detail. Your name would definitely go on the file to give you credit.
I understand exactly what you mean. I prefer to pep everything in and brace it so most of the leg work is done in paper, but I know many others prefer building detail with body filler and other materials. So, since so many people like to build these things differently I will probably make three files for each piece. I will make a medium detail, high detail, and a version with all the details. I'm not quite sure what I want to call that version.
On the chest, the medium detail will include only the needed recessed detail and no raised detail. The high detail will include all of the recessed detail, and none of the raised detail. The final version will include everything. The raised detail that will be removed from the MD and HD files will be represented in the form of floating faces. I will do my best to make the files parts sort of interchangeable. Then you could pick and choose what you wanted to build. This wont work for all of the parts, but I think I can at least get away with it on some of the chest.
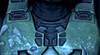
I want to be done with the files as well so I can build them too. Right now I need to adjust some detail on the back of the chest near the center to match the game model better. The back of the forearm has no detail added, which is why I didn't include it in the pictures.
Once I get the details on the models sorted out I will clean up the polygons in Blender, and then it is on to unfolding. Those two steps usually do not take me much time.
Those models look really good, though they make my fingers hurt just to look at them! I'm impressed.
Thank you! Well hopefully I can put together some versions that wont make your fingers hurt just by looking at them lol. I think the worst part about all the Pepakura building is the cutting and scoring. The X-acto knife really does a number on my hands. If only I had a printer to cut it all out for me lol.
These models are really making me look forward to my Halo 3 build. However at the same time they make me dont wanna do it. Still im very anxious to start working on this.
I think you should put the detail in. Just having half of the detail in kinda leaves a half done job as a builder. Ive seen others put in the detail your talking about and think it really adds to the neck detail.
Well I don't want to discourage anyone with any of the files I am making. I know not everyone is going to be up to the task of building the full detail version, and I would hate for someone to miss out because of that. So that is one of the reasons I wanted to make the multiple versions.
Just my two cents:
I agree with RobotChicken. If you're adding a detail that's basically a raised surface off another surface (especially if it's pretty flat) it's much more easily done in mat/illustration board or craft foam. You'll most certainly get a cleaner finish, and the little bevels added in pep like that weaken the structure and shape of the piece as a whole.
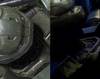
Aside from that, the models themselves are looking amazing. Kind of defeats the purpose of the 'detail sketches' I was doing for my own reference. I'm interested in the HD models for the reference alone! (Speaking of reference, if someone is going to capture more reference pictures, well, sharing is caring!) I'd maybe consider what RobotChicken suggested, and doing a Medium Def file for ease of construction, and a HD file for reference/detail.
That being said, anything you decide to release would be more than appreciated!
EDIT: While we're on the topic of reference, I figured I should note that I'll be taking screencaps of the Halo 3 cutscenes soon. (that's the model I plan to use for reference. It's finer than the in-game model) I'll put an album together an throw it up as soon as I can.
I think I answered all of what you brought up in my reply to RobotChicken lol. Also, I would love to check out those screencaps. I think those would help out a lot. They would come in handy for the work I plan on doing on the cod.
I will jump on to Halo 3 Later on today or tomorrow and take many pics for you. I will try to make them gray for you with photoshop.
Thank you! I don't think you would need to go as far as edit them in Photoshop unless you're certain it would show the details better. I was just saying change the characters armor colors in the game. Regardless, I appreciate the help!
So I guess that is it for now. I'm going to keep messing with the chest file while I wait on some better reference photos of the other parts. Maybe by then I will have the chest ready for the next step. As soon as I get the chest model ready to go I will post pictures of each version to get one more final input from you guys. I want to try and get these files done as soon as I can so we can all start using them.
Well...it's back to work on these parts. Thanks for all of your comments and suggestions!
 Honestly, it would be easier to add during a pep rather than retro-fit a finished forearm, but not being easy doesn't mean impossible. If somebody has enough time, they could, say...build a whole army of Spartans from unused peps.