LesChriserables
Member
Hi there,
I asked a while back if I should be posting a build thread to the forums to document my process and I've finally got around to it! (After a little bit of prodding)
My buddy From the Brink Studios said to me one day "You should build an ODST." I had just finished my MkVII and thought "oh yeah, I'd like a different kind of challenge. Something that uses sewing, foam, leather, and 3d printing! This'll be perfect". And so it all began.
I've posted a few updates on my cosplay instagram @Les_Chriserables. Feel free to follow me if you like my stuff!
This is where I'm at as I'm posting this thread (29/2/2024)
If you see anywhere I'm going wrong in terms of attaining lv3 deployment please say something! Helpful and constructive criticism if appreciated.
Planning:
I consulted the 343 ODST Cosplay Guide to get a better detailed view and breakdown of what I would need to make. I then scoured the internet for the most accurate ODST 3d printable files I could find. I really like the Brink files for their overall accuracy and multi-material design, but prefer the way Galactic Armory sliced their helmet and modelled their visor buck. Also, I was a patron when planning this whole thing and their files were free to me.


Soft Goods
I wanted to go hard on the undersuit. To me, a good undersuit will make a huge difference to the overall quality of the finished build.
I went with these for the pants/ combat shirt as they seemed a great cross between what was in the cosplay guide as well as what I'd expect the ODSTs to wear IRL.
I took those awful knee pads out. I don't know if these will preclude the suit from being tier 3 approvable but if so I could just use a basic black shirt/ pants combo.

Torso undersuit:
I created a pattern on my duct tape mannequin using the ODST cosplay guide as a reference. I love that they put in an undersuit breakdown into the guide. It's made my life easier and helps me plan all my attachment points.


These images do not give justice to the amount of time this took me to plan, measure, cut, glue, stitch, pin, clip and trim all of the pieces. Sewing is still pretty foreign to me but I think I did a decent job considering. I didn't want to add the straps around the sides until I had the back plates painted and attached.
Once they were all ready to go I used E6000 glue to attach everything! The clips helped keep everything in place for the 48 hours it took to fully cure the glue. I didn't want to take any chances.

After all of the back plate pieces were attached I was able to add the kidney plates and hide some buckles in there. This is how I attach the up-armour stomach section.

And this is where I was at with the undersuit. Feeling manly.

I later painted the grey leather bit around the neck black with angelus paints to be more accurate.

Combat belt:
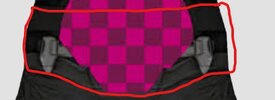
One thing I wanted to do was have the thigh pieces and lumbar plate attached to a belt that matched the reference. The belt (circled in red) in the reference is pretty damn hard to see because it's just a slightly different shade of grey and mostly hidden behind a giant pink nothing except from the below angle.

I just sandwiched some foam between some leather with a recessed part for the webbing. I sewed vertically along the webbing to create a sort of MOLLE situation so the things that become attached don't slide around and so I can add extra stuff if desired. Excuse the extra length of webbing. I cut that shorter later. I also trimmed some of the belt so it could get tighter.


Shoulder pads:
I basically sandwiched a couple of pieces of foam together leaving a channel for the webbing, then covered them in fabric. I made a smaller bit of padding at the bottom to make up for the lack of padding in the sides to fill in the gaps. I did most of this while chatting with 405th people in discord. It was a whole lot of fun and I'd suggest you check it out if you haven't.


I hand stitched up the sides to create the seam effect from the guide. I used hot glue, following the recess on the plates, to attach the shoulder pads.


3D Printed pieces
Resizing 3d files:
So the first step was to size everything according to my body. I'm 6'2" and a bit thicc so Brink's files needed a bit of resizing on the girth axis to fit me properly. 105% for most things (because 5'10" to 6'2" is nearly exactly 5%), except for the thighs, shins and back plates.
Thighs were resized by 125% on the girth axis with 100% on the height axis.
Shins were resized by (looking from the front) 115% wide, 110% deep and 100% tall.
The bottom back plates that wrap around the body were resized to 115% on the girth and 105% on the tall.
I printed the backpack at 100%
Fiberglassing:
I started with reinforcing all the pieces which will take some strain. The lower back plates being the most important. Not pictured are the shins as they didn't fit on the table xD.

Sanding and priming:
Smashed these pieces out in a day. Brink's files are designed to be sanded as easily as possible and the palm sander just shredding through the layer lines.

The shins were done on another day. Brink recently split up the front and back of the shins to make it easier to get them on.

Painting:
I went with a layered approach to make the most of chipping and weathering with liquid latex. I find the layered approach gives texture and makes the black wash even more effective! Base layer is Rustoleum chrome which left my armour looking pretty fly.


Then I applied liquid latex on edges and wherever needed weathering. I sprayed the back plates with a matte black, then hit everything else with a coat of Montana black Slate. I used Montana metallic red spray paint for the helmet, shoulders, and chest detail pieces.
.


After this was left for a few days I started scratching the latex off (except for the shins and forearms) to reveal the chrome underneath. This took forever but was well worth the result.
Camo:
For my thighs and forearms I copied the camo pattern from my undersuit as best as I could using Montana black "Dumbo" rattle can paint and applied Vallejo Game Air Earth with my airbrush.


The blackwash really pulled it all together. Camo looks so strange when it's clean.
Decals:
I designed some decals them using resources from the 405th as well as a font I found via google. A friend made them into decals for me with their Cricut and WOW they looked so good! After a little weathering and a matte clear coat I was all set.


Visor:
I printed the visor buck from galactic armory, made it glassy smooth, and vacuum formed a 1.5mm thick sheet of PETG using a home made vacuum former. I dyed the visor using Idye Poly Crimson to get a nice DEEP red. After polishing the visor with a microfiber towel I airbrushed the inside lightly with SMS Hyper-chrome cold to make it a one way mirror. We don't have Spaz Stix mirror chrome in NZ and this is the next best alternative for an airbrush. (I've tried a lot of different options). Visibility is still very good.


Attachments
Up-armour plates:
So the up-armour plating in the cosplay guide looked to be attached with a thick leather backing. I had some skirting leather left over from my Witcher project so I created a pattern, cut it to shape, dyed it black and attached all the pieces to it! The chest piece was attached using a scrap piece of black leather which came from an old bag. I even re-used a piece with a pocket! So I have another place to hide my treats.


I'll reply to this thread with updates as I steadily progress on this. If you have any questions that I haven't written about please ask. Thanks for reading!
I asked a while back if I should be posting a build thread to the forums to document my process and I've finally got around to it! (After a little bit of prodding)
My buddy From the Brink Studios said to me one day "You should build an ODST." I had just finished my MkVII and thought "oh yeah, I'd like a different kind of challenge. Something that uses sewing, foam, leather, and 3d printing! This'll be perfect". And so it all began.
I've posted a few updates on my cosplay instagram @Les_Chriserables. Feel free to follow me if you like my stuff!
This is where I'm at as I'm posting this thread (29/2/2024)
If you see anywhere I'm going wrong in terms of attaining lv3 deployment please say something! Helpful and constructive criticism if appreciated.
Planning:
I consulted the 343 ODST Cosplay Guide to get a better detailed view and breakdown of what I would need to make. I then scoured the internet for the most accurate ODST 3d printable files I could find. I really like the Brink files for their overall accuracy and multi-material design, but prefer the way Galactic Armory sliced their helmet and modelled their visor buck. Also, I was a patron when planning this whole thing and their files were free to me.
Soft Goods
I wanted to go hard on the undersuit. To me, a good undersuit will make a huge difference to the overall quality of the finished build.
I went with these for the pants/ combat shirt as they seemed a great cross between what was in the cosplay guide as well as what I'd expect the ODSTs to wear IRL.
I took those awful knee pads out. I don't know if these will preclude the suit from being tier 3 approvable but if so I could just use a basic black shirt/ pants combo.
Torso undersuit:
I created a pattern on my duct tape mannequin using the ODST cosplay guide as a reference. I love that they put in an undersuit breakdown into the guide. It's made my life easier and helps me plan all my attachment points.
These images do not give justice to the amount of time this took me to plan, measure, cut, glue, stitch, pin, clip and trim all of the pieces. Sewing is still pretty foreign to me but I think I did a decent job considering. I didn't want to add the straps around the sides until I had the back plates painted and attached.
Once they were all ready to go I used E6000 glue to attach everything! The clips helped keep everything in place for the 48 hours it took to fully cure the glue. I didn't want to take any chances.
After all of the back plate pieces were attached I was able to add the kidney plates and hide some buckles in there. This is how I attach the up-armour stomach section.
And this is where I was at with the undersuit. Feeling manly.
I later painted the grey leather bit around the neck black with angelus paints to be more accurate.
Combat belt:
One thing I wanted to do was have the thigh pieces and lumbar plate attached to a belt that matched the reference. The belt (circled in red) in the reference is pretty damn hard to see because it's just a slightly different shade of grey and mostly hidden behind a giant pink nothing except from the below angle.
I just sandwiched some foam between some leather with a recessed part for the webbing. I sewed vertically along the webbing to create a sort of MOLLE situation so the things that become attached don't slide around and so I can add extra stuff if desired. Excuse the extra length of webbing. I cut that shorter later. I also trimmed some of the belt so it could get tighter.
Shoulder pads:
I basically sandwiched a couple of pieces of foam together leaving a channel for the webbing, then covered them in fabric. I made a smaller bit of padding at the bottom to make up for the lack of padding in the sides to fill in the gaps. I did most of this while chatting with 405th people in discord. It was a whole lot of fun and I'd suggest you check it out if you haven't.
I hand stitched up the sides to create the seam effect from the guide. I used hot glue, following the recess on the plates, to attach the shoulder pads.
3D Printed pieces
Resizing 3d files:
So the first step was to size everything according to my body. I'm 6'2" and a bit thicc so Brink's files needed a bit of resizing on the girth axis to fit me properly. 105% for most things (because 5'10" to 6'2" is nearly exactly 5%), except for the thighs, shins and back plates.
Thighs were resized by 125% on the girth axis with 100% on the height axis.
Shins were resized by (looking from the front) 115% wide, 110% deep and 100% tall.
The bottom back plates that wrap around the body were resized to 115% on the girth and 105% on the tall.
I printed the backpack at 100%
Fiberglassing:
I started with reinforcing all the pieces which will take some strain. The lower back plates being the most important. Not pictured are the shins as they didn't fit on the table xD.
Sanding and priming:
Smashed these pieces out in a day. Brink's files are designed to be sanded as easily as possible and the palm sander just shredding through the layer lines.
The shins were done on another day. Brink recently split up the front and back of the shins to make it easier to get them on.
Painting:
I went with a layered approach to make the most of chipping and weathering with liquid latex. I find the layered approach gives texture and makes the black wash even more effective! Base layer is Rustoleum chrome which left my armour looking pretty fly.
Then I applied liquid latex on edges and wherever needed weathering. I sprayed the back plates with a matte black, then hit everything else with a coat of Montana black Slate. I used Montana metallic red spray paint for the helmet, shoulders, and chest detail pieces.
.
After this was left for a few days I started scratching the latex off (except for the shins and forearms) to reveal the chrome underneath. This took forever but was well worth the result.
Camo:
For my thighs and forearms I copied the camo pattern from my undersuit as best as I could using Montana black "Dumbo" rattle can paint and applied Vallejo Game Air Earth with my airbrush.
The blackwash really pulled it all together. Camo looks so strange when it's clean.
Decals:
I designed some decals them using resources from the 405th as well as a font I found via google. A friend made them into decals for me with their Cricut and WOW they looked so good! After a little weathering and a matte clear coat I was all set.
Visor:
I printed the visor buck from galactic armory, made it glassy smooth, and vacuum formed a 1.5mm thick sheet of PETG using a home made vacuum former. I dyed the visor using Idye Poly Crimson to get a nice DEEP red. After polishing the visor with a microfiber towel I airbrushed the inside lightly with SMS Hyper-chrome cold to make it a one way mirror. We don't have Spaz Stix mirror chrome in NZ and this is the next best alternative for an airbrush. (I've tried a lot of different options). Visibility is still very good.
Attachments
Up-armour plates:
So the up-armour plating in the cosplay guide looked to be attached with a thick leather backing. I had some skirting leather left over from my Witcher project so I created a pattern, cut it to shape, dyed it black and attached all the pieces to it! The chest piece was attached using a scrap piece of black leather which came from an old bag. I even re-used a piece with a pocket! So I have another place to hide my treats.
I'll reply to this thread with updates as I steadily progress on this. If you have any questions that I haven't written about please ask. Thanks for reading!