UNSC Naval Pilot WIP

Status
Not open for further replies.
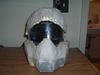
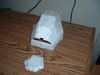
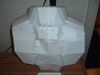
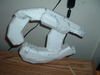
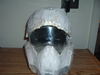
So here I am posting what I have of my suit so far at 12:17 AM. I've posted two threads about the helmet before, the second was because I lost the first thread but I was stupid and didn't make it a WIP thread, I don't think I knew what it even stood for back then. OH WELL! My helmet was originally a test piece to see if I had what it takes to make a suit and after I joined a group of 405th members in Ohio I decided to make a full suit, so heres what I have done. My helmet only needs to be sanded then painted, the shoulders and chest piece are pepped and ready for the other stages. Heres the pics of the pieces.

sss001.jpg
sss002.jpg
sss003.jpg
sss004.jpg
sss005.jpg
 

Attachments

  • sss001.jpg
    sss001.jpg
    93.5 KB · Views: 73
  • sss002.jpg
    sss002.jpg
    92 KB · Views: 68
  • sss003.jpg
    sss003.jpg
    132.9 KB · Views: 79
  • sss004.jpg
    sss004.jpg
    68.6 KB · Views: 68
  • sss005.jpg
    sss005.jpg
    92.2 KB · Views: 79
Reminds me of my Halo 3 days. That's some might fine work and Naval Pilots are rare. I really like their armour. May I ask were you got your visor?
 
Well... Uhm... It's kinda embarrassing actually... I made the visor using some recycled goods I bought... The plastic from the big pepsi bottle. It works for now though, once I get better at this I'll replace it with a real one.
 
Really? I was trying to find a cheap way to make one and that came to mind. The only problem is size, it doesn't fit the entire thing but as an excuse I say its for more air flow.
 
Looks really good! I like the Naval pilot helmet a lot, but I wouldn't like to do it myself until I got my own MJOLNIR done.

Small criticism: don't lather your resin on so thick. It tends to drip and those drips can be a pain later. If you have any spare, brush it around the inside, and make sure you brush up any excess drips before they form.
 
Well... Uhm... It's kinda embarrassing actually... I made the visor using some recycled goods I bought... The plastic from the big pepsi bottle. It works for now though, once I get better at this I'll replace it with a real one.
Don't be embarrased, it's good to be eco friendly. I like the look of the transparent visor.
 
The only bad part is that the actual pilots have this reflective style visor, I can't really say if its a color or not. I don't know if I should give it a tint paint job or just leave it as it and paint the interior black. Any tips for this
 
Those drips happened after I set it out to dry, I can sand them down though couldn't I?

Yeah, you could, but it's just a pain to do because if you do it wrong you can end up shearing through your work if you aren't careful. Just a reference for the future - mix a 'hot' batch of resin, and stay with your piece while it cures to brush out any drips before they form. Saves a hell of a lot of hassle in the future.
 
Just a reference for the future - mix a 'hot' batch of resin, and stay with your piece while it cures to brush out any drips before they form. Saves a hell of a lot of hassle in the future.

So how do I go about heating it up? It seems like it would make it cure to fast to work with it. The bad part about staying with it is having to stay outside since the "tool shed" isn't capable of working in yet.
 
So how do I go about heating it up? It seems like it would make it cure to fast to work with it. The bad part about staying with it is having to stay outside since the "tool shed" isn't capable of working in yet.

More hardener (only if you're using polyester resin!) and high ambient temperature (careful, possible fire hazard) will both speed the hardening up. You can also add a thixotropic agent to help the resin stay on vertical walls (that's what I would try first).

Actually though, I wouldn't care too much about a few drops. Resin sands rather easily, and since you'll have to do lots of sanding anyways to smoothen the putty, it's not really a lot of additional work.
 
So how do I go about heating it up? It seems like it would make it cure to fast to work with it. The bad part about staying with it is having to stay outside since the "tool shed" isn't capable of working in yet.

A 'hot' batch is one that cures fast. The resin/hardener chemical reaction is exothermic - it gives off heat. The hotter it is, the faster it cures.

Therefore, more hardener = hotter reaction = faster reaction time = less drips. Though you do have the tradeoff of a smaller working time.
 
Both really good answers. I'll do that when I go to work with the shoulders and chest piece. I'm also going to slow down on these quick replies. It's starting to look like I'm spamming my own thread.
 
Suggestion: Use Rondo instead up strait up Bondo for the detailing. Mix it a little on the thick side, but still use resin. Apply it with a 1" paintbrush. It's thinner than Bondo, and as such, it doesn't have all those bubbles and low spots that Bondo can get. You do need to apply more layers to get the desired thickness, but it's MUCH easier than strait Bondo for detailing.
 
Yes this is technically a second post so I am sorry about that but I wanted to throw in a update. I have every piece pepped and ready for their next steps. And I learned how to make rondo so that question isn't needed anymore. I have also sanded my helmet more and its almost ready for the first coat of paint. It's probably hard to tell in the picture but it is smoother.
g001.jpg

I also added more padding inside and adjusted the chin strap for a better fit. Plus I will be tinting the visor.

And here's the other update. I am working on two guns, a plasma pistol and an smg. My question for you guys it which do I work on first so it will be ready for convention time? Plasma Pistol or Smg.
g003.jpg
g002.jpg
 

Attachments

  • g003.jpg
    g003.jpg
    86.5 KB · Views: 71
  • g001.jpg
    g001.jpg
    88.8 KB · Views: 76
  • g002.jpg
    g002.jpg
    58 KB · Views: 73
Status
Not open for further replies.
Back
Top