Weedknight's Halo 4 MC Foam Build

Status
Not open for further replies.

Weedknight

New Member
Hello there folks,
i'm new to the 405th forums and also completely new to the cosplay-world. So here is a quick introduction of myself.
My name is Milan, i come from Germany and at the moment i'm studying Industrial Engineering. I love the Halo games, played them for hours with my friends, when i was younger and always dreamed of having a Mjollnir Armour.
Rocking carnival or helloween in one of these suits must be pretty awsome, so i'm trying to get my first build done by the end of the year.
Since this is my first time building anything wearable, don't expect to much from my build. I'm a bloody noob at this and my first few trys all went straight to the trashcan. I thought i'd start with the gauntlets. Since i have no expreience at all, i thought a simple gauntlet can't be that hard.
First i started with the Gauntlet from RainbowDash's thread and soon noticed that my buildingskills weren't up to it. I tried to make it a bit simpler by putting a few smaller pieces together and drawing around them to get one bigger piece, but that resulted in a horribly disfigured gaunlet
img_2132hsjjr.jpg

img_21333wjfb.jpg

img_213436jzd.jpg

Since that wasn't working out as expected, i resigned on that and searched a bit more. So i stumbled across gauntlets from Rhinoc, which seemed pretty easy to build, since there weren't so many small details.
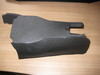
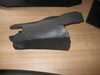
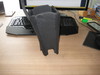
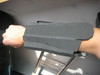
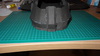
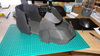
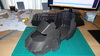
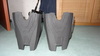
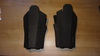
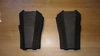
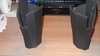
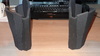
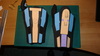
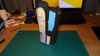
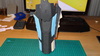
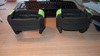
I build them like 3 times, until they were pleasing to look at with small amounts of glue overflowing. What didn't take into account was the fact, that i made them to small. So trashcan it is again. Today i had some sparetime between learning for my exams so i thought, why not try it again. I edited the size to what i thought was more fitting. Added 4cm to the model and started building again. I'm now pretty pleased with the results of this, except for the fact, that it's still to small for my hand to come through the front. I cut it open to see, if it at least had some more space in length, so i can edit the size a bit more, without inhibiting my armmovement.

Any tips from you experienced Foambuilders out there, will be greatly apreciated.


img_2128disc3.jpg

img_21292hsjl.jpg

img_2131xxse3.jpg

The line in the middle of the centerpiece below is the cut i made to get my hand through the opening

img_2127d9sia.jpg


Attachments

  • img_2132hsjjr.jpg
    img_2132hsjjr.jpg
    119.9 KB · Views: 181
  • img_21333wjfb.jpg
    img_21333wjfb.jpg
    103.4 KB · Views: 179
  • img_213436jzd.jpg
    img_213436jzd.jpg
    99.5 KB · Views: 169
  • img_2128disc3.jpg
    img_2128disc3.jpg
    107.9 KB · Views: 155
  • img_21292hsjl.jpg
    img_21292hsjl.jpg
    105.4 KB · Views: 170
  • img_2131xxse3.jpg
    img_2131xxse3.jpg
    101.8 KB · Views: 170
  • img_2127d9sia.jpg
    img_2127d9sia.jpg
    101.6 KB · Views: 156
Hey there,
I had some spare time again and decided to start working on the boots first.

I definitely have to work on those seams. Most of you guys get totally flat seams, whereas mine are huge holes. I hope i can fix that up with some spatula, once i'm on that stage of the build.
Here are some pics of the nearly finished boots. They still need the bigger flap across the top and fastex-buckles to close them properly.
dsc01536irsdw.jpg


dsc01534spz94.jpg

dsc015355bj4b.jpg
 

Attachments

  • dsc01536irsdw.jpg
    dsc01536irsdw.jpg
    150.5 KB · Views: 168
  • dsc01534spz94.jpg
    dsc01534spz94.jpg
    160.1 KB · Views: 165
  • dsc015355bj4b.jpg
    dsc015355bj4b.jpg
    149.3 KB · Views: 162
We all start somewhere mate but looks really good mate! Keep up the good work. Look forward to more updates
 
Thanks, much apreciated.
Funny thing is, i've burned through half my foamsupply and haven't really accomplished a finished piece of armour.
At that pace, i'll run out of foam before i get to the thigh-pieces :D
 
If you're worried about running out of foam, practice techniques on smaller pieces. It should result in cleaner armour at the end of it.

But considering that it's your first time, it looks good.
 
If you're worried about running out of foam, practice techniques on smaller pieces. It should result in cleaner armour at the end of it.

But considering that it's your first time, it looks good.

Thanks for the tip.
I will practice doing angled cuts some more, before i start working on the second boot. Maybe i redo the first one too. I'm not quite happy with how it turned out.
I'm really glad this forum exists. There are so many threads to read through to get new ideas. It's overwhelming. I can't decide which way to go :lol
 
Hello there guys and girls,
i have a little update for you. I managed to build the thighpieces. Still have to do the detailing, but right now i'm lacking the 5mm foam for the small elipsoid thing on the right/left side of ech thigh.
I hope my foam arrives in the mail in the next week.
Now enjoy the photos. And as always feel free to criticise. Always trying to improve my skills.

dsc01537atav5.jpg
dsc01538esbxh.jpg
dsc01539niyos.jpg
 

Attachments

  • dsc01537atav5.jpg
    dsc01537atav5.jpg
    108.4 KB · Views: 152
  • dsc01538esbxh.jpg
    dsc01538esbxh.jpg
    106.6 KB · Views: 177
  • dsc01539niyos.jpg
    dsc01539niyos.jpg
    101.2 KB · Views: 155
It looks incredible. It's even more incredible when you realize that thisis your firs time making something like this. Good job!
 
Those thigh pieces came out a lot cleaner and with tighter seams, nice job!! I'm sure you'll get better and better with each piece :D. If you don't mind me asking what you use to cut the pieces with?
 
Looking very nice. I think those thigh plates are beautiful. Foam can be tricky at times, but it looks like you're getting the hang of it. Keep it up, i expect you to become a spartan!

On a side note what are you using to cut the foam?
 
Thanks you guys for the kind words! That means a lot and keeps me motivated.

I'm using normal scalpel-blades to cut the foam. For each step at least one blade per thigh/shin/gauntlet/...

Most difficult for me is cutting the edges at an angle. Always cutting into the smooth front of my EVA-pieces. Had to use at least 3m^2 for those thighs due to ruined edges.
 
Hello ladies and gentlemen,
a small update to my armour. I've finished the base for my gauntlets. At least they fit now and don't look as terrible, as my first tries.

dsc01543cqq26.jpg

dsc01544snohy.jpg

dsc015450nqv9.jpg

dsc01546ldrc0.jpg

I hope after the detailing-phase i can clean those seams up by filling them up with spackel or something like that. Or i could put 1mm foam on top of the base and only then commence on the detailing.
Not quite sure as of now, how i will do this.
 

Attachments

  • dsc01543cqq26.jpg
    dsc01543cqq26.jpg
    95.3 KB · Views: 202
  • dsc01544snohy.jpg
    dsc01544snohy.jpg
    103.7 KB · Views: 167
  • dsc015450nqv9.jpg
    dsc015450nqv9.jpg
    118.2 KB · Views: 170
  • dsc01546ldrc0.jpg
    dsc01546ldrc0.jpg
    121.4 KB · Views: 171
Hey guys and girls,
i've decided to go with detailing the gauntlets and tidy up the seams later on.
Sadly i've noticed that i've put the left gauntlet together in the wrong way. The two angeled pieces from the top part are wrong. I glued the angled pieces from the other side on the top.....
Well I've decided to roll with it and detail the ****** out of them as an excercise in working with 1mm craftfoam. If you don't know it's wrong, you wouldn't see it anyway. Still it bugs me. Maybe i have to redo them again with some minor changes, i've noticed would be more game accurate.
Enough with the words, enjoy the pics.

dsc01548bslcr.jpg

dsc01549yvlnj.jpg

dsc01551xcb0t.jpg
 

Attachments

  • dsc01548bslcr.jpg
    dsc01548bslcr.jpg
    110 KB · Views: 166
  • dsc01549yvlnj.jpg
    dsc01549yvlnj.jpg
    130.4 KB · Views: 157
  • dsc01551xcb0t.jpg
    dsc01551xcb0t.jpg
    128.2 KB · Views: 166
Updatetime:
I finished the bicepspieces today.
Quite a hassle to bend the outer part around the middle but i'm pretty satisfied with the result.

dsc0155251ang.jpg

dsc01553q6ytd.jpg
 

Attachments

  • dsc0155251ang.jpg
    dsc0155251ang.jpg
    98.1 KB · Views: 201
  • dsc01553q6ytd.jpg
    dsc01553q6ytd.jpg
    109.5 KB · Views: 152
Hey guys and girls,
i've decided to go with detailing the gauntlets and tidy up the seams later on.
Sadly i've noticed that i've put the left gauntlet together in the wrong way. The two angeled pieces from the top part are wrong. I glued the angled pieces from the other side on the top.....
Well I've decided to roll with it and detail the ****** out of them as an excercise in working with 1mm craftfoam. If you don't know it's wrong, you wouldn't see it anyway. Still it bugs me. Maybe i have to redo them again with some minor changes, i've noticed would be more game accurate.
Enough with the words, enjoy the pics.

[url]http://abload.de/img/dsc01548bslcr.jpg[/URL]

[url]http://abload.de/img/dsc01549yvlnj.jpg[/URL]

[url]http://abload.de/img/dsc01551xcb0t.jpg[/URL]

Those look great and your seams are fine. Much better than my attempt. Where did you find Rhinocs basic gauntlet files at? I can only find his HD gauntlets
 
Status
Not open for further replies.
Back
Top