01) WIP: Home Made Foam Halo 3 SRS99D-S2 AM Sniper Rifle

Status
Not open for further replies.
Hey Guys! I have no idea how these threads work but hopefully I can manage. Anyway, Here I will post my steps/ progress towards my very own prop sniper.
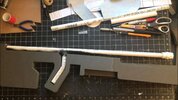
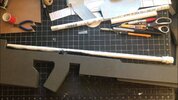
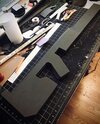
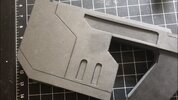
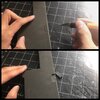
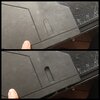
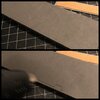
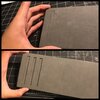
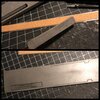
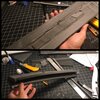
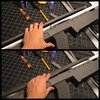
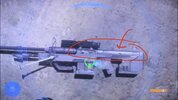
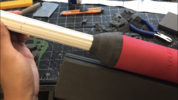
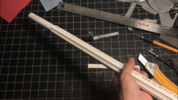
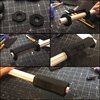
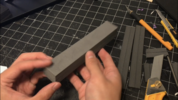
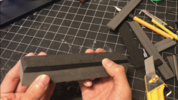
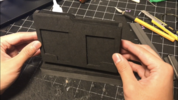
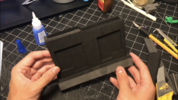
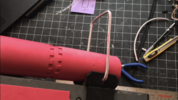
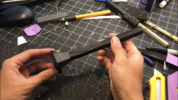
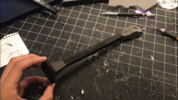
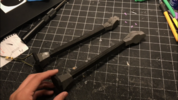
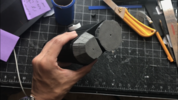
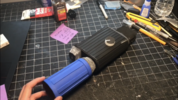
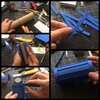
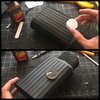
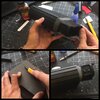
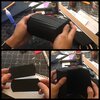
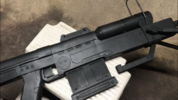
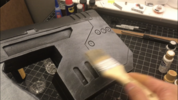
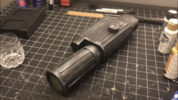
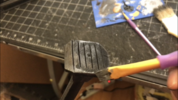
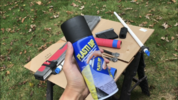
I studied the rifle in forge mode and made sketches/designs in my sketchbook. The "base" rifle is just 2 pvc pipes and 3 layers of 1/2" eva foam. This is the structure, a PVC Sandwich!
 

Attachments

  • 1.jpg
    1.jpg
    87.6 KB · Views: 206
  • 2.jpg
    2.jpg
    105.1 KB · Views: 200
  • 3.jpg
    3.jpg
    103.4 KB · Views: 203
  • 4.jpg
    4.jpg
    25.9 KB · Views: 216
Adding details is a great way to give your projects more life and realism! Here I implement (2) simple yet highly effective techniques: scoring+heating and recessing. Lightly graze the surface of eva foam with a sharp blade and apply heat with a heat gun. This will cause the opening to expand and create nice detail lines. Recessing is cutting out a shape and pushing it passed flush, this will create a nice recessed surface that fits perfectly. Take care everyone!
 

Attachments

  • 0E58B20A-7C07-414C-BCAA-6950104FBC85.jpeg
    0E58B20A-7C07-414C-BCAA-6950104FBC85.jpeg
    222.7 KB · Views: 205
  • ED116732-B436-4135-B19C-E02072EBA845.jpeg
    ED116732-B436-4135-B19C-E02072EBA845.jpeg
    312.8 KB · Views: 204
  • 156F16A7-535D-4B00-BCE6-8769DD8B9FE4.jpeg
    156F16A7-535D-4B00-BCE6-8769DD8B9FE4.jpeg
    321.3 KB · Views: 193
“Curved Top Part”
This Part was a bit tricky because I wanted the curve to look as smooth as possible. My solution was to make a long thin rectangular shape that would wrap around the pvc pipe in a “C” shape. By wrapping it around the pipe, it would give me a nice structure so the foam can follow the shape. Think of it similar to pipe insulation for plumbing. I cut in details to the shape, and used a heat gun to bend it to shape. This is a bit tricky so to help I cut out channels on the interior side to make bending much easier. I then glued it in place. It isn’t perfect but I like the curve and that was my goal!
 

Attachments

  • A1BCC049-2D33-42DA-AD71-2F38D2B70DE9.jpeg
    A1BCC049-2D33-42DA-AD71-2F38D2B70DE9.jpeg
    272.2 KB · Views: 204
  • BD7EDF70-EB7F-491C-BF8E-EB4736EDD73D.jpeg
    BD7EDF70-EB7F-491C-BF8E-EB4736EDD73D.jpeg
    298.7 KB · Views: 185
  • 6596D629-C16A-4AC7-BE9A-78963B3EF976.jpeg
    6596D629-C16A-4AC7-BE9A-78963B3EF976.jpeg
    350.6 KB · Views: 204
  • 2DB90A32-C929-4D3C-ACC6-3B8A091B4214.jpeg
    2DB90A32-C929-4D3C-ACC6-3B8A091B4214.jpeg
    358.2 KB · Views: 184
  • 50C7CD35-6D67-41A9-A8FA-04D68BA73E5B.jpeg
    50C7CD35-6D67-41A9-A8FA-04D68BA73E5B.jpeg
    347.8 KB · Views: 197
  • 9DA46992-07EA-4C31-B3D8-BFC80B2E8F8D.jpeg
    9DA46992-07EA-4C31-B3D8-BFC80B2E8F8D.jpeg
    203 KB · Views: 186
Barrels and Cone Carving?!

-The front barrel of the rifle Is a pvc pipe. I added thin strips of eva foam to try to emulate fluting

-The barrel also has a cylindrical cone shape. To make these, I make a block of eva foam and carve away at an angle to create a rough shape. I have (2) circles drawn on the top and bottom to denote the faces of the final shape. I then sand it with a rotary tool to smooth it out. It’s sort of like sculpting but with foam.
-I also used an old wrapping paper roll and wrapped it with craft foam for the tube shape. This was just a simple cardboard/paper material but they are way more sturdy than the typical toilet paper rolls.
 

Attachments

  • 9A65CF9F-9E29-4185-ABB0-2C4A5358D903.png
    9A65CF9F-9E29-4185-ABB0-2C4A5358D903.png
    3.9 MB · Views: 178
  • D57E4FF4-9703-4190-AD53-EAA31E51F6AD.png
    D57E4FF4-9703-4190-AD53-EAA31E51F6AD.png
    3.6 MB · Views: 177
  • 843CB636-CC14-43CD-887E-E40120ED7451.jpeg
    843CB636-CC14-43CD-887E-E40120ED7451.jpeg
    273.1 KB · Views: 166
  • B778EADB-ED12-47AE-B36A-CE37266DCC9F.jpeg
    B778EADB-ED12-47AE-B36A-CE37266DCC9F.jpeg
    226.2 KB · Views: 162
Last edited:
Hand guard, Barrels, & Barrel Brakes

-The hand guard was made of (3) layers of crafts foam. The inner layer had an opening where I placed a broken chopstick. This will help anchor it to the body of the gun. It’s not an integrated structure like the hand grip, but I'm ok with that.

-The lower barrel was a simple pipe inserted through a circular cutout. I will later wrap it with craft foam for details

- The barrel brake (I know the shape is a bit off) is essentially an octagonal block. I made (2) octagons for the front/back and connected the edges with strips of craft foam. I then recessed faces for details. I add the top “sight” later on too as well as other details
 

Attachments

  • 6E89BF5C-B30D-4B38-AF47-93F5C5FCF9AE.jpeg
    6E89BF5C-B30D-4B38-AF47-93F5C5FCF9AE.jpeg
    354.4 KB · Views: 188
  • 7E388F94-FF11-41B8-ABA7-729C2C9F1150.jpeg
    7E388F94-FF11-41B8-ABA7-729C2C9F1150.jpeg
    256.4 KB · Views: 177
  • ECD7C543-E0CE-435C-89E8-5D1C7D9D4812.jpeg
    ECD7C543-E0CE-435C-89E8-5D1C7D9D4812.jpeg
    323.9 KB · Views: 167
  • B0ADE12F-A313-4894-80B5-75466321592F.jpeg
    B0ADE12F-A313-4894-80B5-75466321592F.jpeg
    355.2 KB · Views: 180
The Magazine

-The Magazine is just a box. I tried my best to make craft foam shapes that would recreate it.
-Construction wise, it looked like the magazine had 2 main parts, the upper and lower parts.
-I recessed some of the faces by cutting out the shapes and pushing them passed flush
-I add more details with my dremel later on
 

Attachments

  • 75AFD32A-0713-4471-91A9-69D9444D39CC.png
    75AFD32A-0713-4471-91A9-69D9444D39CC.png
    3.7 MB · Views: 160
  • EA6EF95D-0F74-46AE-ADF9-E48171B66A37.png
    EA6EF95D-0F74-46AE-ADF9-E48171B66A37.png
    4 MB · Views: 163
  • F6982B53-6FF1-4403-B29C-4AAEE15FFB11.png
    F6982B53-6FF1-4403-B29C-4AAEE15FFB11.png
    3.7 MB · Views: 153
  • 8C3A962F-39E5-4CC0-B328-37BD22F66628.png
    8C3A962F-39E5-4CC0-B328-37BD22F66628.png
    3.6 MB · Views: 163
  • 5F4CC393-30E1-44C2-9104-98E905C3EF98.png
    5F4CC393-30E1-44C2-9104-98E905C3EF98.png
    3.8 MB · Views: 164
The Carrying Handle- Super DIY!

*The carrying handle is just a bent pipe. If possible, I advise you find a 1/4” or 3/16” aluminum rod and bending that. But, here is what I did:

-Find a metal coat hanger
-Bend and cut to a “U” shape
-The coat hanger is too thin so I beefed it up by repurposing an Ethernet cable wire. I removed the internal wires and used that housing
 

Attachments

  • 812FBAB6-85F2-4C24-BAE7-66BC43319F07.png
    812FBAB6-85F2-4C24-BAE7-66BC43319F07.png
    3.6 MB · Views: 185
  • 7599A13D-68CC-4C24-8889-B15C21A8A361.png
    7599A13D-68CC-4C24-8889-B15C21A8A361.png
    3.7 MB · Views: 161
  • 672A493D-B2C9-4E3D-8E09-674F4AAF5B4F.png
    672A493D-B2C9-4E3D-8E09-674F4AAF5B4F.png
    3.8 MB · Views: 172
  • 1E79DB0F-6097-4777-996F-CA702D1EE2AC.png
    1E79DB0F-6097-4777-996F-CA702D1EE2AC.png
    4 MB · Views: 145
  • 901E6037-55C0-49A6-B86B-0AAAF0C1CD5A.png
    901E6037-55C0-49A6-B86B-0AAAF0C1CD5A.png
    3.9 MB · Views: 161
  • CD34C217-4873-49F5-8562-CE7B8CEB8E14.png
    CD34C217-4873-49F5-8562-CE7B8CEB8E14.png
    4 MB · Views: 158
  • 83B897AA-3CA6-4A0E-81F1-77F158DFBB52.png
    83B897AA-3CA6-4A0E-81F1-77F158DFBB52.png
    3.3 MB · Views: 155
He did the thing!!!! Good stuff Victor. I swear you just can ever throw metal hangers out.
 
Ye ‘Ol Bipod

*This was surprisingly more complex than I thought! As always, I just look at my reference photos and try to make the corresponding pieces

I can break down the bipod into (3) main sections: the foot, the stem, the head.

-the stem is the coat hanger wire sandwiched between 2 layers of craft foam. This part will be glued at a slight angle to the “head” to give that anglebipod mount look

-the foot is a flat top pyramid. Again, I layer eva foams and carve away at the sides to make the shape. I glue another layer to the bottom of the foot too complete it.

-The head is hard to describe. It looks like a wing-nut in profile. It’s a circle with angled sides. I stack 2 foam layers and carve away.
*i will add smaller details in the end

(repeat this twice to make a pair!)
 

Attachments

  • 941EBA4E-6CDE-40C4-A3AC-B5F0182765BE.png
    941EBA4E-6CDE-40C4-A3AC-B5F0182765BE.png
    4 MB · Views: 159
  • 20D9B9CE-2121-4042-ADB8-4FEBD187A6AC.png
    20D9B9CE-2121-4042-ADB8-4FEBD187A6AC.png
    4.2 MB · Views: 164
  • 3A6EF4B9-4E5B-45C4-AAD3-AC6E21E301B1.png
    3A6EF4B9-4E5B-45C4-AAD3-AC6E21E301B1.png
    3.7 MB · Views: 164
  • 8C1D2D84-1675-431F-A7BC-A29A392F0CAA.png
    8C1D2D84-1675-431F-A7BC-A29A392F0CAA.png
    3.9 MB · Views: 167
  • 64DA47AC-FC63-443E-9044-0F40423D4A78.jpeg
    64DA47AC-FC63-443E-9044-0F40423D4A78.jpeg
    242.5 KB · Views: 152
  • 2F5AC711-B743-4682-A06F-7AF922BC0D53.jpeg
    2F5AC711-B743-4682-A06F-7AF922BC0D53.jpeg
    172.1 KB · Views: 161
The Scope
*I break down the build into 3 main segments: the front, middle, and back.

-the front is the cardboard tube, wrapped with craft foam + thin strips

-the middle is a rounded box. This was made by wrapping 2 ellipse shapes With a large rectangle

- the back is sort of a combination of the front and middle. It’s an extruded/rounded ellipse

-I scavenged my own Xbox game case for the green display

-one bottle cap was recycled for the top knob

-I sculpted other portions with the stack/layer techniques from before as well

*I also make the mount that attaches the scope to the rifle body
 

Attachments

  • E7388CE5-0C0E-43C8-846A-EEE146C927CF.png
    E7388CE5-0C0E-43C8-846A-EEE146C927CF.png
    3.4 MB · Views: 156
  • A4CDA916-9917-4D9A-BF05-BC00BF80B5C4.png
    A4CDA916-9917-4D9A-BF05-BC00BF80B5C4.png
    4.1 MB · Views: 158
  • 66E10769-4041-490B-B63D-28DCB4D5B631.jpeg
    66E10769-4041-490B-B63D-28DCB4D5B631.jpeg
    268.1 KB · Views: 144
  • 4CD66838-C814-45C7-943B-522225D220F9.jpeg
    4CD66838-C814-45C7-943B-522225D220F9.jpeg
    317.8 KB · Views: 146
  • F6A46F67-4540-4F44-B6A3-8E97A9EFDA17.jpeg
    F6A46F67-4540-4F44-B6A3-8E97A9EFDA17.jpeg
    337.5 KB · Views: 156
  • 4D89EC71-E07F-430F-A021-D2D751615550.jpeg
    4D89EC71-E07F-430F-A021-D2D751615550.jpeg
    284.8 KB · Views: 143
  • 2B6B3166-7984-4D5A-894F-C6FD1292C0D8.jpeg
    2B6B3166-7984-4D5A-894F-C6FD1292C0D8.jpeg
    291.5 KB · Views: 157
  • 6D895C87-2811-4F4F-A383-DE1DCADB15EF.jpeg
    6D895C87-2811-4F4F-A383-DE1DCADB15EF.jpeg
    292.2 KB · Views: 131
Painting & Priming- Crash Course

-Heat seal all eva foam props with a heat gun prior to sealing

-Seal the foam. I like to use black Plastidip spray. White glue such as Elmers glue could also work but I like the rubber flexibility of Plastidip (This acts as my primer). Use 2-3 layers for full coverage

- Use acrylic paint and brushes to create your own paint job. I’m keeping it to a battle damaged UNSC and use black and silver paints

Thats it!
 

Attachments

  • 70E032DD-DF9C-4ABB-9156-2BBEEF5763DF.png
    70E032DD-DF9C-4ABB-9156-2BBEEF5763DF.png
    3.8 MB · Views: 146
  • 697F0372-762E-446D-841E-4B7518F56F14.png
    697F0372-762E-446D-841E-4B7518F56F14.png
    3.5 MB · Views: 149
  • E20F1910-5BBA-496D-99F8-38F3C94BF74E.png
    E20F1910-5BBA-496D-99F8-38F3C94BF74E.png
    3.7 MB · Views: 135
  • 67F4F8C4-400A-469E-A074-0512000651B1.png
    67F4F8C4-400A-469E-A074-0512000651B1.png
    3.8 MB · Views: 148
  • A61A8E3C-0C43-4E0B-BF02-ECD66732330C.png
    A61A8E3C-0C43-4E0B-BF02-ECD66732330C.png
    3.7 MB · Views: 136
  • F48A864A-2612-49CD-8D70-6A0DAC3E63DB.png
    F48A864A-2612-49CD-8D70-6A0DAC3E63DB.png
    5 MB · Views: 145
Very good break down Victor. Will most definitely help other members looking into doing the same prop.
 
The Final Results

Here is the link to my YouTube tutorial on this sniper rifle:


As always, there are countless ways and methods as to how you can create. Experiment, find something you enjoy, and gradually step it up!
 

Attachments

  • a.jpg
    a.jpg
    8.7 MB · Views: 146
  • _DSC4192.JPG
    _DSC4192.JPG
    3 MB · Views: 139
  • _DSC4138.JPG
    _DSC4138.JPG
    9.5 MB · Views: 142
  • _DSC4124.JPG
    _DSC4124.JPG
    5.6 MB · Views: 135
Status
Not open for further replies.
Back
Top