Once all the remaining pieces are printed I will start working on a tutorial. I might even just make a YouTube video to save me the trouble of having to do a picture and caption play by play. As goofy as it sounds it’s actually an extremely long and complex process, but I truly think you get the most realistic effect of battle worn armor.Yes looks amazing. Still anxiously awaiting that tutorial")
You are using an out of date browser. It may not display this or other websites correctly.
You should upgrade or use an alternative browser.
You should upgrade or use an alternative browser.
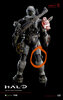
3D print Halo Reach build. *complete*
- Thread starter DefineLuck
- Start date
- Status
- Not open for further replies.
Everything looks great so far good job. How much do you have left to do?
Your armor looks perfect dude! Its so nicely weathered!
- Member DIN
- S118
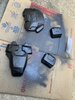
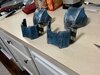
those are very clean nice job on the hand plates....After a long 14 hour night shift, I got home and couldn’t resist to start pulling some casts from the V1 of the Reach Handplates. Very minimal clean up.
All of the remaining pieces to complete the suit are printed. Now it’s just going to be the endless cycle of gluing, sanding and fillingEverything looks great so far good job. How much do you have left to do?
Thank you, I’ll be making a video on my processYour armor looks perfect dude! Its so nicely weathered!
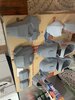
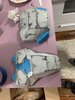
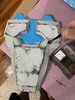
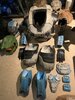
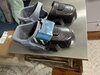
Just a small update. I decided to coat all of my remaining pieces in XTC 3D. None of these pieces have any Intricate detail that could be lost in the layer of epoxy, but this will make the sanding process a heck of a lot easier. Once dried I will use filler primer to see what I’m working with, then you all know the drill- SAND. I’ve already hardened and supported some of the backside of these pieces in smoothcast 65D. Once I’m happy with all of these pieces I will begin to paint and assemble. Finally this suit will be complete
Attachments
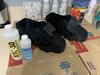

After just one coat of the XTC, and one coat of filler primer you can really see how the bulk of the print lines are removed. This will make the process of spot putty and sanding much easier. Just wanted to show you guys a pic
Attachments
- Member DIN
- S240
Agreed, I’ve got a little back log of parts that need the same treatment.
Yours is so close tho. You must see the light at the end of the tunnel .
Yours is so close tho. You must see the light at the end of the tunnel .
A very huge part of me wants to mold and cast these pieces because I’ve always preferred wearing a clean piece of resin that doesn’t have all the layers of rondo/bonds/putty and epoxy all over it Haha but I’m in the process of moving and I just don’t have the access to all my tools so I’m just going to start painting these Things probably this week just to call this suit FINISHEDAgreed, I’ve got a little back log of parts that need the same treatment.
Yours is so close tho. You must see the light at the end of the tunnel .
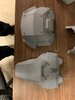
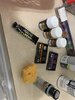
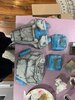
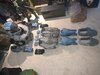
Ok so I’ve made some progress today, a good amount. I was able to completely finish the process of painting and weathering the front, back and side pouches of the COD piece. I’ve attached some pictures of the process along with materials but will go in depth in a later thread on how i bring it to life. This is extreme weathering made to look like the spartan has been in battle. This type of weathering is not for everyone so please keep in mind I am going for realism here.
Attachments
-
 A2C84D7D-E4EF-4FBB-B205-75741B3C4385.jpeg2.4 MB · Views: 356
 -
 EAD8E116-A59C-4735-9CF5-F522D7B98397.jpeg1.4 MB · Views: 365
 -
 7A1488A1-DDA6-4493-B478-972470E18EFC.jpeg988.3 KB · Views: 334
 -
 75E769AE-983D-44B2-A6DB-A816C286F446.jpeg1.5 MB · Views: 347
 -
 E2ED819E-4537-4F9E-8D50-597E98FFD1D6.jpeg2 MB · Views: 346
 -
 D6122CB1-8696-4137-A7F7-CAAC8F6EF8FE.jpeg1.2 MB · Views: 352
 -
 B4445F99-35CB-4F24-983E-E4B67D755217.jpeg1.8 MB · Views: 316
 -
 1D88B53A-294F-4382-92C5-2F45B03F6FDF.jpeg2.1 MB · Views: 362
 -
 28940BF1-FEEB-440E-AF07-7D5B408CC736.jpeg1.9 MB · Views: 315
 -
 7DEE263B-EEF4-4946-887B-F33CC1CECF9C.jpeg3.5 MB · Views: 337
- Member DIN
- S829
DefineLuck - your weathering is sooo good. I love it
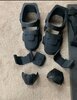
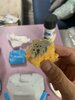
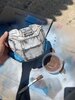
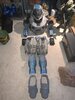
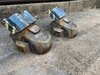
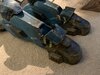
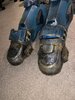
I have been anxiously waiting to weather the feet. Like I’ve stated before, I wanted this paint job to resemble a spartan actually involved in battle. If you look at the weathering on the costumes from the TV shorts like Halo reaches deliver hope. The armor is filthy. I’ve used a mixture of motor oil, brushed aluminum, sandy, mud and crud pigments on these boots to give it that authentic look. Here are the results once Carefully layered over one another
Attachments
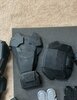
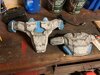
Well, the reach suit is officially done. I was able to epoxy the cod piece together at work today. I’ll have to do some finishing touches with paint and weathering but not much. I’ll snap a pic of all the parts when I get off.
Attachments
- Status
- Not open for further replies.
Similar threads
- Replies
- 2
- Views
- 1,425
- Replies
- 2
- Views
- 216