3D printed HW MK IV helmet

Status
Not open for further replies.

noobbuilder

New Member
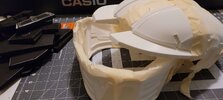
Hello all, I'm in the middle of trying to piece this helmet together. Unfortunately for me, I skimped out on speed over quality and now It's reasonably a bit roughed up, mainly on the inside at corners and tiny nooks and crannies, also where the 3D printed brim/skirt used to be. Towards the back of the top (so sorry for all the tape) there's a very apparent gap that came to exist after I carelessly processed it through Meshmixer; which I know I'll have to seal up or fill in, I've chosen to deal with it later.

Unfortunately I've come to a sort of standstill because I'm not exactly sure how to connect the individual pieces together?
I've seen some people suggest using super glue, but I feel like that's too weak, and I want to avoid using contact cement as it seems like overkill and is insanely toxic. Any advice?

TLDR; worried about structure and post-adhesion of the print.
 

Attachments

  • 20220905_041256.jpeg
    20220905_041256.jpeg
    296.2 KB · Views: 121
For my helmets, I usually just super glue the parts together, then plastic weld them together on the inside. I would recommend being careful and patient with the super glue, and being patient and generous with the plastic welding. If you still feel worried about the overall structural integrity, you could could put a layer or two of resin on the inside. I used this process for my Halo Infinite Cavallino helmet build.
Hope that helps.
Thanks for that. How do you go about fixing cracks, gaps, and whatever else in the printed object itself? In my case, the top back of the helmet has this weird gap in a small portion of both sides that makes it so the print cannot make any contact. The rest will glue, it's just that there'll be an awkward hole there. I figure it's worth salvaging as the rest of the print is fine.
 
Thanks for that. How do you go about fixing cracks, gaps, and whatever else in the printed object itself? In my case, the top back of the helmet has this weird gap in a small portion of both sides that makes it so the print cannot make any contact. The rest will glue, it's just that there'll be an awkward hole there. I figure it's worth salvaging as the rest of the print is fine.
That's a great question. For larger cracks and gaps I would use Bondo body filler. I would glue like a popsicle stick on the inside (or a piece of plastic or something) just to give the filler some support. then let that dry for a day or so, sand it down a bit, then come back over it with Bondo spot putty. You can use the spot putty to fill in small gaps, cracks, print lines, etc. You'll just need to sand over it to your desired smoothness. And you'll need to wear a mask when applying or sanding the Bondo, because its pretty toxic.

I've had to deal with a lot of gaps and print lines in my prints, but this method covers it up pretty well, it just takes some elbow grease.
 
Super glue and print welding has done the trick for assembling all my parts so far. If you're still worried about structure you can use 2 part epoxy to assemble it together.
(Print welding guide here)

You can also add resin to the outside and inside to help fill in some inperfections before going back with bondo or another filler.
 
I may be a little late to help on this, but looks like the rest of the community has got you covered. Super glue is good for the initial bond and it is weak enough if you mess up you can still separate it to try again and save your print if you're fast enough. For additional support I used a sandable epoxy that jb weld makes on the inside of all my seams. It's also a 2 part epoxy that comes in a syringe so its really easy to mix. As for print lines I recommend using bondo's spot putty. It comes in a metal toothpaste tube and it's only 1 part so no mixing needed. Apply a thin coat and sand to hide the lines, also if there are any spots or small holes in it after painting just remember you're making armor and most people distress it in some way shape or form anyway. My point is that as metal wears it starts to have pits and scuffs so its less wearing that you have to do at the end of your project. Any other print issues you have can be made into a feature if you're creative enough and it adds more depth and uniqueness to your final build if you embrace some of them. Sorry I got a little off track there, Next I use a sandable fillable primer that you can get at some automotive and hardware stores. Wait for it to dry and sand it then you will be all ready for paint. To get a super smooth final sand I end up wet sanding with 2000 grit sand paper and the part comes out glass smooth. If you mess up really bad at any point don't forget to save some off your messed up parts to use for testing and practicing new techniques and materials. I think that about wraps up finishing work. Sorry for the long post I just get excited to see people wanting to make props and cosplays with their own two hands instead of buying them, so I hope you don't let issues and missteps get you downtrodden. I can't wait to see your journey to your final product!
 
Status
Not open for further replies.
Back
Top