3D printed mkVI build (Citruspers)

I'll still need to do some cutouts for the legs (they should be able to swing open and closed) and fasteners, the little "spike" at the bottom and perhaps some additional detail...if I can figure out how.

...but I'm pretty pleased with how it looks so far :D

bubble shield opened with legs.png


edit: some magnets to hold the legs together will probably make carrying a bit easier.
 
Last edited:
This is looking great. Bubble shield was always one of my favorite deployables in halo 3

Hands down one if the best builds I've seen so far. I love the design and electrical work your doing. I can't wait to see it finished!

Thanks guys, I really appreciate your kind words :)

Here's the finished design. It's dimensionally and visually as similar as I could make it to the in-game Halo 3 model. The legs can fold in and out for slightly more compact carrying.

bubble shield render complete.png


---

I was able to do some priming recently, and both printers are currently working on the bubble shield parts, so hopefully I have some more substantial updates soon.

In the mean time, here's a little fitment test for the mechanical parts of the bubble shield. Swivel legs on the left, screwed-in threads on the right.

bubble shield fitment test.png


This thing is going to be massive... :lol:
 
Last edited:
I love it more and more :love:

was thinking. is it possible (feasible) to print a white inside and a black (cage) outside so that one could put a light in there :cool:
 
I love it more and more :love:

was thinking. is it possible (feasible) to print a white inside and a black (cage) outside so that one could put a light in there :cool:

Probably, yeah!

I did actually consider making the "windows" open, and then adding an insert that could be printed in transparent/translucent filament, but honestly I was already quite deep into "I have no idea what I'm doing" territory trying to design this model. So I think I'll leave it like this for now, and just paint the "windows" a nice bright amber or something.
 
Managed to get a bit more painting done :)
BR top layers.png


I also used some contact cement to stick some pieces together, seems to hold up well enough:

forearm and glove.png


The hand bit could do with a bit more weathering, it's just a tad too light. But that's for another time.

The bubble shield looks pretty cool in its base silver coat. Could've done a better job sanding but....I keep trying to remind myself of the 1.5 meter rule ;)


bubble shield silver.png
 
Thanks for the idea MicaHusky . I already have some "tactical" buckles that I'm going to try first, but the latches seem like a solid option.

Meanwhile, I've made some progress with the battle rifle. I think I got it pretty close to the Infinite 'Breacher' variant, with some small additional accents to make it extra obvious this is not a real weapon.

BR breacher paint.png


Next up: adding some wear and tear, dirt and grime, then sealing the whole thing with matte varnish :)
 
The bubble shield looks pretty cool in its base silver coat. Could've done a better job sanding but....I keep trying to remind myself of the 1.5 meter rule ;)
Love the bubble shield model! I'd love to print out some Halo equipment! Care to explain what the 1.5 meter rule is? I'm still pretty new and I'd love to know!
 
Love the bubble shield model! I'd love to print out some Halo equipment! Care to explain what the 1.5 meter rule is? I'm still pretty new and I'd love to know!
Hey, thanks! I believe the 1.5 meter rule is that people mostly view your stuff from 1.5 meters away. So when I find myself fussing over small details, I try to remind myself that most people will not be able to see any imperfections from a normal distance. :)
 
Hey, thanks! I believe the 1.5 meter rule is that people mostly view your stuff from 1.5 meters away. So when I find myself fussing over small details, I try to remind myself that most people will not be able to see any imperfections from a normal distance. :)
Huh, I never thought of it like that! As someone who is currently sanding I will be sure to keep that in mind when judging my work! Thanks!!
 
Update: if anyone doesn't want to scroll all the way to the end, here's a little update how things are going:

View attachment 324544View attachment 343342
View attachment 342692View attachment 342693

-----

Hi everyone,

I'm Citruspers from The Netherlands, 31 years old and been a Halo fan for a long time (I'm no stranger to hauling CRT TV's for a system link LAN party, lol). I've obviously played the games and have read most of the books. Favourite game is a toss-up between Halo 3 (finale) and Reach (storytelling/presentation), favourite books are probably the Karen Traviss series.

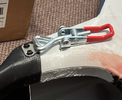
I've been dabbling with making a Mjolnir costume for years now, starting out years ago with a paper/pepakura model and a massive amount of filler putty. After that, the project had been on ice for a few years until the Halo TV show came around. Disregarding the flaws, their depiction of spartan armor got the itch going again and I found myself low-key 3D printing some parts of Moe Sizzlac's mkVI armor set.

Then Castlefest came around again (finally!) where I walked around in my first (and last-minute) Skyrim cosplay and the reactions I got really motivated me to pursue my Mjolnir armor further.

So that's where I'm at now, my printer (a Voron 2.4 300mm) is busy cranking out more parts as I type this. I'll update this post to become a proper build log, but for now I'm excited to join the community, have a chat and share experiences. :)

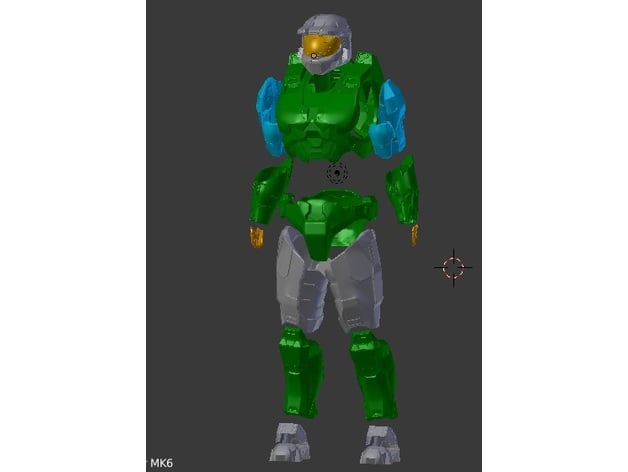
Links to files used:

That battle rifle is HOT! Did you link the print on that one?
 
Thank you! I tried to do the keying method for lining up the joints and it didn't work to well for me, so I ended up just sanding them off and using super glue and doing it by hand. As for finishing, I sanded my parts down some first a bit, not enough to break through the skin and details, but enough to lower the lines down a bit. Next I'll superglue the components together and back the seams with a plastic epoxy. It typically dries to touch in 30 minutes. After that dries I will use bondo spot and glazing putty, it's a one part putty that air dries within about 10 minutes and sands like powder. Sand it using a medium grit sandpaper (240ish grit) down until it where you like it leaving a few pits here and there for weathering detail. Then, I'll rinse it off and let it dry. Next I paint it with a sandable fillable primer. Spray like 2 or 3 coats on it and let it dry. Next I'll wet sand it with 800 then 2000 grit sand paper and its ready for final paint. I use a respirator when applying and sanding the spot putty because its just as nasty as regular bondo.

I'm glad to hear you don't have to reprint your parts. I 100% recommend backing your seams with some epoxy. None of my parts failed or broke on my seamlines. They only stress fractured on the prints structure.
What does “backing seams with epoxy” mean? Including it between the parts when gluing? Or filling seams with it? Thank you!!!
 
Last edited:
What does “backing seams with epoxy” mean? Including it between the parts when gluing? Or filling seams with it? Thank you!!!
Once you've tacked the 3D printed parts in place with Super Glue, or whatever your favorite way to attach 3D printed parts together is, you make a broad backing, about 1/4 to 1/2 inch from the seam in both directions, using a stronger adhesive or plastic, like epoxy and/or fiberglass, to reinforce the seam. Typically 3d printed parts that are held together with only CA or Super glue tend to shatter apart like Legos if dropped, this helps to prevent that.
 
Once you've tacked the 3D printed parts in place with Super Glue, or whatever your favorite way to attach 3D printed parts together is, you make a broad backing, about 1/4 to 1/2 inch from the seam in both directions, using a stronger adhesive or plastic, like epoxy and/or fiberglass, to reinforce the seam. Typically 3d printed parts that are held together with only CA or Super glue tend to shatter apart like Legos if dropped, this helps to prevent that.
Amazing bookmarking this thank you!!
 
Once you've tacked the 3D printed parts in place with Super Glue, or whatever your favorite way to attach 3D printed parts together is, you make a broad backing, about 1/4 to 1/2 inch from the seam in both directions, using a stronger adhesive or plastic, like epoxy and/or fiberglass, to reinforce the seam. Typically 3d printed parts that are held together with only CA or Super glue tend to shatter apart like Legos if dropped, this helps to prevent that.

Can confirm, before reinforcing my back armor fell of the chair while painting and it shattered back into a couple pieces. You just need more surface area to get a good bond. Ideally with some reinforcement to prevent shearing.

I can't recommend fiberglass though, at least not the loose sheets I bought. They came apart when I was applying the resin and turned into loose fibers/splinters. You do NOT want fiberglass splinters anywhere near you, and sanding them requires a LOT of PPE.

That's why I switched to bug netting/tulle fabric. Easy to cut into the right shape with scissors, tack it down with a dot of superglue and then cover with one or 2 layers of resin. Much safer and (hopefully!) strong enough.
1712081203818.png
 

Your message may be considered spam for the following reasons:

If you wish to reply despite these issues, check the box below before replying.
Be aware that malicious compliance may result in more severe penalties.
Back
Top