3D printer help

Status
Not open for further replies.
Degrees F. ? F? Your printer isn't really calibrated in F is it? I've never seen any that were. Are you sure you're not trying to print at 190°c ?
Because 190F probably wouldn't melt the PLA.

2nd:
Look at the gCode. Do you see the lines for it turning off the heating? Just delete them. gCode is just a text file. My favorite editor is Notepad++

Also if its a "heating runaway" error that's a little different. If it doesn't heat the nozzle fast enough, there is a safety concern that the reading is wrong and you're in a runaway state that will burn it all up, so it shuts down. Is your parts cooling fan *ON* the nozzle instead of *just below* the nozzle on the extruded plastic? You will have a hard time maintaining temp if there is a constant cooling blow on it.

I assume you ahve a silicone sock on the heat block to help retain heat.

Also check the grub screw holding the heating cartridge in place. If the cartridge has a loose fit its not transferring heat well.
Yeah absolutely degrees C. Idk why it says F must have mistyped.
I do have my silicone sock on my extruder and during printing, the tempt remains stable, so it's not having trouble maintaining temp except during the autohome. I will check that fan level but I don't think that's the issue. And I checked all my screws to no avail. I guess I will have to look at the gcode. Boo! I hate reading code - makes my head hurt.
 
Hello again! A little money came in and I bought an upgraded mobo for my 3d printing baby. I went with a silent mainboard upgrade from creality V4.2.7. After getting it plugged in and everything secured I can say that I have begun the arduous process of troubleshooting! I am having 2 main issues. The first is that when heating above 192F I am getting a heating error E1 please restart kinda error. Last time I got this I had to replace the thermistor which was kind of a pain in the butt.
Which board are you using and what firmware? Is it an immediate thing, gets to 192* then throws error, or is it after a while? Did you try PID tuning the hotend, and was it successful?

The second issue is one that I haven't been able to find ANYTHING about online, and so I am asking here now. When I start a gcode, the machine goes and does an autohome thing with the BLtouch before moving to the first area to print. WHat is weird is that when it does the autohome, the temp turns off on the nozzel and the bed, and they both start cooling. Then, when the printing stage starts, they heat back up during the printing process so the first few border lines usually dont print because the extruder is cold (relatively speaking). I am worried about clogs, but so far it has always continued extruding once it returns to the set temp, and it has not affected any prints (as far as I can tell). Its more just weird, and I would like it to stay hot while autohoming. Anyone seen anything like this before? I lost 12 degrees last time during the autohome process!
Your slicer should have sections for custom G-code, probably got some funky default thing saved in yours right now. In Prusaslicer you would find that by switching to "Expert" view > Click "Printer Settings" tab > select "Custom G-Code" on the left. From here you can change your startup gcode however you need, mine personally is just home all, then lift the nozzle a few mm so it can heat up.

G28 ; home all axes
G1 Z5 F5000 ; lift nozzle

I'm not too familiar with Cura, maybe some one else can tell you where to find custom gcode in that slicer. I think Superslicer is based off Prusaslicer, so might be in the same place, but I don't know for sure.
 
Which board are you using and what firmware? Is it an immediate thing, gets to 192* then throws error, or is it after a while? Did you try PID tuning the hotend, and was it successful?


Your slicer should have sections for custom G-code, probably got some funky default thing saved in yours right now. In Prusaslicer you would find that by switching to "Expert" view > Click "Printer Settings" tab > select "Custom G-Code" on the left. From here you can change your startup gcode however you need, mine personally is just home all, then lift the nozzle a few mm so it can heat up.

G28 ; home all axes
G1 Z5 F5000 ; lift nozzle

I'm not too familiar with Cura, maybe some one else can tell you where to find custom gcode in that slicer. I think Superslicer is based off Prusaslicer, so might be in the same place, but I don't know for sure.
I am using this mobo https://www.amazon.com/gp/product/B0943TVGS9?ref=ppx_pt2_dt_b_prod_image
and I downloaded the most recent bltouch firmware from creality's website
"Ender-3Marlin2.0.6HW4.2.7BLTouchFilament bla bla bla"

I played around with my start gcode and added in a line that should (hopefully) make it wait after autohome until the extruder and the bed have reached the set heat. I can't check it until I get home tonight, but hopefully that will fix the problem. I don't know what PID tuning is, but I will do some googling. Odds are I haven't done that...

The temp error does not happen immediately. When I set the temp to 200 for example it heats up and gets to 192 ish then falls down a couple degrees and tries again and then after a while it just crashes and gives me the error.
 
Did a little searching around, sounds like this is a common issue for creality boards when parts get swapped. Here's a video on PID tuning. An explanation of PID tuning starts at 2 minutes, and the actual instructions start at 5 mins:

Gotta ask though, why did you get a Creality board, when something like the e3 mini is available for the same price? https://www.amazon.com/BIGTREETECH-...sr_1_10?keywords=skr+2&qid=1649090928&sr=8-10
OOh looking forward to watching that. and Yes that other board looks awesome. I chose the one I chose because I didn't know much about it and the ones I was choosing between this one had the best reviews. I'm mostly not confident enough to mix brands on this yet because I don't feel like I know what I'm doing well enough. I have had good experience (relatively speaking) with Creality support too and I'm worried they will write me off if I mix brands.
 
Creality does have good support, I'll give them that. The big problem with their boards is that they limit future upgrades by not having any ports for anything extra. I'll admit that's a bigger problem for tinkers like me than most people that just want a working printer.
 
Creality does have good support, I'll give them that. The big problem with their boards is that they limit future upgrades by not having any ports for anything extra. I'll admit that's a bigger problem for tinkers like me than most people that just want a working printer.
Yeah I'm just not at that level yet. One day I'm sure I will get there.
 
I was having huge problems with hot end temps for a while, especially on our CR10s5. It ended up being a combination of PID tuning and the new blower fan we installed....it was too powerful and directly hitting the block. It kept dropping the temperature so rapidly that it would go into thermal runaway.
But yes, PID tuning is very helpful.
 
The Gcode addition did not work. I will work on this PID thing, but it might take me a while this week is looking pretty busy. Thanks everyone for the input! I will update when I can!
 
Yeah, if it's having problems getting to temp in the first place, the start up G-Code isn't really going to do much to help it. I was seeing your second issue as a separate issue from the first, but I now think it's more a symptom of the first issue. Definitely let us know how PID tuning turns out, or if you need help!

It's good to know where to find start/end gcode is in case you want specific things to happen before and after prints, like lifting up before heating so the nozzle doesn't damage your build surface, or lifting Z and increasing Y to present a print after its complete. Your slicer should have default start/end gcode, so it's not something you specifically need to worry about if you don't want to.
 
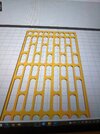
So, my slicer has decided to slice the opposite of what I want. As you can see in this picture it's a wide flat piece with holes cut out.
PXL_20220420_003115553.jpg

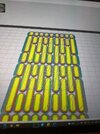
But the slicer has decided to print the hollow spaces and not the walls...

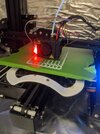
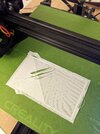
PXL_20220420_003123923.jpgPXL_20220420_003134274.jpg

WHAAAAT?!?!?

Seriously though I am totally stumped on this... Thoughts?
 
So, my slicer has decided to slice the opposite of what I want. As you can see in this picture it's a wide flat piece with holes cut out.
View attachment 316926

But the slicer has decided to print the hollow spaces and not the walls...

View attachment 316925View attachment 316924

WHAAAAT?!?!?

Seriously though I am totally stumped on this... Thoughts?
The first photo matches what the printer is doing.
Looks like the model and printer are in agreement.
That second photo is... inverted. So I'm guessing she sliced it in "mold mode", where it trying to print a negative mold of the item. Does that sound right?
 
That's the creality slicer right? If so there should be mesh/geometry fix options near the bottom of the settings or in the advanced tab. My thought is that something there is selected and when the slicer tries to "fix" the model it ends up doing that. I've had issues with stray vertices on a model causing issues for the slicer too, if the settings are fine I'd check the model for anything out of place.
 
The first photo matches what the printer is doing.
Looks like the model and printer are in agreement.
That second photo is... inverted. So I'm guessing she sliced it in "mold mode", where it trying to print a negative mold of the item. Does that sound right?
The first photo is how I loaded the file in the slicer. The second photo is when I switch the view to layers view to see how each layer lays down. And they are inverse of each other. The third photo is the printer printing. You can (maybe) see that the printer is printing the inverted picture because the brim is ribbed rather than smooth. It's drawing the brim around the cutout bumps rather than the smooth, solid walls.

That's the creality slicer right? If so there should be mesh/geometry fix options near the bottom of the settings or in the advanced tab. My thought is that something there is selected and when the slicer tries to "fix" the model it ends up doing that. I've had issues with stray vertices on a model causing issues for the slicer too, if the settings are fine I'd check the model for anything out of place.
Yeah it's the creality slicer. I never got cura to work right and gave up in favor of actually getting prints printed. I will take a look at the advanced settings.
It is a model I modified myself so there's a good chance there's something up with the model. I ran the 3d print check on blender and it looked fine. We will see what we find..
 
The first photo is how I loaded the file in the slicer. The second photo is when I switch the view to layers view to see how each layer lays down. And they are inverse of each other. The third photo is the printer printing. You can (maybe) see that the printer is printing the inverted picture because the brim is ribbed rather than smooth. It's drawing the brim around the cutout bumps rather than the smooth, solid walls.


Yeah it's the creality slicer. I never got cura to work right and gave up in favor of actually getting prints printed. I will take a look at the advanced settings.
It is a model I modified myself so there's a good chance there's something up with the model. I ran the 3d print check on blender and it looked fine. We will see what we find..
When I was getting the internals for my carbine printed one of the parts would load into the slicer but as soon as I hit slice it vanished. After reviewing the model I found a stray line on one of the faces I must have left there. Don't know why this was such an issue for the slicer but erasing it solved that problem. Only other problem I've seen in that slicer is if one face is inside out my files freak out and don't slice. Sketchup makes it very clear when I have a face the wrong way so I'd imagine that blender check would account for something similar.
 
Hopefully this video will load. My printer started doing this and idk why. It doesn't seem to affect the prints but it's annoying as **** and certainly sounds bad...

I have disassembled it and looked at it and there's nothing in contact with the fan, but it seems to not do it if the carriage is unscrewed. I got no ideas left. All the screws are tight.
View attachment 302499

Anyone have any ideas?
what is that red glowing thing on the side of your motor? is that the thing you installed? what's it for?
 
what is that red glowing thing on the side of your motor? is that the thing you installed? what's it for?
That's a BLtouch, it's a sensor used for auto bed leveling. It works by physically touching a probe to the surface of the bed and measuring. A lot of after market main boards are now being built with ports specifically for BLtouch cables, so if you were looking to get one, depending on your board, install could just be plug (and configure firmware) and play. I hear they are nice, but I don't personally have any because I'm cheap so I just use capacitive sensors and optocouplers.
 
Last edited:
Decided to break down to the basics and see if I can figure out what's going on with my printer. Broke down the enclosure, set up PLA, took off the bltouch and reset the firmware to use the OG z stop. Even took apart some of my *cough* "custom" parts that I was using with the intent of making things run smoother. Basically put it back to like it was out of the box. Had to remember how to manually level the bed but after a million attempts to get that right I have successfully got a print running. Anyone using this thread for troubleshooting:

Bed level needs to be REALLY precise. I was worried about the quality of my filament and bed ahdesion and whatnot but really I just needed to raise the bed by a fraction of a millimeter. I did not take a good pic of the first layer post bed raise but here is what I had pre-

PXL_20220621_012549610.jpg
Looked ok for most of it - not great but not immediately failing, but some significant holes in the middle. I raised the bed like just a fraction of a mm, and it 100% fixed it. The next time running the print was awesome. Best looking first layer I had printed in months... Maybe a year. Truly if you are having issues it's probably bed level or printing temps. I will take a pic when I get home of the print if it finishes.

I also am almost out of filament now that I have my settings dialed in nicely... Of course.
 
FalseShepherd
Thrilled its working. I keep all of my machines with minimal updates. No sensor on any of them. All trammed to be truly flat then hand leveled. Then done: Don't need to touch it again.
My only updates have been Microswiss all-metal hotends, later updated to direct drive. Silcone bushings to replace the bed springs. And adjustable Z switch mounts. Oh, and the CR10s-5 got a sync belt for the dual Z motors.
As Mr. Scott said in ST:III "The more they overhaul the plumbing, the easier it is to stop up the drain."
Keep it simple and it will serve you for years.
Now you just have to get out of the PLA and into some more robust like PETG
 
That's a BLtouch, it's a sensor used for auto bed leveling. It works by physically touching a probe to the surface of the bed and measuring. A lot of after market main boards are now being built with ports specifically for BLtouch cables, so if you were looking to get one, depending on your board, install could just be plug (and configure firmware) and play. I hear they are nice, but I don't personally have any because I'm cheap so I just use capacitive sensors and optocouplers.

But to be clear - its not a fix nor does it level the bed. It *maps* the bed so it know all the hills and valleys. Then it moves up and down in Z to match that as it prints. It doesn't fix anything. It makes your hotend follow the warp of the bed like a car on a San Francisco hilly road. I'll pass.
None of my machines have sensors. They are all glass bed that have been trammed to be *flat* then leveled. Its worth the weekend spent to have parts that are properly flat at the bases.
 
Status
Not open for further replies.
Back
Top