405th Recruiting Center Booth Build

Status
Not open for further replies.

Asgardianhammer

Identity Officer and BCO
Division Staff
405th Regiment Officer
Member DIN
S113
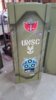
The goal of this build thread is to provide all regiments with plans, sheet cut list, materials list, and accompanying graphics for a recruiting booth to take to Conventions to promote the 405th and have a place for props weapons, etc.

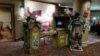
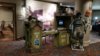
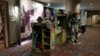
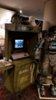
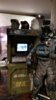
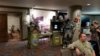
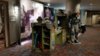
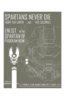
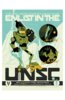
First of all I wanted to make something similar to what we have seen in game, weapon racks and recruitment stations as seen in New Mombasa. More importantly this needed to be quick to setup and portable, have space to hold all of our gear and represent the 405th and the Halo Universe.

Four Sheets of material were used:
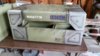
1 Sheet of 4'x8' 3/4" Paint grade plywood
2 sheets of 4'x'8' 1/2" MDF ( medium Density Fiberboard)
1 Sheet of 4'x8' 1' inch thick Insulation Foam

PDF Files of the cut list are attached and their arrangement on the sheets. remember to account for the cerf of the saw blade which is typically 1/8". If you do not have a table saw available most of these large parts can be cut on a panel saw at Home Depot or Lowes. This is also where I purchased these sheet goods.

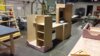
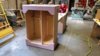
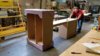
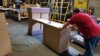
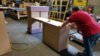
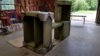
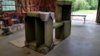
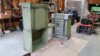
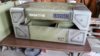
I began by building the kiosk base. it is the largest box item and will be used in the future to transport all parts when you wheel this in to the convention location. Use 3 inch screws to hold the walls together. These walls are 3/4" thick. i used 3/4" screws to screw the 1/2" mdf face plate to the exterior walls. I also used some pneumatic staples and a nail gun for a cleaner finish. the screws will be covered by the face detail of 1/2" MDF for the exterior face.

20170614_174132.jpg
 

Attachments

  • sheet cut list .75 paint grade ply.pdf
    55.1 KB · Views: 1,650
  • sheet cut list MDF 1.pdf
    57.4 KB · Views: 1,234
  • sheet cut list MDF 2.pdf
    59 KB · Views: 1,451
  • sheet cut list .75 paint grade ply.pdf
    55.1 KB · Views: 1,230
  • Inner Support band.pdf
    47 KB · Views: 1,379
After the base was completed I built the back wall with two sheets of MDF for the back wall. ***EDIT*** Cut list will be modified to include these two pieces of 1/2" MDF. 26"x30" and 17"x30". These two pieces were hinged on the side and this was used to support the monitor back wall. The 2 3" L brackets were attached to the back and 2 1/4x20 threaded inserts were placed into the underside of the base cabinet with the back wall placed roughly 4.5 inches in from the left hand back side and flush with the back of the base cabinet. Use 1/4x20 threaded t-knob inserts to affix the back wall to the base. There are 3 lightweight cardboard structures i created to cap this item and create the side of the kiosk. The pdf files for those are attached. I used velcro to attach these to the upright back wall. There is also a fake keyboard that is a folded wedge box that just sits in place.

20170621_200656.jpg


20170621_194816.jpg


20170625_185620.jpg


20170625_185640.jpg
 

Attachments

  • Keyboard Box.pdf
    1.3 MB · Views: 1,219
  • Kiosk Header Box Template.pdf
    1.3 MB · Views: 1,407
  • LEFT SIDE KIOSK SUPPORT Box Template.pdf
    1.2 MB · Views: 1,295
The Counter is 16"x37" in length with a 2 inch lip that was stapled in place and 2"x15" filler strip added. This had two through holes drilled. The right hand side is a lip that rests on two blocks placed 15 inches apart from outside edge to outside edge permanently affixed to teh left hand side of the base cabinet. We will address how this counter is attached after the weapon rack is constructed.

20170701_195232.jpg
 
The weapon Rack is made from 1/2" MDF and the 1 inch Insulation foam. I don't have this in the cut list but i also used in this some scrap 1/8 thick birch i had. Masonite or something comparable will suffice. The back walls are made of 2 - 17.5 x 48" 1/2" MDF. These 2 pieces were butt joined and put together with a 36" piano hinge. This entire section is flipped over and the two outside walls are attached with piano hinge. You may want to pre-drill your shelf peg holes prior to this assembly. The hinges are placed on the inside corners making sure the back wall hinge is on the opposite side. This allows the Walls to accordion fold flat. Next we will address the top and bottom segments.
 

Attachments

  • Weapon Rack Walls.jpg
    Weapon Rack Walls.jpg
    150.1 KB · Views: 451
Oh WOW that's cool.

Could you do some Halo: Reach or Halo 5 style weapons racks? I could 3D model all that stuff for you via Solidworks or Fusion 360 to speed up the process. I think it would be a cool thing to set up at cons for weapon displaying. I'm talking about the weapon racks that are more like this:
8fc46881343ee215e9dcd3937d863db9.jpg

Just something with the more futuristic aesthetic. They would also be pretty easy to break down into pieces for easy storage/transport. They would look really nice, be lightweight, easily transported, and (most importantly) hold lots of guns. :D

I'm sure a conjoined table could be made for displaying helmets and such. I dunno, just spit-balling here.

Your painting is really nice, BTW. And your garage...I'm envious. :)
 
The top and bottom are both made of 3/4 plywood frames that are clad in 1" foam. Once the sheet foams are cut teh two large pieces which will be the top and the base were beveled on the edge within 1/4" of the top and bottom face edges. The side are then butt joined with glued in place with liquid nail and screwed with 1" drywall screws. This needed much time to dry. After it was dried i used a retractable breakaway blade to add a bit of dimension so the corners stand out a bit. The two open edges have a decorative beveled front cut. Inside the top only I glued in a piece of the 1/8" birch. This was to keep the top of the walls from digging into the foam and give it additional support from leaning and resting items on it. The bottom Foam base is placed on the ground with the first frame laid inside of it. The frame is pushed to the front edge of the foam which should leave a half inch reveal around the back and sides. The Back wall is placed between the frame and the foam locking it in place. Once the back wall is in place the central divider for the sleeves slips into the slot in the middle. The top frame can now be put in place and the foam top cap can be lowered down. I found it easier to just glue the top frame into the foam cap. It must be lowered into place evenly however or you run the risk of popping the foam. Lastly i cut a few scrap sheets to act as bottoms in the rack so as to hide the frame and make it cleaner.
 

Attachments

  • 20170616_172652.jpg
    20170616_172652.jpg
    649.8 KB · Views: 501
  • 20170621_200656.jpg
    20170621_200656.jpg
    714.6 KB · Views: 360
  • 20170621_200716.jpg
    20170621_200716.jpg
    556 KB · Views: 361
  • Inside cap bands top.jpg
    Inside cap bands top.jpg
    216.6 KB · Views: 348
  • Inside cap bands.jpg
    Inside cap bands.jpg
    182.6 KB · Views: 367
  • 20170616_172652.jpg
    20170616_172652.jpg
    649.8 KB · Views: 387
  • 20170630_130320.jpg
    20170630_130320.jpg
    829.9 KB · Views: 380
Oh WOW that's cool.

Could you do some Halo: Reach or Halo 5 style weapons racks? I could 3D model all that stuff for you via Solidworks or Fusion 360 to speed up the process. I think it would be a cool thing to set up at cons for weapon displaying. I'm talking about the weapon racks that are more like this:
View attachment 246628
Just something with the more futuristic aesthetic. They would also be pretty easy to break down into pieces for easy storage/transport. They would look really nice, be lightweight, easily transported, and (most importantly) hold lots of guns. :D

I'm sure a conjoined table could be made for displaying helmets and such. I dunno, just spit-balling here.

Your painting is really nice, BTW. And your garage...I'm envious. :)
I really like the idea of this and i am sure many would be interested in this direction that could break down into a few lightweight pieces and hold a lot of stuff.
 
The 5 rifle rack had some wooden dowels and a few drill holes for inserting it. Shelf pegs were added and 14"x16" shelves lay in place. To attach the counter to span the two I added two threaded inserts into the back of the weapon rack for the two holes drilled earlier making sure to lever the counter with the top of the base cabinet. The counter rests on the two blocks on the right and then use the other two 1/4x20 t knobs to affix the left hand side of the counter to the back of the weapon rack.

Overall everything got a sanding and holes and staples filled with a lightweight spackle. I primed it all with Gripper and then gave all of a it a Olive Drab exterior latex base coat, all parts took about 3/4 gallon of each. that pva primer is important on that foam.
 

Attachments

  • 20170616_172639.jpg
    20170616_172639.jpg
    844.8 KB · Views: 370
  • 20170616_172652.jpg
    20170616_172652.jpg
    649.8 KB · Views: 332
  • 20170616_172705.jpg
    20170616_172705.jpg
    875.3 KB · Views: 379
  • 20170616_172709.jpg
    20170616_172709.jpg
    876 KB · Views: 341
  • 20170625_151125.jpg
    20170625_151125.jpg
    921 KB · Views: 338
  • 20170625_151126.jpg
    20170625_151126.jpg
    859.2 KB · Views: 373
Lastly I added all my paint effects which are washes and some airbrush. I lightly masked off and sparingly used some Silver spray paint. make sure your foam is well sealed or the spray paint can eat your foam. I then added all my paint masks and added my lettering and vinyl details. These graphic files are attached. I can supply the cut files for the graphics as this is too large to attach to this thread.
 

Attachments

  • 20170625_185541.jpg
    20170625_185541.jpg
    845 KB · Views: 381
  • 20170625_185547.jpg
    20170625_185547.jpg
    843.1 KB · Views: 377
  • 20170625_185614.jpg
    20170625_185614.jpg
    686.6 KB · Views: 357
  • 20170625_185620.jpg
    20170625_185620.jpg
    695.9 KB · Views: 377
  • 20170625_185640.jpg
    20170625_185640.jpg
    662.4 KB · Views: 353
  • 20170628_190355.jpg
    20170628_190355.jpg
    421.5 KB · Views: 351
  • 20170628_190407.jpg
    20170628_190407.jpg
    585 KB · Views: 345
  • 20170628_190416.jpg
    20170628_190416.jpg
    856.7 KB · Views: 384
  • 20170628_190422.jpg
    20170628_190422.jpg
    853.1 KB · Views: 376
  • 20170628_190429.jpg
    20170628_190429.jpg
    693.6 KB · Views: 358
  • Booth Graphcis OUT 070317 B-01.jpg
    Booth Graphcis OUT 070317 B-01.jpg
    673.8 KB · Views: 357
  • Booth Graphcis OUT 070317 A_1.png
    Booth Graphcis OUT 070317 A_1.png
    261 bytes · Views: 376
And this was our finished event completed with an 8x8 backdrop of a scene in New Mombasa fighting the Covenant that I printed. I also added a few posters i found on the web that I printed on 11x17 and trimmed down to fit the recruiting theme.
 

Attachments

  • .facebook_1499103150254.jpg
    .facebook_1499103150254.jpg
    69.6 KB · Views: 385
  • 20170630_130152.jpg
    20170630_130152.jpg
    926.2 KB · Views: 408
  • 20170630_130155.jpg
    20170630_130155.jpg
    978 KB · Views: 412
  • 20170630_130204.jpg
    20170630_130204.jpg
    907.1 KB · Views: 373
  • 20170630_130206.jpg
    20170630_130206.jpg
    895.5 KB · Views: 381
  • 20170630_130240.jpg
    20170630_130240.jpg
    858.2 KB · Views: 419
  • 20170630_130252.jpg
    20170630_130252.jpg
    863.5 KB · Views: 401
  • 20170630_130300.jpg
    20170630_130300.jpg
    802.8 KB · Views: 377
  • 20170630_130320.jpg
    20170630_130320.jpg
    829.9 KB · Views: 361
  • 20170701_195232.jpg
    20170701_195232.jpg
    791.5 KB · Views: 385
  • FB_IMG_1499104342591.jpg
    FB_IMG_1499104342591.jpg
    63 KB · Views: 370
  • Battle_of_New_Mombasa_Painting.jpg
    Battle_of_New_Mombasa_Painting.jpg
    212.3 KB · Views: 374
  • FB_IMG_1499104349964.jpg
    FB_IMG_1499104349964.jpg
    66.8 KB · Views: 367
  • 1129be621eff7fef46feae0484331c8f-01.jpg
    1129be621eff7fef46feae0484331c8f-01.jpg
    278.1 KB · Views: 361
  • 2377c632a54ae36b1e95c68ecfd6a9b9-01.jpg
    2377c632a54ae36b1e95c68ecfd6a9b9-01.jpg
    518.8 KB · Views: 360
  • 96988262b09bcf9debd8e99409f956d7-01.jpg
    96988262b09bcf9debd8e99409f956d7-01.jpg
    1 MB · Views: 398
  • db8918df3dc768cfdb67c6727e26bd4a-01.jpg
    db8918df3dc768cfdb67c6727e26bd4a-01.jpg
    731.3 KB · Views: 373
  • f0d3a6bc322e17ca5706eba3_rw_1920-01.jpg
    f0d3a6bc322e17ca5706eba3_rw_1920-01.jpg
    905.1 KB · Views: 373
  • halo-propaganda-recolor-unsc-by-gotwafpng_jymm-01.jpg
    halo-propaganda-recolor-unsc-by-gotwafpng_jymm-01.jpg
    475.7 KB · Views: 365
I would like to see this as a 5 piece breakdown. Two sides and three central sections to join the sides together. Just need to make sure it's staple enough to hold the weight of the weapons.
Oh WOW that's cool.

Could you do some Halo: Reach or Halo 5 style weapons racks? I could 3D model all that stuff for you via Solidworks or Fusion 360 to speed up the process. I think it would be a cool thing to set up at cons for weapon displaying. I'm talking about the weapon racks that are more like this:
View attachment 246628
Just something with the more futuristic aesthetic. They would also be pretty easy to break down into pieces for easy storage/transport. They would look really nice, be lightweight, easily transported, and (most importantly) hold lots of guns. :D

I'm sure a conjoined table could be made for displaying helmets and such. I dunno, just spit-balling here.

Your painting is really nice, BTW. And your garage...I'm envious. :)
 
Thanks all. If you have any questions please feel free to reach out to me!
 
Damn that looks fine.

Curse my hatchback not being able to fit one of these to take out to conventions. Time to look for fellow 405th West Coasters with a truck/van.
 
Kudos to you for using MDF. When I had to work with it as a theater carpenter I found it challenging to work with and kinda heavy. About how much does each unit weigh? Do you just carry them or end up using a hand cart/dolly?

This is very cool. Some inspiration stuff to keep in mind when I start promoting my own project.
 
Wow, I almost missed this..

Really fantastic job on this booth. I wish we had one and I will be bookmarking for future reference. ;)
 
Status
Not open for further replies.
Back
Top