Aliens M41a Pulse Rifle (from a Nerf Stampede!)

Status
Not open for further replies.
Okay, large update here:

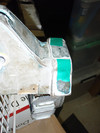
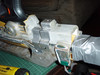
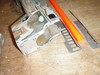
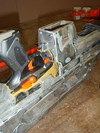
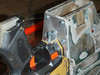
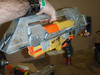
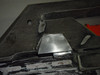
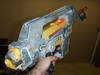
I needed a way to hold everything together nicely so i decided to use the brackets i sanded off as actual brackets.
5548632157_a888f8fa80_z.jpg

5549216434_27d0f82b9d_z.jpg

5549216058_640b319501_z.jpg

5548632841_f6c9e6cf0a_z.jpg


Also the rear bracket.
5548633881_9e4e3db70f_z.jpg


Nice!
5549215292_d75e66a0cb_z.jpg


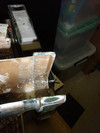
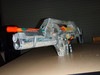
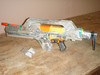
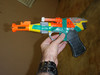
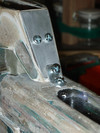
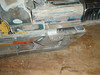
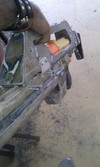
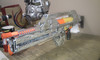
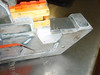
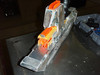
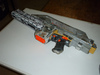
And started working on the barrel bracket and vents (almost as bad as sanding...). Note the new nice long barrel. The front gun will not ever be used as it was intended so... why not :)
5548634025_3f847563ed_z.jpg

5549216962_cf79c264ee_z.jpg


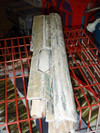
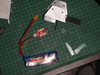
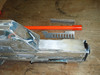
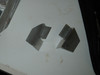
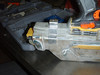
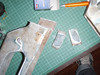
Opps! Got home very late/early and dropped it on its ass. Its a nice clean break where i dremeled everything down to fit the rear of the gun. Ah well, on the upside its gonna be tough as nails after i finish with it.
5548635449_513a959c1a_z.jpg


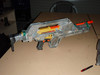
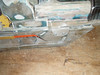
Close to getting a coat of paint i think :)

Cheers.
 

Attachments

  • 5548632157_a888f8fa80_z.jpg
    5548632157_a888f8fa80_z.jpg
    54.9 KB · Views: 214
  • 5549216434_27d0f82b9d_z.jpg
    5549216434_27d0f82b9d_z.jpg
    115.1 KB · Views: 204
  • 5549216058_640b319501_z.jpg
    5549216058_640b319501_z.jpg
    97.6 KB · Views: 198
  • 5548632841_f6c9e6cf0a_z.jpg
    5548632841_f6c9e6cf0a_z.jpg
    122.6 KB · Views: 203
  • 5548633881_9e4e3db70f_z.jpg
    5548633881_9e4e3db70f_z.jpg
    108 KB · Views: 187
  • 5548634025_3f847563ed_z.jpg
    5548634025_3f847563ed_z.jpg
    118 KB · Views: 198
  • 5549215292_d75e66a0cb_z.jpg
    5549215292_d75e66a0cb_z.jpg
    147 KB · Views: 203
  • 5549216962_cf79c264ee_z.jpg
    5549216962_cf79c264ee_z.jpg
    88.7 KB · Views: 234
  • 5548635449_513a959c1a_z.jpg
    5548635449_513a959c1a_z.jpg
    183.1 KB · Views: 203
Im planning to epoxy (a tiny amount will do) the bits together then go over it with fiberglass.

Also as im out of the chopped mat ill have to do a lunchtime run down to the local supplier.

*sigh* More work...
 
Ok the repairs are almost done. Just need bondo over the top. I might actually put a little bit of fiberglass then sand it back for more strength.
5554398775_b3d99bd027_z.jpg

5554983066_aa04445c03_z.jpg


Also theres a little more bondo on the grenade launcher.
5554399015_3eacda448e_z.jpg


Cheers.
 

Attachments

  • 5554983066_aa04445c03_z.jpg
    5554983066_aa04445c03_z.jpg
    91.7 KB · Views: 212
  • 5554398775_b3d99bd027_z.jpg
    5554398775_b3d99bd027_z.jpg
    74.8 KB · Views: 199
  • 5554399015_3eacda448e_z.jpg
    5554399015_3eacda448e_z.jpg
    127.7 KB · Views: 184
Awesome update!:

5568991631_bcf3e463e3_z.jpg

5569579248_8300df2044_z.jpg

5568991779_35d6041c46_z.jpg


Im a little worried about how low the barrel is in relation to the shroud but if it looks odd, ill build it up a little bit. No worries :D

Ah!! Its sooo close to being finished!
 

Attachments

  • 5568991631_bcf3e463e3_z.jpg
    5568991631_bcf3e463e3_z.jpg
    79.8 KB · Views: 190
  • 5568991779_35d6041c46_z.jpg
    5568991779_35d6041c46_z.jpg
    93 KB · Views: 190
  • 5569579248_8300df2044_z.jpg
    5569579248_8300df2044_z.jpg
    77.3 KB · Views: 205
Quick update:

Joining the metal bits together so there is something solid holding it together, and that will come appart when needed. Also note the lipo low voltage warning buzzer with the 2 LEDs lit.
5575555995_b7299512d5_z.jpg


Filled in the gap.
5575556129_952744254c_z.jpg


I have all the screws and bits to add to it now, its just a matter of gluing nuts underneath the brackets.
 

Attachments

  • 5575556129_952744254c_z.jpg
    5575556129_952744254c_z.jpg
    120.8 KB · Views: 178
  • 5575555995_b7299512d5_z.jpg
    5575555995_b7299512d5_z.jpg
    175.3 KB · Views: 194
Update:

Drilled the mounting holes for the shroud bolts.
5587400149_7e3f755d12_z.jpg


Another profile shot :)
5587399951_1c563b8478_z.jpg


Waste not want not. Ill use the bits left over to create a steampunk style pistola. Also paint for practice.
5587399723_aa23818276_z.jpg


Cheers.
 

Attachments

  • 5587399951_1c563b8478_z.jpg
    5587399951_1c563b8478_z.jpg
    116 KB · Views: 179
  • 5587400149_7e3f755d12_z.jpg
    5587400149_7e3f755d12_z.jpg
    106 KB · Views: 192
  • 5587399723_aa23818276_z.jpg
    5587399723_aa23818276_z.jpg
    89.6 KB · Views: 204
Update:

Ok so apparently some dodgey place (No names) sold me a 7.4v battery instead of an 11.1v.. so the results were worse than the original voltage.
5608600519_9490d7bf8f_z.jpg

5611329909_42bc0fe337_z.jpg


New battery and new Powah! :)

Cheers.

5608600519_9490d7bf8f_z.jpg


5611329909_42bc0fe337_z.jpg
 
Last edited by a moderator:
Update:

Started working on all the brackets and metal inserts so i can actually screw it together and fix it in place. Templates cut, now just need to cut the aluminium.

Cheers.
 
Ok fiddly update! Grr so many little things for this to work.. Anyway, the templates were cut, transfered to the aluminium, cut out and smoothed. And now ive been adding them to the correct areas for load bearing, which is harder than i thought as the screws go through into areas i need for clips :D

Anyway here is the barrel assembly and base plate. This will have right angle brackets on the underside to screw to the grenade launcher:
5633925704_d6a086724a_z.jpg


Im going to build the top up with epoxy sculpt and glue a small plate on top to even it all out:
5633342349_81e153216f_z.jpg


Rear bracket and plate:
5633924904_1c3937461c_z.jpg

5633341823_071157bb40_z.jpg

5633925064_4d26d80a29_z.jpg


Front bracket and plate:
5633925376_3c7f0a4ab9_z.jpg


Side mounting points:
5633925628_f1cdb64bc2_z.jpg

5633342077_b8152b9b07_z.jpg


Ah... and so next i will be working on trimming the bolts so they dont foul any of the internals. There will also be another front load bearing plate connected to the underside of the shroud... as usual more to come :)

Cheers.
 

Attachments

  • 5633925704_d6a086724a_z.jpg
    5633925704_d6a086724a_z.jpg
    137.4 KB · Views: 194
  • 5633342349_81e153216f_z.jpg
    5633342349_81e153216f_z.jpg
    136.2 KB · Views: 189
  • 5633924904_1c3937461c_z.jpg
    5633924904_1c3937461c_z.jpg
    146.5 KB · Views: 182
  • 5633925064_4d26d80a29_z.jpg
    5633925064_4d26d80a29_z.jpg
    135.3 KB · Views: 189
  • 5633341823_071157bb40_z.jpg
    5633341823_071157bb40_z.jpg
    129 KB · Views: 194
  • 5633925376_3c7f0a4ab9_z.jpg
    5633925376_3c7f0a4ab9_z.jpg
    110.2 KB · Views: 179
  • 5633925628_f1cdb64bc2_z.jpg
    5633925628_f1cdb64bc2_z.jpg
    143.2 KB · Views: 182
  • 5633342077_b8152b9b07_z.jpg
    5633342077_b8152b9b07_z.jpg
    144.3 KB · Views: 184
Quick update:

Most of the nuts for the shroud are now epoxied into place and firm so... :

5636120559_9d2dd0d6bf_z.jpg


Cheers.
 

Attachments

  • 5636120559_9d2dd0d6bf_z.jpg
    5636120559_9d2dd0d6bf_z.jpg
    115 KB · Views: 183
Ok post-easter update:

I have been working on all the shitty little bits that take alot of time to make and fit. All the brackets are now working to hold the grenade launcher solid to the nerf gun. See below holding it by the shroud. *grin* There was a photo of me shaking it but.. well it didnt turn out very well lol.
5678311989_c3194ba1ab_z.jpg

5678870964_e58b309cdd_z.jpg


Next to trim the bolts so they fit flush and then work on the clip. I have to glue it togehter and make certain it still fits flush.

Cheers.
 

Attachments

  • 5678311989_c3194ba1ab_z.jpg
    5678311989_c3194ba1ab_z.jpg
    135.3 KB · Views: 186
  • 5678870964_e58b309cdd_z.jpg
    5678870964_e58b309cdd_z.jpg
    85.5 KB · Views: 179
Quick update:

Ok so ive been roped into a 5v5 nerf game on the weekend so i thought i would use the cut down Stampede as a side arm :D Mac10 baby! See below for new spring goodness. You cant really see the range as i was shooting at a wall but it went from one side of the site (15m) to the other with almost no drop. I think ill have to check out the range...


Cheers.
 
Last edited by a moderator:
Status
Not open for further replies.
Back
Top