- Member DIN
- S113
This post will be a well collected trove of info for all of you traveling with armor and armor storage.
Information
So a few quick notes about the types of totes available. Even though there are a lot of totes out there today we will focus on two Sterilite Totes in particular:
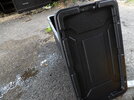
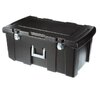
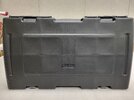
1. The Sterilite Plastic Foot Locker with Wheels - 31 1/4" x 17 5/8" x 13 7/8" and retails for around $30.00 USD

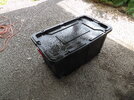
2. The Sterilite Jumbo Tote with Wheels - 37"x21"x18" 40 gallon and just under $60.00 USD and available in red and yellow accents.

Both readily available and easy to find online or in your large box store. The upside to both of these units is if you fly on Southwest these fly free if they come in under 50lbs. We will talk more about that later.
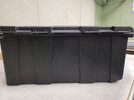
The lid captures on both ends of the 40 gallon tote can be removed and stored inside the tote until your destination is reached. The top is made with four pass through holes for bungie cords or zipties and or locks (i don't recommend locks for TSA purposes.)
The Foot Locker will require two 1/4" holes to be drilled through the top and the bottom on each end to secure the lid closed as you do not want to rely on the hasps to secure this in travel.
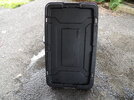
I have been told that an entire ODST Kit will nest up nicely in the Foot Locker. It will take one of each size more than likely for Spartan Armor. It did with mine.
Painting:
So as a general rule of thumb for all purchased parts: CLEAN THEM!!
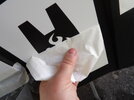
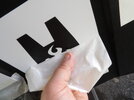
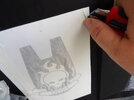
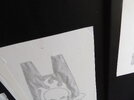
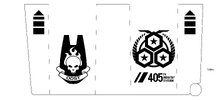
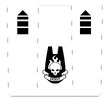
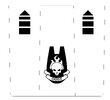
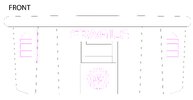
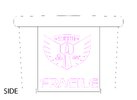
I clean all surfaces with some isopropyl alcohol. Let it dry throughoughly before applying any stencils. Stencils can be made from tape, vinyl etc. Make sure to squeegee down all masked edges well, to help avoid paint creep.
Next I prefer to use Duplicolors Adhesion Promoter and apply according to manufacturer instructions. All of my paint for these applications I choose again Duplicolor or another brands lacquer based paints. Don't apply so heavily that your paint runs. Next I peel all of my masking while the paint is still soft or wet.
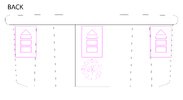
I am attaching my stencils to this thread for your use. Any overspray from painting can be cleaned up with a rag and some acetone.


You can see all of the various totes from fellow members in the last shot. These were folks who traveled from various parts of North America and I am certain their experiences were each unique for traveling.
Packing and Traveling:
When packing your items experiment with how to best nest your soft and hard parts. Make accommodations for any extras such as repair items and make sure lids close properly without pressing down on parts. Add any padding necessary such as a towel or foam to avoid scratches when traveling. Keep in mind that TSA if you are flying may need to go through your boxes so ensure you have enough space that if they repack you won't have items getting damaged.
Checking your tote as luggage, Like i said previously Southwest flies two checked bags for free as long as they each weigh less than 50lbs. Airlines calculate the size of the bin as width+height+depth. If it is under 80" you are usually okay. the 40gallon tote is just slightly over this but they accepted it anyways.
Lastly most helmets are best kept in a drawstring bag and on your person while traveling. Take this as a carry-on item when flying. It makes for a great conversation starter!

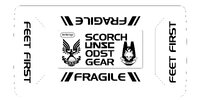
Last items to note. Place a ziplock bag attached to the inside lid of your totes with additional zipties should TSA need to gain access to your bin there will be extras for TSA Agents to secure your Armor Bin. I also placed one last item in my bins. Here you can see my Ziptie locations on my boxes. You can see where I drilled holes on the end of the 22gallon tote.

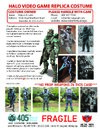
A photo reference of the contents and on the wearer with contact information and and gentle note to Agents requesting care and an approximate value of the items along with an explanation of what it is. Keep in mind that everyone does not know what Cosplay is but most people know what Costumes are. Here is what my laminated Armor Packing Notification looks like.
Also as a SIDE NOTE: I have never flown with Prop weapons and as a result do not know how that goes over with Agents. I would take the utmost care to make sure those items are peace bonded with zipties with notes tied to them as to what they are and non-functioning.

A well painted armor box makes a great addition as scenery in a con booth as well and is free advertising for your regiment and the 405th as a whole.
On the whole my armor has flown across the country and back with no issues. Not paying an additional charge to ship what i thought for sure would be oversized was a huge cost savings. The more professional you can make your gear look while in storage and traveling the less likely it will be mistreated. That is not to say that will always be the case.
I hope this has been insightful and there are further references attached to this post. Please share your bins and any travel experiences you have had.
Until next time kids..and don't forget to put the toilet seat down.
Information
So a few quick notes about the types of totes available. Even though there are a lot of totes out there today we will focus on two Sterilite Totes in particular:
1. The Sterilite Plastic Foot Locker with Wheels - 31 1/4" x 17 5/8" x 13 7/8" and retails for around $30.00 USD
2. The Sterilite Jumbo Tote with Wheels - 37"x21"x18" 40 gallon and just under $60.00 USD and available in red and yellow accents.
Both readily available and easy to find online or in your large box store. The upside to both of these units is if you fly on Southwest these fly free if they come in under 50lbs. We will talk more about that later.
The lid captures on both ends of the 40 gallon tote can be removed and stored inside the tote until your destination is reached. The top is made with four pass through holes for bungie cords or zipties and or locks (i don't recommend locks for TSA purposes.)
The Foot Locker will require two 1/4" holes to be drilled through the top and the bottom on each end to secure the lid closed as you do not want to rely on the hasps to secure this in travel.
I have been told that an entire ODST Kit will nest up nicely in the Foot Locker. It will take one of each size more than likely for Spartan Armor. It did with mine.
Painting:
So as a general rule of thumb for all purchased parts: CLEAN THEM!!
I clean all surfaces with some isopropyl alcohol. Let it dry throughoughly before applying any stencils. Stencils can be made from tape, vinyl etc. Make sure to squeegee down all masked edges well, to help avoid paint creep.
Next I prefer to use Duplicolors Adhesion Promoter and apply according to manufacturer instructions. All of my paint for these applications I choose again Duplicolor or another brands lacquer based paints. Don't apply so heavily that your paint runs. Next I peel all of my masking while the paint is still soft or wet.
I am attaching my stencils to this thread for your use. Any overspray from painting can be cleaned up with a rag and some acetone.
You can see all of the various totes from fellow members in the last shot. These were folks who traveled from various parts of North America and I am certain their experiences were each unique for traveling.
Packing and Traveling:
When packing your items experiment with how to best nest your soft and hard parts. Make accommodations for any extras such as repair items and make sure lids close properly without pressing down on parts. Add any padding necessary such as a towel or foam to avoid scratches when traveling. Keep in mind that TSA if you are flying may need to go through your boxes so ensure you have enough space that if they repack you won't have items getting damaged.
Checking your tote as luggage, Like i said previously Southwest flies two checked bags for free as long as they each weigh less than 50lbs. Airlines calculate the size of the bin as width+height+depth. If it is under 80" you are usually okay. the 40gallon tote is just slightly over this but they accepted it anyways.
Lastly most helmets are best kept in a drawstring bag and on your person while traveling. Take this as a carry-on item when flying. It makes for a great conversation starter!
Last items to note. Place a ziplock bag attached to the inside lid of your totes with additional zipties should TSA need to gain access to your bin there will be extras for TSA Agents to secure your Armor Bin. I also placed one last item in my bins. Here you can see my Ziptie locations on my boxes. You can see where I drilled holes on the end of the 22gallon tote.
A photo reference of the contents and on the wearer with contact information and and gentle note to Agents requesting care and an approximate value of the items along with an explanation of what it is. Keep in mind that everyone does not know what Cosplay is but most people know what Costumes are. Here is what my laminated Armor Packing Notification looks like.
Also as a SIDE NOTE: I have never flown with Prop weapons and as a result do not know how that goes over with Agents. I would take the utmost care to make sure those items are peace bonded with zipties with notes tied to them as to what they are and non-functioning.
A well painted armor box makes a great addition as scenery in a con booth as well and is free advertising for your regiment and the 405th as a whole.
On the whole my armor has flown across the country and back with no issues. Not paying an additional charge to ship what i thought for sure would be oversized was a huge cost savings. The more professional you can make your gear look while in storage and traveling the less likely it will be mistreated. That is not to say that will always be the case.
I hope this has been insightful and there are further references attached to this post. Please share your bins and any travel experiences you have had.
Until next time kids..and don't forget to put the toilet seat down.
Attachments
-
 Sterilite Bin Template-01.jpg1.4 MB · Views: 618
 -
 Sterilite Bin Template-02.jpg989.2 KB · Views: 533
 -
 Sterilite Bin Template-03.jpg995.8 KB · Views: 582
 -
 Sterilite Bin Template-04.jpg1.6 MB · Views: 597
 -
 2d17d0f3e062008489573b4faeb95ebf.jpg20.5 KB · Views: 506
 -
 20220314_160646.jpg1 MB · Views: 498
 -
 20220314_160656.jpg3.4 MB · Views: 457
 -
 20220314_160703.jpg2.5 MB · Views: 454
 -
 20220314_160709.jpg2.5 MB · Views: 488
 -
Armor Box.zip6.5 KB · Views: 484
-
 Armor Packing Notice-01.jpg2.5 MB · Views: 553
 -
Armor Box Templates.pdf357.5 KB · Views: 575
-
 Armor Box Templates-01.jpg1.2 MB · Views: 580
 -
 Armor Box Templates-02.jpg1.4 MB · Views: 534
 -
 Armor Box Templates-03.jpg1.2 MB · Views: 519
 -
 Armor Box Templates-04.jpg1 MB · Views: 538
 -
 Armor Box Templates-05.jpg1 MB · Views: 547
 -
40 Gallon Sterilite Bin Template.pdf651.6 KB · Views: 484
Last edited: