- Member DIN
- S090
I'm learning from a friend as I go, but apparently craft foam for seams and coveringAt least you remembered to post now! That's all that counts!
Progress looks good. What do you have in mind for seam filling?
I'm learning from a friend as I go, but apparently craft foam for seams and coveringAt least you remembered to post now! That's all that counts!
Progress looks good. What do you have in mind for seam filling?
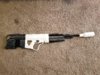
Haven't done much in the way of armor this week, so I thought I'd share a weapon update.
View attachment 278571
Glued everything, then realized I messed up a piece (the white circle on the flashlight) on both sides. Reprinted and glued.
Sand and prime and sand and prime etc etc....
View attachment 278572
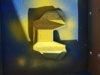
First few coats of paint and I'm pretty happy with how it looks so far. Probably at least one more coat then needs some spot touches before doing accents/highlights, weathering etc.
Looks like 114% in Cura. I'll double check the measurements when I get home.What did you end up resizing the flashlight at?
Thanks. I took another look at it again and I think you are right, it was too tight. I adjusted the rails on the model so that it slides with some clearance...maybe a quarter mm. V2 is up on thingiverse.Looks like 114% in Cura. I'll double check the measurements when I get home.
It was still really tight on the rail, really had to push it but it didn't crack this time so I call it a win. Also, no glue needed haha.
You are the man, man.Thanks. I took another look at it again and I think you are right, it was too tight. I adjusted the rails on the model so that it slides with some clearance...maybe a quarter mm. V2 is up on thingiverse.
View attachment 278597
Double checked the measurement, might have been 112%. Either way, looks like you got it sorted!Thanks. I took another look at it again and I think you are right, it was too tight. I adjusted the rails on the model so that it slides with some clearance...maybe a quarter mm. V2 is up on thingiverse.
View attachment 278597
Either way, that print and paint job looks awesome.Double checked the measurement, might have been 112%. Either way, looks like you got it sorted!
Because your model is awesomeEither way, that print and paint job looks awesome.

Awesome. Since I just printed the same thing, I am going to ask how you are gluing it together. I printed it out in the 26 pre sliced peices, and on some of them, the quick weld kept breaking off. I think if I sand it down and reapply it should be fine, bit I would like to hear your processHere's a shot of the DMR I'm building too. Did it at 80% so it's more me sized and not 7ft Spartan size. Only down side is the trigger placement is a bit awkward but hey, proper trigger discipline means I won't really have my finger on it anyway.
I made a BR not too long ago at full size and it's huge... I'll post a picture of it later.
View attachment 278677
So far I've just been using crazy glue with a spray activator. My typical process for 3D printed stuff is that (sometimes with a 3D pen to weld) and then milliput on seams. Sand that down nicely and then with the filler-primer those seams can be practically invisible after painting.Awesome. Since I just printed the same thing, I am going to ask how you are gluing it together. I printed it out in the 26 pre sliced peices, and on some of them, the quick weld kept breaking off. I think if I sand it down and reapply it should be fine, bit I would like to hear your process
That looks great. I also think the default scope looks too clunky, and I went with the clasic recon scope (which also had really bad print problems with missing layers). How does your scope attatch to the rails? Recon wont slide on and I dont know if I should just lop off the rails on the bottom of the scope or try a different approachUnfortunately, still no updates on armor progress. But I have been working on weapons.
For the pistol, I've added some red highlights to the flashlight/laser (depending on what reference photo you use). Now I just need to go buy some gunmetal grey or something for the rest and clear coat. I'm really happy with how this turned out.
View attachment 278950
The DMR is finished and assembled. I printed it at 80% though so I won't look tiny holding it. Here is a size comparison to the BR I printed (poorly) a little while ago. It's sanding and filling process has already started. But I need more milliput and probably more filler-primer before I start the DMR.
View attachment 278951
View attachment 278956
I'm thinking I'll go with the silencer attachment (haven't attached it yet, that's why it looks wrong):
View attachment 278957
And then the scope....
I printed the default scope but then felt it might be too bulky.
View attachment 278954
So I printed the "Sentinel" scope.
I did have problems with the file. That one and the "Longshot" kept slicing with missing layers and errors. It was pretty annoying. Eventually got it to work after mucking around with it in Meshmixer.
View attachment 278955
Anyway, that's all for now.
I do have one forearm printed that I'm starting to sand, but it has a significant layer shift in it so I want to make sure I can make it look good before posting about it.
The sentinel scope has a flat bottom "inside" the rail clamp, so I was going to just glue it there. But I'm also considering attaching a magnet to the rail on the rifle and the bottom of the scopes so I can print them all and swap out whenever I want.That looks great. I also think the default scope looks too clunky, and I went with the clasic recon scope (which also had really bad print problems with missing layers). How does your scope attatch to the rails? Recon wont slide on and I dont know if I should just lop off the rails on the bottom of the scope or try a different approach