OpticChief
New Member
A Build Log and Modeling Journey
There are projects you pick because they’re easy, and then there are projects you pick because they force you to grow.
The Balor helmet fell firmly into the second category.
This project started during a Discord voice conversation with MNKR and several members of the 405th community. During that discussion, it became clear that Mnkr was planning a Mirage core build and needed a high-quality 3D model of the Balor helmet, accurate enough to withstand not just digital scrutiny but also physical fabrication.
I offered to take on the task free of charge, with two conditions: the work would be done on my own timeline, and MNKR would be forced to be my friend for eternity - just kidding.
Although I’ve been 3D modeling since around 2015 and have worked across a wide range of assets, furniture, vehicles, weapons, tools, architectural structures, and props, I had never modeled a helmet or armor piece before. That fact alone made this project interesting. Helmets sit at an intersection of organic form, hard-surface precision, and real-world engineering. There’s nowhere to hide mistakes; every curve, every transition, every edge is exposed.
I knew going into this that it wouldn’t be fast, but I also knew it would be worth doing properly.
Building the Foundation: References Before Geometry
Before touching a single vertex, I focused on reference accuracy.
I pulled the Mirage core assets from the Halo Archive and isolated the Balor helmet and its attachments. Inside Blender, I imported the helmet mesh and textures, hid the attachments, and set up a controlled lighting environment to remove visual noise from reflections and shadows.
From there, I generated a standardized set of reference images from multiple angles, carefully maintaining consistent scale and alignment. These references became the backbone of the entire project. Any error here would ripple outward through the model later, so I treated this step less like prep work and more like laying structural foundations.
Once the references were prepared, I imported them into a clean Blender file and aligned them in orthographic space. From that point forward, every modeling decision was anchored to those images.
Choosing a Starting Point: Why the Ear Section
Instead of starting at the front or top of the helmet, I deliberately began at the ear section.This wasn’t arbitrary. The ear region sits near the midpoint of the helmet’s overall volume and connects multiple major forms: the dome, the jawline, the side panels, and the rear structure. By starting there, I created a reliable anchor point that helped maintain proportional consistency as the model expanded outward.
To enforce symmetry and maintain clean topology, I started with a cube, reduced it to a single vertex, and applied a Mirror modifier along the X-axis. From that single point, I began extruding edges and placing vertices, slowly tracing the helmet’s contours.
At this stage, progress was slow and methodical. Every vertex placement was checked in side, front, and top views. I wasn’t chasing detail yet; I was chasing accuracy.
Shaping the Identity: Primary Forms and Silhouette
Once the ear section was established, I focused on defining the helmet’s primary silhouette.The Balor helmet has a distinctive visual language: sharp, intentional lines layered over smooth, controlled curvature. Capturing that balance meant constantly adjusting vertex spacing, edge flow, and curvature transitions.
My workflow became a rhythm:
- Place geometry in one view.
- Validate it in two others.
- Adjust spacing to preserve smooth curvature.
- Revisit earlier sections to ensure continuity.
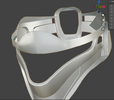
The Mouth Section: Where Theory Met Reality
The mouth section was the first area that truly tested the model’s structural integrity.Visually, it’s one of the most aggressive features of the Balor helmet. Technically, it’s a dense intersection of layered surfaces, hard edges, and organic transitions. I rebuilt this area several times, experimenting with different edge flows and curvature strategies until the shape felt both accurate and structurally stable.
There were moments where the geometry looked correct in one view but failed in another. Fixing those inconsistencies meant undoing work, rethinking topology, and sometimes abandoning entire approaches.
But once the mouth section stabilized, it became a cornerstone of the model. From there, the rest of the helmet started to grow more naturally.
Side Note: Modeling With Reality in Mind
I treated this model not as a digital sculpture, but as a future physical object. Previously, I was used to doing game-ready assets, so this needed to have consistency.
- Avoiding razor-thin surfaces that would collapse in print.
- Ensuring panel lines were deep enough to survive sanding and finishing.
- Maintaining a clean, quad-dominant topology to reduce shading artifacts.
- Keeping curvature consistent to minimize post-processing effort.
- Preventing non-manifold geometry and structural ambiguities.
Completing the Helmet Volume
After stabilizing the front and side forms, I began wrapping the geometry around the back of the helmet. This stage was less about adding detail and more about understanding the helmet as a three-dimensional volume rather than a collection of panels.At this point, the model started to transition from a traced silhouette into a real object with mass and presence. The challenge wasn’t just matching the reference images, but ensuring that the helmet felt structurally believable from every angle.
The dome of the helmet, in particular, required patience. Small adjustments in vertex placement dramatically affected the perceived shape, so progress was incremental and deliberate. I introduced support for edge loops, refined vertex spacing, and continuously checked the model under subdivision to identify surface irregularities before they compounded.
Once the main volume was established, I shifted my focus to building the helmet in layers rather than chasing details prematurely.
Constructing the Dome: Defining the Head Shape
With the side structure and overall volume in place, I focused on shaping the helmet's dome, the “head” portion that defines its silhouette from almost every angle.Instead of relying on sculpting, I manually traced and shaped the dome using controlled edge flow. I worked across the top, front, and rear views, gradually refining the curvature so that it flowed naturally into the surrounding geometry without flattening or bulging unnaturally.
This phase involved a lot of subtle adjustments:
- Redistributing vertices to smooth curvature.
- Adding supporting edge loops to control surface tension.
- Ensuring the dome transitioned cleanly into the side panels and rear structure.
- Avoiding pinching and shading artifacts that would become obvious under subdivision.
The dome became the visual anchor of the helmet. Once it felt correct, the rest of the model had a stable reference point to grow from.
Building the Lower Structure: Jawline and Underside
After the dome was established, I moved downward to construct the helmet's lower portion. This area was deceptively complex. Unlike the dome, which is mostly continuous curvature, the lower section combines layered armor plates, sharp transitions, and subtle slopes.I approached this section by extending edge loops downward from the existing structure, carefully shaping the jawline and underside to match the reference. This required constant back-and-forth between side, front, and bottom views to maintain consistent proportions.
The main challenges here were:
- Maintaining a clean transition between the dome and lower armor.
- Preventing the underside from becoming too flat or too bulky.
- Preserving the aggressive silhouette of the Balor helmet without exaggerating proportions.
- Ensuring the geometry remained print-friendly and structurally sound.
By the time the lower structure was complete, the helmet finally felt like a unified form rather than a collection of separate components.
Hard-Surface Detailing and Panel Language
Only after the base form felt structurally solid did I begin adding hard-surface details.This included:
- Panel lines and cut-ins.
- Layer separations between armor plates.
- Structural edges and bevel transitions.
- Visual language consistent with Halo’s design style.
At this point, the model shifted from being an exercise to becoming something with identity. The surface details didn’t just decorate the helmet; they explained how it might realistically be constructed.
Where the Project Stands Now
At the time of writing this post, the core structure of the Balor helmet is largely complete. The remaining phases of the project include:
- Finalizing panel lines and hard-surface details.
- Modeling the helmet’s attachments.
- Performing a full topology cleanup and optimization pass.
- Creating two versions of the model:
- A print-ready version optimized for fabrication.
- An editable master version for future modification.
- Producing scaled test prints (approximately 10–20%)-(Like a cat size) to identify physical issues before full-scale production.
- Making final adjustments based on real-world testing.
I am very excited to finish this and even more so excited to see MNKR be the first to put it together with a full set of armor.