Yup its that time again, time for a blender tutorial.
Today we are covering a quick method in adding quick detail to a chunky/ low resolution mesh.
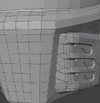
Our victim today is the Lehto MK 5 helmet (by Wayward Flood)

Its reasonably detailed but has enough chunk(visible polygons) that I don't want to have to sand out.
I'm going to focus on the visor first because its really low rez for a smooth surface.
I select the visor and hit TAB to go into and out of EDIT MODE. (edit mode is the mode in which we can edit the physical geometry of an object aka polygons, Object mode is where you can edit the orientation and organization of objects in a 3d space)
In edit mode we can see the topology of the model, its very organized which is good but since its in tris we will want to convert it to quads. Quads are generally just easy to work with in blender.
To convert (the majority of this) to quads all we need to do is select all in edit mode (S, A) then when all the polygons are highlighted we need to hit ALT+J this will run an automatic quad conversion. Its not fully thorough so we may need to manually edit the mesh afterward but this should eliminate the bulk of them

This is what you should be left with once your done.
You can also do this manually by manually stitching faces together, or selectively merging vertexes which you will have to do on certain models.
There are even a couple on this helmet that need to be looked at.

To manually stitch you really want to have a mirror modifier enabled that copies the side you are editing to the side you are leaving alone. you can manually edit both sides but when it comes to more detailed models you should probably save time and do this instead
(this doesn't always work for the best if the model is not 100% symmetrical and centered on its origin it will not mirror correctly)
To start manually retopologizing I'm going to select the offending edge I don't want and delete it with X, E in edit mode this will leave a hole ill need to manually stitch up.


be sure to not select any unwanted geometry behind or beside what you are stitching any holes you make you'll have to backtrack and fill
To fill the hole I select 2 of the holes opposing edges and hit F. (this is the fill tool it fills in lines edges and faces depending on your selection)


Now that we've gone over the basics of cleaning up lets get to adding detail.
Lets go back to our visor and add a subdivision modifier to our mesh


We've made it much smoother but that is a problem as weve essentially nuked some of our detail. This isn't a problem yet though as the model can be edited while the modifier remains unapplied.
Now we go back to Edit mode we can see here that the underlying geometry is the same as before we tabled the subdivision modifier. This is the geometry we are going to be editing.

I'm going to select every edge on the model that is sharp/flat, you can use any number of selection tools now that quads are in play but I like to use loop selection.
You loop select when you Alt+click a edge, face or 2 verts in a loop. Sometimes it doesn't select the whole loop especially when the model is tri based so you may need to make multiple selections using shift.

When youve got your final selection hit shift+E then 1 to crease those edges. That will allow our modifier to add detail to our mesh without removing key creased features.


Now all we have left to do is to move back to object mode tab and tweak our modifier to our liking before applying it(apply is in a small tab beside the camera looking button on the modifier stack). Once a modifier is applied the mesh is changed you can undo out of it so long as it was a recent addition but its good practice to make a copy of your model before applying anything just in case you want to go back and tweak something else.

Anyways here's the before and after, adding detail in the design step saves you a lot of time in post processing so its a pretty useful skill to learn in this hobby.


As always if you have any questions or comments leave them below.
Thanks for reading
Ciao~
Today we are covering a quick method in adding quick detail to a chunky/ low resolution mesh.
Our victim today is the Lehto MK 5 helmet (by Wayward Flood)
Its reasonably detailed but has enough chunk(visible polygons) that I don't want to have to sand out.
I'm going to focus on the visor first because its really low rez for a smooth surface.
I select the visor and hit TAB to go into and out of EDIT MODE. (edit mode is the mode in which we can edit the physical geometry of an object aka polygons, Object mode is where you can edit the orientation and organization of objects in a 3d space)
In edit mode we can see the topology of the model, its very organized which is good but since its in tris we will want to convert it to quads. Quads are generally just easy to work with in blender.
To convert (the majority of this) to quads all we need to do is select all in edit mode (S, A) then when all the polygons are highlighted we need to hit ALT+J this will run an automatic quad conversion. Its not fully thorough so we may need to manually edit the mesh afterward but this should eliminate the bulk of them
This is what you should be left with once your done.
You can also do this manually by manually stitching faces together, or selectively merging vertexes which you will have to do on certain models.
There are even a couple on this helmet that need to be looked at.
To manually stitch you really want to have a mirror modifier enabled that copies the side you are editing to the side you are leaving alone. you can manually edit both sides but when it comes to more detailed models you should probably save time and do this instead
(this doesn't always work for the best if the model is not 100% symmetrical and centered on its origin it will not mirror correctly)
To start manually retopologizing I'm going to select the offending edge I don't want and delete it with X, E in edit mode this will leave a hole ill need to manually stitch up.
be sure to not select any unwanted geometry behind or beside what you are stitching any holes you make you'll have to backtrack and fill
To fill the hole I select 2 of the holes opposing edges and hit F. (this is the fill tool it fills in lines edges and faces depending on your selection)
Now that we've gone over the basics of cleaning up lets get to adding detail.
Lets go back to our visor and add a subdivision modifier to our mesh
We've made it much smoother but that is a problem as weve essentially nuked some of our detail. This isn't a problem yet though as the model can be edited while the modifier remains unapplied.
Now we go back to Edit mode we can see here that the underlying geometry is the same as before we tabled the subdivision modifier. This is the geometry we are going to be editing.
I'm going to select every edge on the model that is sharp/flat, you can use any number of selection tools now that quads are in play but I like to use loop selection.
You loop select when you Alt+click a edge, face or 2 verts in a loop. Sometimes it doesn't select the whole loop especially when the model is tri based so you may need to make multiple selections using shift.
When youve got your final selection hit shift+E then 1 to crease those edges. That will allow our modifier to add detail to our mesh without removing key creased features.
Now all we have left to do is to move back to object mode tab and tweak our modifier to our liking before applying it(apply is in a small tab beside the camera looking button on the modifier stack). Once a modifier is applied the mesh is changed you can undo out of it so long as it was a recent addition but its good practice to make a copy of your model before applying anything just in case you want to go back and tweak something else.
Anyways here's the before and after, adding detail in the design step saves you a lot of time in post processing so its a pretty useful skill to learn in this hobby.
As always if you have any questions or comments leave them below.
Thanks for reading
Ciao~
Attachments

Last edited:
