Introduction
Time for another tutorial for all the community modelers out there. This one is going to be extremely useful for some of you beginners that are just starting out. || Today we are going to cover the topic of 'Retopology' or more specifically 'Manual Retopology' using Blender. Retopology is the act of rebuilding the underlying faces of a model, it can be done in many ways, even automatically with certain programs and plug-ins but its usually best to start learning the process from the ground up so you understand what makes a strong and efficient model.
Some of you may be asking why would you need to retopologize a model? The simple answer is to regain & simplify creative control. Making alterations to a model that is fully baked and detailed is much more difficult and the results are much less... beautiful. With simpler models you have more creative control of your geometry, hopefully this guide will show you why this can be important when editing models.
For today’s example of a complicated model in need of retopology I will be using one of my own designs the MK5 Lehto/ Campaign Evolved Helmet, that can be found for download (at a price :3) on Halo CE Remake Mjolnir MK5 Helmet. Feel free to follow along with your own model as the workflow will remain primarily the same.
Section 1: Startup
1.1 (Setup): First things first we have to start up blender and build our new scene. Select 'general' from the 'New File' tab of the startup menu.
After that you will want to clear our new scene by left clicking an empty area of the workspace then hit "S","A","X","Enter". This will select all then delete the cube light and camera that are loaded in a default scene.(you can keep them if you really want but they are not needed)
Now you will want to import the model you will be 'Retopologizing' today, To do this you will want to head to the top left corner of the workspace and select the 'File' tab, after you have the file tab selected you will want to scroll down this newly opened list of commands to the 'Import' Function then select file-type of the respective 3d file you are looking to import from the pop-out submenu. For this example I will be importing an '.stl' file. Once you select the file type a new file explorer window will appear called 'Blender File View' use this window to find and select the given file you will be working on today.
Two important notes of this operation
- You want to make sure you click 'Import' NOT 'Export' exporting will overwrite the file you select with the current empty scene and cannot be undone.
- If you cannot find the file you are looking for check to make sure you select the correct file type when in the 'Import' file-type submenu.
Now you should have an empty scene with just your object you are looking to edit.
1.15 (Optional): You can skip step '1.1' if you want to utilize a scene you already have setup within blender. Just open the project you want to work in from the Startup scene selector.
1.2 (Backup): The first step in any digital workflow is to make a backup I'll be doing this by duplicating the entire collection of the object I'm working on in my project. But you can simply just make a copy of just object you are working on in windows or blender using 'Copy/Paste' Functions. To do either of these within blender itself you will want to go to the top right corner where our 'Outliner' tab is located. In this Hierarchical list you need to 'right click' your object and Copy followed by a 'right click' 'Paste'. Once this is done you should have 2 of your objects in the 'Outliner'
- You can also do this within the scene view by left clicking the object you've made until its highlighted and then pressing 'Ctrl+C'(copy command) followed by 'Ctrl+V'(paste command)
- To 'Duplicate Collections' like me you'll want to right click the collection your object is currently inside of in the 'Outliner' and select 'Duplicate Collection' from the drop down menu.
Either way you slice it you should now have two different versions of the same model. This backup model we will want to hide from the operation, to do this select the 'hide' button on the right side of your object's name within the 'Outliner' The hide button is the button that looks like an open eye. Congratulations your backup should be done now we can move on to the meat and potatoes of this exercise.
Section 2: New Beginnings
2.1 (Creating Our Plane): To start out Retopologizing we are going to create the all powerful 'Plane' to do this we are going to go to the top left corner of our viewport and select the 'Add' button followed by the 'Mesh' submenu and then the 'Plane' obj found in the dropdown to the right of that sub menu. This should make a plane at the world origin (center of the scene)
- Be advised the plane may spawn extremely small compared to your object so you will most likely have to scale it up. So long as it is selected in the scene view or the 'Outliner' you should be able to hit 'S'(for Scale) and then drag your mouse away from the plane to make it big enough to see. you can tell its selected by the 'x','y','z' arrows being present.
2.2 (Basics Of 3D Navigation): I'd be re-missed if we didn't cover the basics of 3d viewport manipulation for our beginner audience. So here is a quick overview of how to navigate blender's viewports.
- If you want to look around or 'Orbit' the scene, just hold the 'middle mouse button' and drag your mouse.
That’s pretty much the main move you’ll use all the time. Its rotates your view around the fixed point usually based off your selection or the world 'Origin'
- You can scroll your mouse wheel to 'Zoom', or hold 'Ctrl+middle mouse' and drag if you like smoother movement.
- You can also 'Pan' your view by holding 'Shift+Middle Mouse' and drag. It’s great for moving around without tilting the view.
With these movement tools you can easily maneuver around whatever object you have decided to work on.
2.3 (Getting Started In Edit Mode): Now that you know how to move we can start with the process of re-meshing our object with the 'Plane' we created in step 2.1. to do this Select your plane by left clicking it until its highlighted after you have done this hit 'tab' to enter 'Edit' mode. Blender has many different object interaction modes, you see them all in the drop down list in the top left corner of the viewport. This is also where you can tell which mode you are in.
- Keep in mind you can only enter 'Edit' mode when you have an object selected
- You also want to make sure you have the correct model selected before you enter 'Edit' mode.
- To return to the default 'Object' mode all you have to do is hit 'tab' once again or you can select it from the mode menu in the top left of the viewport.
- While in 'Edit' mode you can tell if you have your plane selected if it looks orange as shown.
2.4 (Setting Up Magnetism): The primary mechanic of manual retopology is utilizing the 'Sna p' Tool. The 'Snap' Tool is a setting that allows whatever we manipulate to stick or magnetize to specific parameters within a scene. For our use case we are going to have our plane here stick to our model. The 'Snap' Tool is located in the top center of the viewport, It is the button that looks like a little magnet. While in 'Edit' mode with our plane selected left-click on it and enable it. Then click the button directly to the right of the 'Snap' tool this is the snap tools drop down settings menu. We are going to change a few things to make retopo a bit easier. These specific settings in the drop down menu that you want to select are as follows 'Closest', 'Face Nearest', 'Include Active', 'Include Edited', 'Include Non-Edited', 'Move','Rotate' and 'Scale'. I know it seems like a laundry list of parameters but most of these should be on by default. Once you have all those selected you can click off of the dropdown menu to start your retopology journey.
Section 3: Retopology
In this section we will explore several other fundamentals required to make retopology an easier and more efficient process within Blender, first we will cover selections within the 'Edit' mode then we will cover symmetry within the 'Modifiers' section, If you already know the basics of blenders workspace you can skip to section 3.3.
3.1 (The Basics Of Editor Selection): There are several ways to manipulate your geometry within Blender's 'Edit' mode. But to first be able to manipulate anything you must understand how to select the individual pieces and parts of a given model's geometry. Within 'Edit' mode you may only select pieces of geometry on the object that you initially selected when you entered the respective mode. In Blender’s 'Edit' mode, there are three different main selection modes 'Vertex', 'Edge', and 'Face' each offer a different way to interact with a mesh. The selection modes can be found near the top left corner of the viewport near the 'Mode' selection dropdown. The selection types are represented by an icon depicting a point on a cube(Vertex), an icon depicting an edge on a cube(Edge) and an icon depicting a quadratic face on a cube(Face).
The basic functions of these different selection types are as follows. 'Vertex Select' lets you manipulate individual points, giving you fine control over the shape. 'Edge Select' focuses on the lines between vertices, useful for adjusting topology and defining sharp structures. 'Face Select' allows you to work with whole surfaces at once, making it easy to shape larger areas quickly. Together, these modes let you model with precision, whether you’re tweaking tiny details or sculpting broad forms. The three selection modes are illustrated down below.
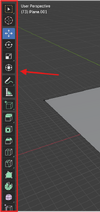
3.2 (Basics Of The Editor Manipulation): Now that we understand how to be precise with our selections we will need to become acquainted with t he manipulation tools within Blender's 'Toolbar' that is located on the left side of the viewport. It can seem kind of daunting but much like any toolbox each tool has a specific and sometimes minor purpose. All manipulation tools appear in the Toolbar on the left side of the 3D Viewport you can press 'T' to show/hide. Each tool is represented by an icon, and the active tool is highlighted in blue much like every selected parameter in Blender.
Core Manipulation Tools:
3.2.1 (Select Box and other select tools):
Function: Select vertices, edges, or faces using box, circle, lasso, or tweak selection.Position: Very top of the toolbar.
Shortcut: "B', 'C', 'Ctrl+Left-Mouse','Ctrl + numpad(+/-)', 'Ctrl+L'
Appearance: There are multiple you can left click and hold the main icon to see them all
- Box Select: rectangle icon
- Circle Select: circle icon
- Lasso Select: free form lasso icon
- Tweak: hand-like cursor icon
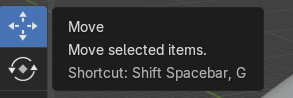
3.2.2 (Move [Grab] Tool):
Function: Move selected elements along axes.Position: Below the selection tools.
Shortcut: 'G'
Appearance: Icon shows four-way arrows (a cross-shaped arrow). When active, a 3-axis gizmo (red/green/blue arrows) appears.
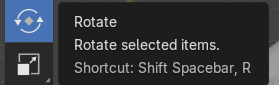
3.2.3 (Rotate Tool):
Function: Rotate elements around axes.Position: Below the Move tool.
Shortcut:'R'
Appearance: Circular arrow icon. Shows a 3-axis rotation gizmo (colored arcs).
3.2.4 (Scale Tool)
Function: Scale elements uniformly or per axis.Position: Below Rotate.
Shortcut:'S'
Appearance: Icon of a square with corner arrows. Displays a 3-axis scale gizmo (colored cubes).
3.2.5 (Transform Tool):
Function: Unified tool: move, rotate, and scale using a single combined gizmo.Position: Under the basic transform tools.
Shortcut:'Shift + Space'
Appearance: Three-axis gizmo with arrows, arcs, and cubes all at once. Icon looks like a combined move/rotate/scale symbol.
Mesh Manipulation Tools: can only be accessed withing edit mode.
3.2.6 (Extrude Region / Extrude Along Normals) :
Function: Pull out new geometry from selections.Position: Lower in the toolbar, under transform tools.
Appearance: Upward arrow extruding from a face icon.
Shortcut:'E' and then drag and click
3.2.7 (Extrude Individual) :
Function: Extrudes each selected face separatelySubmenu: left click and hold Extrude to find extrude individual.
Appearance: Multiple separate faces being pulled outward.
Shortcut:'Alt+E' and then drag and click
3.2.8 (Inset Faces) :
Function: Creates an inset outline within faces.Appearance: A square inside another square.
Shortcut:'I'
3.2.9 (Bevel Vertices/Edges) :
Function: Rounds or chamfers edges or vertices.Appearance: An icon showing a corner edge being cut.
Shortcut:'Ctrl+B'
3.2.10 (Loop Cut):
Function: Inserts a loop of edges around a mesh.Appearance: A yellow vertical cut line along a cube edge.
Shortcut:'Ctrl+R'
3.2.11 (Knife Tool) :
Function: Draws and confirms custom cuts.Appearance: Knife blade icon.
Shortcut:'K'
3.2.12 (Bisect Tool) :
Function: Cuts the mesh in half with a plane.Appearance: A diagonal cut line through a shape.
Shortcut: 'Shift + Space'
3.2.14[We don't do cursed numbers round here] (Merge function):
Function: Joins two selected pieces of geometry at a single pointAppearance: it isn’t in the side toolbar like the rest but it was too useful not to include this tool is in the mesh tab at the Top of our viewport it can be found under Mesh > Merge
Shortcut:'M'
- Toolbar content changes slightly depending on whether you’re in Vertex, Edge, or Face mode, but tools retain their icons and basic purpose. In this guide you will mostly just be using Basic Transform manipulations alongside the Extrude Tool.
First thing you are going to want to do is make sure you have symmetry turned on for our Plane here. We will be using the modifier tab for this specific exercise but you can just as easily use the built in selection symmetry tools in the top right corner of the viewport.
If you are working on an asymmetrical model (unlikely) you can skip the entirety of the Symmetry Step 3.31.
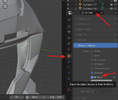
3.31(Setting up symmetry): We are going to look at the right side of our viewport now to find the 'modifier tab' that is held within the 'editor type' submenu beneath the Scene 'Outliner'. The modifier tab is the button that looks like a wrench.- While in the 'modifier tab' click the large add modifier button. Note this is a good time to make sure our plane is still selected as its name should show up in the top of the 'Properties tab'.
- Once you've clicked add modifier a drop-down will appear once this has appeared simply type mirror to find the mirror generator. This modifier mirrors our given geometry off its origin point allowing us to only need to work on one side of a given model. After you have this selected change the parameters from 'X' axis to 'Y' axis. Note this may need to be different based off your models axis of symmetry or lack thereof you can tune the modifier to suit whatever axis you need to mirror so long as it isn’t mirrored along a diagonal axis.
- Once you have this done any modification you do to your plane should be mirrored as shown below.
You'll want to utilize this newfound symmetry to establish the center of your first face. That is essentially what our Plane is, the first face of a new object. To do this grab the leftmost edge and drag it to the origin point, it should snap to it assuming our model is symmetrical in case it doesn’t just use the Snap tool grid setting to snap to the world grid beneath our model, you can then use Grab or Transform while Edge Selection is enabled to draw our edge towards the approximate perfect center of our scene. Hopefully you get something like this. Notice how the left side edge of the model does not have a black selection indication this is because that is mirrored geometry it doesn’t exist outside the modifier so it cannot be selected until the Mirror modifier has been applied.
3.32(Getting On Top Of Things): Now with our newly made Plane face s elected we want to make sure that the plane always appears on top of whatever we are sculpting, This helps us distinguish the difference between the original model and what we are now sculpting. To do this Go into the properties panel and left click the Orange Square Icon this is the Object Properties panel once in this panel we will want to type 'in front' in the search bar at the top of this Object Properties panel to find the always in front property hidden within the viewport display sub-menu. Now our face should always appear on top. To test this utilize your Transform and Rotations tools to orient your plane on your model. Click and drag the using the respective operations to get things where you want. It should snap to the surface of your model but still be visible no matter what angle you look at it as shown Below.
To becontinued...