BLOXX3R’s Spartan-III build, 3D Printed

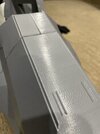
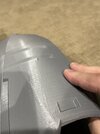
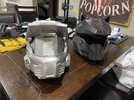
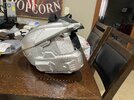
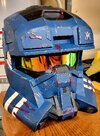
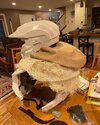
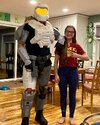
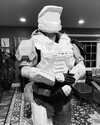
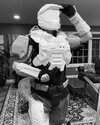
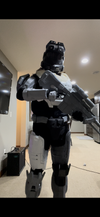
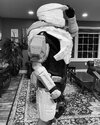
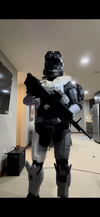
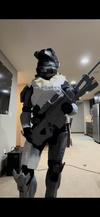
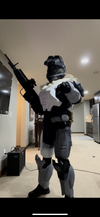
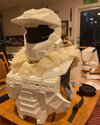
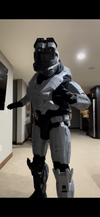
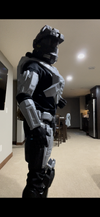
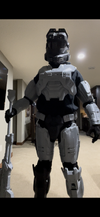
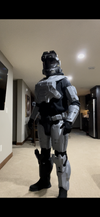
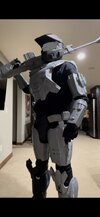
Hello again! Been awhile yet again haha. I was looking back at some photos, and I noticed that my chest armor looked a little large. So took a few new ones to try to get some better angles (emphasis on tried), and I’d like to hear some opinions. Is my chest armor large and in need of a reprint, or am I just going crazy?

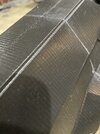
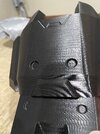
Edit: I feel like the thighs are a little small as well. Again though, I might just be way too OCD lol
 

Attachments

  • FF509027-4BD7-4735-BF4B-4E366E590147.png
    FF509027-4BD7-4735-BF4B-4E366E590147.png
    9.9 MB · Views: 136
  • C2EBCF53-E08C-443F-9851-7414B8828B2F.png
    C2EBCF53-E08C-443F-9851-7414B8828B2F.png
    10 MB · Views: 132
  • 2446B3A2-0C61-4DEA-88A6-5B28750EC915.png
    2446B3A2-0C61-4DEA-88A6-5B28750EC915.png
    10.3 MB · Views: 123
  • 82F79A68-70AF-445B-9CDA-B58814393EB0.png
    82F79A68-70AF-445B-9CDA-B58814393EB0.png
    10 MB · Views: 126
  • F69F8CB1-E240-4C97-89ED-66CD6178C28A.png
    F69F8CB1-E240-4C97-89ED-66CD6178C28A.png
    10.1 MB · Views: 130
  • 72AF8D54-8668-4AC0-BC3C-E180BF217ED7.jpeg
    72AF8D54-8668-4AC0-BC3C-E180BF217ED7.jpeg
    332.1 KB · Views: 123
  • A6FC9C46-91C1-48D0-874D-A150DB51F11B.jpeg
    A6FC9C46-91C1-48D0-874D-A150DB51F11B.jpeg
    325 KB · Views: 135
Last edited:
I’ve got another question for my 3D printing friends out there- After a good amound of printing, maybe about halfway through my suit, I started to get these really weird wavy walls (silver calf is nice and clean for reference). I thought nothing of it at first, but now that I’ve started to sand it I’ve realized that it’s a pain in the butt. Any tips on how to get rid of it before I print any other big items?

Also, for some reason it only shows up on bigger prints. I’ve printed a handful of benchys and calibration cubes and they all came out flawless, so I can’t figure out what on earth is happening.
 

Attachments

  • 1B430442-27C3-4C33-ADE1-96338F7BB362.jpeg
    1B430442-27C3-4C33-ADE1-96338F7BB362.jpeg
    1.8 MB · Views: 94
  • A6F577F5-1BB8-4921-8E25-748115A1CE65.jpeg
    A6F577F5-1BB8-4921-8E25-748115A1CE65.jpeg
    1.5 MB · Views: 107
  • E8254E80-D8FC-4509-8D88-BA8796CED358.jpeg
    E8254E80-D8FC-4509-8D88-BA8796CED358.jpeg
    1.6 MB · Views: 99
  • 25EC2B95-53DE-4DC8-8FF0-33FF2F23098F.jpeg
    25EC2B95-53DE-4DC8-8FF0-33FF2F23098F.jpeg
    2 MB · Views: 91
That looks like it could be an issue with Z-banding. I don't remember a whole lot about it, but I know it can occur when the gantry isn't level, or there's an issue with the Z-axis rods, like they're not completely vertical.
 
Finally got some paint on the Mk. V bucket! Laid down a couple layers of silver for the undercoat. What did some of you use for your main paints in terms of “texture?” I’m planning to use a gloss primary with a semigloss secondary and a clear matte finish on top. Will the semigloss accents look tacky? Should I stay consistent with the gloss? Any tips are greatly appreciated!
 

Attachments

  • 2A870318-43B3-4BE0-B6A2-9C818B5D527A.jpeg
    2A870318-43B3-4BE0-B6A2-9C818B5D527A.jpeg
    3.4 MB · Views: 88
  • FEAED816-8505-4B36-AFB0-2752FB6A46E9.jpeg
    FEAED816-8505-4B36-AFB0-2752FB6A46E9.jpeg
    4.1 MB · Views: 81
Finally got some paint on the Mk. V bucket! Laid down a couple layers of silver for the undercoat. What did some of you use for your main paints in terms of “texture?” I’m planning to use a gloss primary with a semigloss secondary and a clear matte finish on top. Will the semigloss accents look tacky? Should I stay consistent with the gloss? Any tips are greatly appreciated!
In the past I also used gloss and finished with clear matte. Semi-gloss imo just looks like a less wet, shiny version of the gloss. I've only tried the matte clear coat once, but I'm guessing whatever texture you use, the matte will just make it all look the same in the end. Probably stay consistent with the gloss.
 
Finally got some paint on the Mk. V bucket! Laid down a couple layers of silver for the undercoat. What did some of you use for your main paints in terms of “texture?” I’m planning to use a gloss primary with a semigloss secondary and a clear matte finish on top. Will the semigloss accents look tacky? Should I stay consistent with the gloss? Any tips are greatly appreciated!
I used ulta flat colors for my armor then put some layers of clear matte over it. For one helmet that I made I did use a gloss green and matte black for details, it didnt look quite right but after putting a semi-gloss clear over top it looked way better.
 
I used ulta flat colors for my armor then put some layers of clear matte over it. For one helmet that I made I did use a gloss green and matte black for details, it didnt look quite right but after putting a semi-gloss clear over top it looked way better.
In the past I also used gloss and finished with clear matte. Semi-gloss imo just looks like a less wet, shiny version of the gloss. I've only tried the matte clear coat once, but I'm guessing whatever texture you use, the matte will just make it all look the same in the end. Probably stay consistent with the gloss.
Thanks for the tips, guys! I appreciate it!
 
Finally got some paint on the Mk. V bucket! Laid down a couple layers of silver for the undercoat. What did some of you use for your main paints in terms of “texture?” I’m planning to use a gloss primary with a semigloss secondary and a clear matte finish on top. Will the semigloss accents look tacky? Should I stay consistent with the gloss? Any tips are greatly appreciated!
I've been reading about your build. I too am building a spartan 3. Looks great so far! My question is what do you mean by texture for the paint? I've hit all my stuff with 2 or 3 coats of matte finish. My only recommendation would be to test out your finishing coats on a few bad prints if you have any lying around. And then make sure you apply the same technique to the whole suit. A semi gloss probably won't look tacky if your whole armor is going to be a brand new set that's never seen battle. However if you plan on weathering it up, the gloss might look out of place. Keep up the good work!
 
I've been reading about your build. I too am building a spartan 3. Looks great so far! My question is what do you mean by texture for the paint? I've hit all my stuff with 2 or 3 coats of matte finish. My only recommendation would be to test out your finishing coats on a few bad prints if you have any lying around. And then make sure you apply the same technique to the whole suit. A semi gloss probably won't look tacky if your whole armor is going to be a brand new set that's never seen battle. However if you plan on weathering it up, the gloss might look out of place. Keep up the good work!
Thanks a lot! By texture I guess I mean like type of paint (gloss, semigloss, matte, etc). I am hoping to weather it up a little bit. I’ve been planning to follow weathering @ConnorCreator’s tutorial on YouTube
and he used gloss paint and then used a matte clear finish when he was done with everything and I thought it looked pretty good! I just don’t know whether to keep the gloss paint consistent for the whole armor, or if I’d want to use like semigloss or matte for the black accents.
So I know this is comparing apples to oranges but I matte finished my helmet but then someone had told me to use gloss nail polish for my blood to give it more of a blood like appreance. Not sure if this will apply to your armor or not, but just a suggestion.
 

Attachments

  • 20220425_203753.jpg
    20220425_203753.jpg
    2.3 MB · Views: 75
Hello again… long time no update. I’ve been struggling hardcore with my printer over the last month or so. First I had large clog that formed a block of plastic around my hot end, then I clean it up and replaced the bowden tube, and I started getting this weird wavy texture on my prints. Then I decided to replace the entire hot end. I started to finally get some distinguishable prints off with what I think was some pretty bad under extrusion. THEN, when I was in the midst of trying to fix my prints, this happened… again.
D8D69F78-8742-41F8-90BE-CB9C6ADA80FC.jpeg
F12EFF9D-AB6B-46CC-A79F-F6C51E0D568C.jpeg
I have no idea what the hell caused this for a second time, nor can I figure out why my prints aren’t solid anymore. Currently running a 0.4mm nozzle, and might try something a bit bigger and see if that helps… maybe a 0.6mm? I don’t know. This has been a super frustrating process that I’m sure every 3D printer-person has gone through at some point, but if anybody has any knowledge or any ideas on what I might be able to to to get my printer back to solid working condition that would be greatly appreciated! I’ll give any details needed.
 
Oh my goodness I think I got it (mostly) back to normal!! Sorry for being a bit dramatic in my previous post. I cleaned up my hot end, did my best to clear my bowden tube, hot end tube, and I put on the new 0.6mm nozzle. After loading up a calibration cube I still noticed some under extrusion. I was looking all over the printer, and then I saw it:
359632E2-07B0-452F-9E15-E7CA880C3ED7.jpeg
That silver gear on the extruder wasn't moving. I tightened up a couple of screws to help press the silver gear up against the toothed bronze gear, and she seems to be printing like normal again! I’ll be running some more test prints and posting another update or two. Fingers crossed everything goes well!
 
Glad you got it fixed! Just a word of caution though, I would look into upgrading your plastic extruder to a metal one. The plastic ones tend to crack and will leave you with more problems at some point. Because of the pressure the spring is putting on the plastic lever, it's only a matter of time until it cracks on you. It also looks like you are missing the little black clip on your Bowden tube at the extruder connection. Those are supposed to help the tube from not backing out. You should also have one of those on your hot end for the same reason.
Oh my goodness I think I got it (mostly) back to normal!! Sorry for being a bit dramatic in my previous post. I cleaned up my hot end, did my best to clear my bowden tube, hot end tube, and I put on the new 0.6mm nozzle. After loading up a calibration cube I still noticed some under extrusion. I was looking all over the printer, and then I saw it: View attachment 321511That silver gear on the extruder wasn't moving. I tightened up a couple of screws to help press the silver gear up against the toothed bronze gear, and she seems to be printing like normal again! I’ll be running some more test prints and posting another update or two. Fingers crossed everything g
 
Glad you got it fixed! Just a word of caution though, I would look into upgrading your plastic extruder to a metal one. The plastic ones tend to crack and will leave you with more problems at some point. Because of the pressure the spring is putting on the plastic lever, it's only a matter of time until it cracks on you. It also looks like you are missing the little black clip on your Bowden tube at the extruder connection. Those are supposed to help the tube from not backing out. You should also have one of those on your hot end for the same reason.
Thanks for the tips! I’ll definitely look into getting a metal extruder. As for those clips I have some, I just totally forgot to pop them back on after I replaced the bowden tube, so thanks for the reminder!
 
Glad you got it fixed! Just a word of caution though, I would look into upgrading your plastic extruder to a metal one. The plastic ones tend to crack and will leave you with more problems at some point. Because of the pressure the spring is putting on the plastic lever, it's only a matter of time until it cracks on you. It also looks like you are missing the little black clip on your Bowden tube at the extruder connection. Those are supposed to help the tube from not backing out. You should also have one of those on your hot end for the same reason.
I second this. My plastic one cracked after only a month of use.
to be fair i did also print an entire chest piece in 2 weeks but regardless. Metal one is far better long term
creality printers generally are weird with how long they last though. So many upgrades needed for a stock printer. ughhh
 
I've taken your advice and I have a new metal extruder upgrade on the way! Should be here Monday. I had another print fail for the same reason after I sent my last message so I figured I'd just replace the extruder before I mess anything else up!
 
Hello again y’all! We’re nearing completion! Got my printer back up and running (I don’t remember who called it, but my plastic extruder was completely cracked haha), and I got most of my rigging figured out! I got the tactical/patrol gillie thing intsalled and it’s lookin pretty sweet! Pretty much all that’s left is for me to finish up sanding/painting and electronics!

I printed out Oddwork’s DMR and I don’t regret it! It turned out fantastic!

I’m looking for a temporary visor solution that I can get within a month, since the person I’d like to commission one from is currently unavailable. Any suggestions would be greatly appreciated! I might also look into reprinting my thigh armor eventually. I feel like they sit a bit too low at the moment, and they’re a bit too small to get them all the way up my leg lol
 

Attachments

  • 1BC442C8-5F00-42E9-BD6C-EF9AD67192A8.jpeg
    1BC442C8-5F00-42E9-BD6C-EF9AD67192A8.jpeg
    603.1 KB · Views: 127
  • 9C026AD2-D093-4271-9C34-572DA865C36A.jpeg
    9C026AD2-D093-4271-9C34-572DA865C36A.jpeg
    492.7 KB · Views: 114
  • 646E89CA-BD85-442E-A098-A90170C2B25B.jpeg
    646E89CA-BD85-442E-A098-A90170C2B25B.jpeg
    458.2 KB · Views: 113
  • DFE52DB4-F80C-4500-9120-13C6FB58BAAB.jpeg
    DFE52DB4-F80C-4500-9120-13C6FB58BAAB.jpeg
    505.2 KB · Views: 94
  • 70F02EFD-9A47-4C3A-A5C7-240AA7C6DB8A.png
    70F02EFD-9A47-4C3A-A5C7-240AA7C6DB8A.png
    9.7 MB · Views: 96
  • F1110398-54F4-4E04-B9B4-D21D4843F444.jpeg
    F1110398-54F4-4E04-B9B4-D21D4843F444.jpeg
    585.2 KB · Views: 92
  • E8B91412-09FF-483B-9598-D8DAEE846C88.png
    E8B91412-09FF-483B-9598-D8DAEE846C88.png
    9.9 MB · Views: 86
  • 99485B73-DADA-4033-9CEC-903C5737E918.png
    99485B73-DADA-4033-9CEC-903C5737E918.png
    9.9 MB · Views: 78
  • 31A4C3C4-67AB-4A24-9D92-3CEF9DB09F55.png
    31A4C3C4-67AB-4A24-9D92-3CEF9DB09F55.png
    9.9 MB · Views: 82
  • 976A3811-282D-448F-9770-8C9485598003.jpeg
    976A3811-282D-448F-9770-8C9485598003.jpeg
    535 KB · Views: 99
How tall is the girl in the picture? I can't tell if she is short or you're just tall in the armour.

It looks great so far though!
 
This thread is more than 10 months old.

Your message may be considered spam for the following reasons:

  1. This thread hasn't been active in some time. A new post in this thread might not contribute constructively to this discussion after so long.
If you wish to reply despite these issues, check the box below before replying.
Be aware that malicious compliance may result in more severe penalties.
Back
Top