Looking good so far. Just some tips for when your using bondo, first off bondo cures by heat, so follow the instructions on the can for how much hardener to add, and take note that the colder it is outside, the longer it will take to make the bondo fully cure, and vice versa. Based on the temperature outside, add an amount of hardener that will give you plenty of time to spread the bondo.
Also, when spreading and applying the bond to the helmet, be sure to do so in thin even coats and try not to glob th bondo onto the helmet and let it cure.
Another thing you can try is looking through Cearel Killl3r's thread in the elite forums if you haven't already and take some of tips about using a razor blade to shape rubbery, half cured bondo. This can significantly cut down on the amount of sanding you have to do if you cut the shape of the curing bondo with a blade.
Lastly, when you are spreading the bondo on the helmet and you feel it start to become thicker, stop trying to continue spreading it, because thats how you end up with the bondo clumping if you try to continue.
Good luck with the rest of your build.
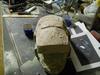
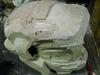
 in good time. Bondo is coming along nicely still not sure how long I should let it set before sanding though.