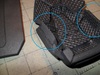
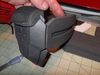
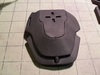
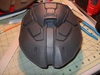
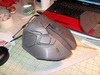
This is a detailed construction tutorial for the Halo 4 Mk VII Bicep part. Once finished, it should look similar to this:

FIRST AND FOREMOST, due credit must be given. Model by L3X BLU3R1V3R, Unfold by L3X BlU3r1V3R, and Foam Conversion by Rainbow Dash.
This bicep file can be found here.
Tools required:
EVA foam - This build utilizes approx. 1 - 2' X 2' sheet of EVA Foam for both left and right shoulders
Craft Foam - 2" X 8" of 2mm craft foam will be sufficient
*Scalpel handle with #11 blades (I used just one blade and sharpened it between each piece at a minimum)
Ball point pen
Printed templates. I used the default size of H:119mm W:106mm D:180mm
*Box Cutter blade - I use the small, rectangle, single edge ones (the kind you put in a cheap box-cutter)
*Cutting mat (or other surface to protect your table or whatever is under your foam!)
Hot glue gun
*High temp glue sticks (I ONLY use hot temp and not low or multi-temp ones... they make a difference!)
Heat gun
*Dremel with barrel sander bit (120 grit)
* indicates optional or personal preference. I have found that using these items generally yield superior builds if used correctly.
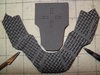
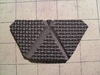
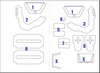
Ok, now for the pep file template.

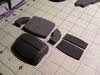
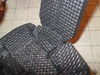
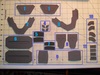
And my cut-outs

Prepping the template file:
You will need to search through the pieces that are outside the 2D area that represent parts #5 and #7. To do this, hover over the 2D side and zoom out until the parts in the upper right corner of that panel appear. Once you find them, you will need to drag them back into the template panel. Please note: This requires Pepakura Designer to accomplish. If you are using Viewer, you will need to freehand these pieces. I will go over that more in a bit.
Remember, these instructions and cut-outs are for only one side (Left or right, they are the same). If you plan on making two full pieces, you will need to do this twice.
Let's go over the parts:
#1. Where the blue lines are in the template picture is where you will want to hand draw on your printed piece. Cut them out so it looks like the ones I have in the foam photo.
#2. This is cut out just like it is on the template.
#3. Same as #2
#4 As drawn in blue on the template picture, you will need to basically double these. also, they are mirrored, so you will need to cut the opposite as well, like in my foam cut-out photo.
#5 If you have designer, you will need to smooth the lines a bit, but the basic shape and size is what we are looking for here. If you do not have Designer, you will need to freehand draw and cut these template pieces yourself. Using the template picture as reference, here are the dimensions. The short sides are 3/4" and the long sides are 1 3/4". Don't forget to add a bit of a curve to one side (it has approx. a 1/8" rise and drop). This piece will be cut out of the 2mm craft foam.
#6 Cut this out just like it is on the template.
#7 Just like #5, but these are only 1/2" on the short sides. The rest of the dimensions and shape are the same. This piece will be cut out of the 2mm craft foam.
#8 Cut this out just like it is on the template.
#9 This is a custom cut. Taking the templates you used from #5 and #7, lay them out so that they are parallel with each other on the long side that does not have the curve. The space between should be 1/8". Then, you will draw around the outside, leaving 1/8" gap. This will give you this piece's pattern.
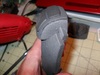
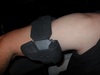
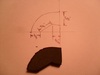
#10 This is also a custom cut and is a bit more tricky to come up with. Here is how it is made. Curving the part you made (cut out EVA, not the template) to approximately what I am showing in the picture below, trace the outside edge onto your cardstock. Then, follow the measurements in the photo.

#11 These are custom cut, and will be used as buffer pieces. Accuracy is not imperative here, but try to keep it close. The long edge is 1" and the short edge is 1/2". You will need four of these.
Next post will be the heat shaping, cutting angles and assembling.

FIRST AND FOREMOST, due credit must be given. Model by L3X BLU3R1V3R, Unfold by L3X BlU3r1V3R, and Foam Conversion by Rainbow Dash.
This bicep file can be found here.
Tools required:
EVA foam - This build utilizes approx. 1 - 2' X 2' sheet of EVA Foam for both left and right shoulders
Craft Foam - 2" X 8" of 2mm craft foam will be sufficient
*Scalpel handle with #11 blades (I used just one blade and sharpened it between each piece at a minimum)
Ball point pen
Printed templates. I used the default size of H:119mm W:106mm D:180mm
*Box Cutter blade - I use the small, rectangle, single edge ones (the kind you put in a cheap box-cutter)
*Cutting mat (or other surface to protect your table or whatever is under your foam!)
Hot glue gun
*High temp glue sticks (I ONLY use hot temp and not low or multi-temp ones... they make a difference!)
Heat gun
*Dremel with barrel sander bit (120 grit)
* indicates optional or personal preference. I have found that using these items generally yield superior builds if used correctly.
Ok, now for the pep file template.

And my cut-outs

Prepping the template file:
You will need to search through the pieces that are outside the 2D area that represent parts #5 and #7. To do this, hover over the 2D side and zoom out until the parts in the upper right corner of that panel appear. Once you find them, you will need to drag them back into the template panel. Please note: This requires Pepakura Designer to accomplish. If you are using Viewer, you will need to freehand these pieces. I will go over that more in a bit.
Remember, these instructions and cut-outs are for only one side (Left or right, they are the same). If you plan on making two full pieces, you will need to do this twice.
Let's go over the parts:
#1. Where the blue lines are in the template picture is where you will want to hand draw on your printed piece. Cut them out so it looks like the ones I have in the foam photo.
#2. This is cut out just like it is on the template.
#3. Same as #2
#4 As drawn in blue on the template picture, you will need to basically double these. also, they are mirrored, so you will need to cut the opposite as well, like in my foam cut-out photo.
#5 If you have designer, you will need to smooth the lines a bit, but the basic shape and size is what we are looking for here. If you do not have Designer, you will need to freehand draw and cut these template pieces yourself. Using the template picture as reference, here are the dimensions. The short sides are 3/4" and the long sides are 1 3/4". Don't forget to add a bit of a curve to one side (it has approx. a 1/8" rise and drop). This piece will be cut out of the 2mm craft foam.
#6 Cut this out just like it is on the template.
#7 Just like #5, but these are only 1/2" on the short sides. The rest of the dimensions and shape are the same. This piece will be cut out of the 2mm craft foam.
#8 Cut this out just like it is on the template.
#9 This is a custom cut. Taking the templates you used from #5 and #7, lay them out so that they are parallel with each other on the long side that does not have the curve. The space between should be 1/8". Then, you will draw around the outside, leaving 1/8" gap. This will give you this piece's pattern.
#10 This is also a custom cut and is a bit more tricky to come up with. Here is how it is made. Curving the part you made (cut out EVA, not the template) to approximately what I am showing in the picture below, trace the outside edge onto your cardstock. Then, follow the measurements in the photo.

#11 These are custom cut, and will be used as buffer pieces. Accuracy is not imperative here, but try to keep it close. The long edge is 1" and the short edge is 1/2". You will need four of these.
Next post will be the heat shaping, cutting angles and assembling.


") I hope you have found this helpful, and if you have any questions or comments, please feel free to provide them.
I hope you have found this helpful, and if you have any questions or comments, please feel free to provide them.