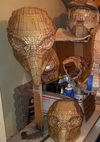
Duke's Prometheus Engineer Helmet

Status
Not open for further replies.

PerniciousDuke

RCO & BCO
405th Regiment Officer
Member DIN
S128
It has begun.
As promised..

20161024_210949_zpsykju93up.jpg

20161024_210813_zpsislwyefs.jpg

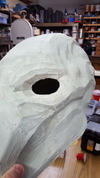
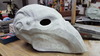
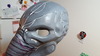
I'm really happy with how this helmet came together. (I'll point to the download link later). It was interesting how many tabless lines there were. But it worked. Sadly I'll have to redo this one. The person I'm making it for is bigger than me and I could barely get my head into the pep.

I still wanted to post it so that any newcomers might see that even those of us who have made multiple pieces still end up repepping due to scaling issues.

I think I'll still finish this one though. Stay tuned.
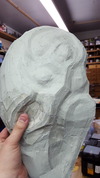
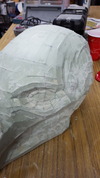
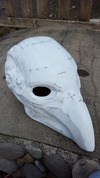
 

Attachments

  • 20161024_210949_zpsykju93up.jpg
    20161024_210949_zpsykju93up.jpg
    310.8 KB · Views: 706
  • 20161024_210813_zpsislwyefs.jpg
    20161024_210813_zpsislwyefs.jpg
    347.2 KB · Views: 463
Very cool.

Thanks, dude!

Here's my second take.
20161029_113158_zpsltqmucbl.jpg
Much more to scale for the person who will be wearing it. Plus I gave higher tolerances of printable fold angles which I think added just a little bit to the shape.

Here is the link where I got the file.

I'll be fiberglassing it today and tomorrow, along with my reach chest and biceps. Photos to drop Monday. Thanks for checking it out and hope you are all having a safe Halloween weekend.
 

Attachments

  • 20161029_113158_zpsltqmucbl.jpg
    20161029_113158_zpsltqmucbl.jpg
    335.3 KB · Views: 581
Dudeeee this is looking awesome!!!

Haha, thanks! Rest assured I will finish this and it will look even cooler in the weeks to come.

This last weekend I was able to get quite a bit done. Finished hardening both helmets. Two thin coats of resin on the outside, removed the braces, one thick coat on the inside and then enough resin to soak into the fiberglass. Super durable now. Stinks like no other though. The tenants in my new apartment are going to hate me. :l
20161030_151606_zpsuzjqcbwh.jpg
 

Attachments

  • 20161030_151606_zpsuzjqcbwh.jpg
    20161030_151606_zpsuzjqcbwh.jpg
    560.6 KB · Views: 431
When they come to confront you about the odor......just look them dead on and say "What smell?"
 
Dude, these helmets are gorgeous! I will be following your progress on these for sure.

As a side note, isn't it interesting how the resin shows where all the tabs are underneath the surface?
 
I bet the smell is strong with all those resin filled helmets ha. Can't wait to see the progress on this man!
So strong. I share an enclosed entry with three other tenants and my storage closet is in that entry way. So every time we come in and out of our apartments you can smell them all. :sick
I'm going to buy one of those deodorizing sprays that is supposed to get rid of smoke smell. I'll make a post if that worked.

When they come to confront you about the odor......just look them dead on and say "What smell?"
Haha! I chose to go with bribery. Everybody likes brownies. :D


Dude, these helmets are gorgeous! I will be following your progress on these for sure.

As a side note, isn't it interesting how the resin shows where all the tabs are underneath the surface?
Thank you!

Yeah, I thought so too. The discoloration you are talking about is from the hot glue that I use. Something about how the resin doesn't get to soak through the backside of the paper because the glue is in the way, that's my thought anyway.
 
New Update:

I'm getting a good amount of time into bondoing this weekend. I decided to take CommanderPalmer 's lead and tried rondoing the outside layer this time. I'm really happy with the results.

First I rondoed the inside and with the extra I applied it to the outside with a paint brush. Since I didn't lose much of the detail I then made a full batch of rondo for the outside. This time a little heavy on the bondo. Probably 40/60. I kept brushing it on non stop so that it wouldn't settle in one spot long enough to pool. Usually the flats of a pep sag a little after being resined. This did a great job of leveling out those saging flat spots.

Then I saved even more time, normally I would grab a rasp and knock out the high points, but this time I grabbed 40 grit sandpaper instead.

Here you can see the sides have been rondo ed and knocked down and the top has an extra layer of bondo already.
20161105_194536_zps3aaq2k6p.jpg

To bondo the top I used a putty knife, but to do the sides I used my hands. There are a lots of shapes that I needed to keep. If I ever started to lose them I would dig my fingers in and smooth it out.
20161105_202239_zpsakedzqti.jpg

Here I managed to get the eyes cut out. Another coat or two of bondo tomorrow and I should be close to done with this guy.
20161105_205034_zpst5z2bsfl.jpg
 

Attachments

  • 20161105_205034_zpst5z2bsfl.jpg
    20161105_205034_zpst5z2bsfl.jpg
    165.7 KB · Views: 411
  • 20161105_202239_zpsakedzqti.jpg
    20161105_202239_zpsakedzqti.jpg
    168.8 KB · Views: 428
  • 20161105_194536_zps3aaq2k6p.jpg
    20161105_194536_zps3aaq2k6p.jpg
    160.5 KB · Views: 421
Two coats of Bondo unsanded:
20161106_095942_zpsqpf4vndg.jpg

Two coats of Bondo sanded in 6 steps 40 grit - 60 grit - 80 grit - 120 grit - 220 grit - 400 grit:
20161106_153656_zpsvurfl8zy.jpg

Nice coat of primer to show me all my little mistake. :/ I think I will keep the divots in since this helmet is supposed to emulate organic material and bone and skin has imperfections. I won't be painting the helmet. The person wearing it is making the rest of the suit out of foam so I think it would be best if he painted the helmet to match the suit. Right now I'm in the home stretch for my part. I will be installing a fan and switch. I will be installing lenses, hopefully like a mirrored smoke with some curve to it. And I think I will attempt to glue craft foam in strips along the trunk to create the ribbed effect. I have not worked with foam before so it will be interesting. Then everything will be plasti-dipped hopefully achieving a skin look. I'm open to suggestions on how to finish this guy up.
20161106_154616_zps6doqp01a.jpg


Here is my reference photo:
engineer-helmet-in-prometheus.PNG
 

Attachments

  • 20161106_154616_zps6doqp01a.jpg
    20161106_154616_zps6doqp01a.jpg
    180.5 KB · Views: 459
  • 20161106_153656_zpsvurfl8zy.jpg
    20161106_153656_zpsvurfl8zy.jpg
    179.9 KB · Views: 295
  • 20161106_095942_zpsqpf4vndg.jpg
    20161106_095942_zpsqpf4vndg.jpg
    196 KB · Views: 420
My friend has decided that he does want me to do more detail. So I will be adding in the veins and whatever I can do to improve the look.

So far this is the reference image I like the most for detail.
engineer_helmet_by_loadagain-d5b3y0w.jpg

A lot of the other helmets built out there are similar to the one from the movie in that they've been decayed for years. Since the guy I'm making it for is going to wear the suit, we're going for the "newer" look.

This is the only other reference image I can find of a newer space jockey.
spacejockey_prometheus_helmet.jpg
 
Great job. I hope I can get this good at my builds lol.
Thanks! We all have to start somewhere. I've been doing this for a year now and I learn more and more with each project. If you'd like to follow my progress I try to detail out what I learn along the way and the links to them are in my signature. The Pipboy was my first one which shows how I approached it. The Venator was my second and I attempted to organize my process into repeatable steps. I hope you might find them helpful.
 
Not a big update, but I'm still moving along. I can't get quite the detail like I've seen in warbola and foam, but it's the best I can do at the moment. I sharpied black lines to give me the idea of what I wanted and then used small files to grind grooves in. Not super dramatic, but I think it gives the helmet more dimension or character. The grooves are not very deep and once they are painted the same color you won't notice them as much. But, I like to think that each engineer's suit was unique. Every decayed one is so different it gives the impression that they were originally handcrafted by the engineer that wore them. Just an idea. Up next will be my first venture into foam! Wish me luck!

20161119_213355_zps4oarqlwf.jpg
 

Attachments

  • 20161119_213355_zps4oarqlwf.jpg
    20161119_213355_zps4oarqlwf.jpg
    123.4 KB · Views: 438
Oh wow, I never even considered looking into this part of the forum before. All these nice goodies I was totally left unaware of. :D

I could say SOO many positive things about this Duke, but THIS :

I've been doing this for a year now and I learn more and more with each project.

embodied everything I could say in one simple sentence.

Great job, Duke. As always.
 
Last edited by a moderator:
Oh wow, I never even considered looking into this part of the forum before. All these nice goodies I was totally left unaware of. :D

I could say SOO many positive things about this Duke, but THIS :

I've been doing this for a year now and I learn more and more with each project.

embodied everything I could say in one simple sentence.

Great job, Duke. As always.

Why, thank you, kind sir. :)

Update: I don't envy you foam smiths. I've been at this for two hours now and this is as far as I've got. No mess ups, just super slow. First I drape 1mm craft foam over because it contours really well. I outline what I want and cut it out. I then use that as a template and cut out the piece in a 2mm foam. Then round one edge using a craft knife and sand paper. Then I superglue it down. I'm happy with the result. 6 more hours I should have an alien trunk beak thing. :D

20161125_153843_zpseqdmby2l.jpg

20161125_153843_zpseqdmby2l.jpg
 
Last edited by a moderator:
Oooh? what have we here?

I've tried pepakura before, but I REALLY hate it.

just so time consuming, and it never seems to come out like I want it to.:cry

every time, I start one, then let it be for a week or so, then come back to it
whenever I start up again, and get sanding, I do this:

:sickBLEEEEEeeeeeghhhh....bluuuhhhrk....Ugh, I think I'm good...

hup, wait...BLEGH, :sick:sick:sick

I may be just a tad bit dramatic, but how do you guys do so well?! it looks awesome!:lol

advice, anyone? I feel like I'm doing it wrong.:)
 
Status
Not open for further replies.
Back
Top