You are using an out of date browser. It may not display this or other websites correctly.
You should upgrade or use an alternative browser.
You should upgrade or use an alternative browser.
1st Build First Build - Carter-A259
- Thread starter pinoyfiasco
- Start date
pinoyfiasco
Jr Member
It's just solid PLA. The designer recommends making it out of foam to make it easier to put on, but I didn't quite have the means to do that well. I opted to print it solid and just cut the front open instead, which works just fine.The build is looking fantastic so far! What is that chest gasket printed out of? Is is solid, or did you use TPU (or something similar)?
This is looking great! I'm excited to see how this whole system comes together.I haven't been able to work on anything almost all week, so this morning I got started on rigging and a bit of an experiment with the boot.
View attachment 347900
The two buckles on each thigh will be connected to the codpiece and backside bulkhead on the belt to prevent any unwanted drifting or shifting, and will be mostly concealed by the inner suit while the buckles are tucked underneath the armor.
View attachment 347906
I haven't done the shins yet but I drew up a rough sketch of how I'm thinking the strap will be placed. The buckle (red) will be just out of sight above the knee, then the strap (green) will run underneath a kneepad (blue) and be cemented to the inside of the shin guard a little ways down. The distances are off in the photo but that's the vague idea.
I'm trying a little something with the boot that I don't know will work. My plan is to add a treaded sole underneath using layers of 10mm EVA floor tile and sole rubber.
View attachment 347902View attachment 347903View attachment 347904View attachment 347905
I started by opening the boot STL in OrcaSlicer and cutting all but 1mm off of it, leaving just the bottom outline. I merged this with a .4mm thick rectangle. which will equate to two printed layers at a .2mm layer height. This is thick enough that it won't tear out, but just thin enough to cut with scissors with minimal resistance. Once printed I cut off all of the extra material.
This now serves as a more solid bottom layer for the boot, which will be sandwiched between layers of foam, to which I'll add the tread for traction. All of this will be glued together using shoe cement.
This is about as far as I got this morning so I apologize there's not much more to show. It'll definitely need a lot of testing to see how comfortable it will be to walk in, and it certainly won't be 100% accurate to the game model, but if it works, I think it'll elevate the look (pun intended). It'll keep the plastic from dragging or scraping the ground, hopefully minimizing the risk of damage. It can also give me almost an extra inch of lift. I think the boot will also look more solid this way instead of simply sitting on top of the shoe, while still allowing for some flex.
Gochya! How's mobility? I used a printed gasket similar to yours (albeit a bit larger) early in my first build, and it severely restricted my arm movement,It's just solid PLA. The designer recommends making it out of foam to make it easier to put on, but I didn't quite have the means to do that well. I opted to print it solid and just cut the front open instead, which works just fine.
pinoyfiasco
Jr Member
I would say it's pretty good. I haven't experienced any loss of movement. There are some segmented pieces that will be run along the edge of the arm holes (you can see them in the images on this Etsy listing), so I'm sure my biceps will collide with those when my arms are at rest, but I'll be printing those from TPU so they'll have plenty of flex and won't be in the way.Gochya! How's mobility? I used a printed gasket similar to yours (albeit a bit larger) early in my first build, and it severely restricted my arm movement,
pinoyfiasco
Jr Member
Put some more work into the boots.
I cut the "insoles" out of 5mm foam and stuck it on with some cement. They look like little SPARTAN slippers - "little" not being the operative word here.


Then another layer of 5mm foam on the underside for reinforcement. This one got tricky. Once the cement sets and the two surfaces come into contact, there's no backsies. Unfortunately one of the boots got out of control and is shifted to the side. There was no way I could reposition it without destroying the part, so I had to add some scrap foam to fill out the problem areas. I still need to add the actual sole, but this was as far as I could get last night.
Nobleezys, coming soon to stores near you.

I cut the "insoles" out of 5mm foam and stuck it on with some cement. They look like little SPARTAN slippers - "little" not being the operative word here.
Then another layer of 5mm foam on the underside for reinforcement. This one got tricky. Once the cement sets and the two surfaces come into contact, there's no backsies. Unfortunately one of the boots got out of control and is shifted to the side. There was no way I could reposition it without destroying the part, so I had to add some scrap foam to fill out the problem areas. I still need to add the actual sole, but this was as far as I could get last night.
Nobleezys, coming soon to stores near you.
Attachments
pinoyfiasco
Jr Member
Small but big update. With all the big pieces printed I was finally able to do a test of my rigging, which allowed me to pinpoint the problem areas (of which there were many).
I had hooked the thigh pieces to the codpiece and mudflap, and the shins to the thighs. I significantly underestimated just how heavy the thigh/shin assembly would be, so it was pulling the belt down quite a bit, which is why the entire lower half is sitting so low in the photo. I decided to reroute the thigh strap to the shoulder harness, which I'm sure will bear the weight much better.

I've also had some questions about my harness setup so here it is. I can get a better photo of it later but I was in a bit of a hurry this morning. I'm wearing these tactical suspenders, and the torso armor just sits right on top. The padded shoulders I'm going to swap those swivel clips out (shown in the photo) for some proper side-release buckles which will be lower profile and much easier to hide.
The second major problem area was the shins dangling a little too freely, though I knew that going in. They simply required more padding, so I layered some foam tile on the inside, attached in such a way that I can still lift up part of it to adjust the straps if need be. It fits a little more snugly now, but I can still get my leg in and out fairly easily. I'm toying with the idea of putting an elastic strap in there for extra security, but I'll need a way to hold it open while I'm slipping the leg on so it doesn't catch my compression pants and bunch them up.

pinoyfiasco
Jr Member
Did a little work on the belt. To prevent it from twisting and sagging, I affixed some more elastic on the inside face which helps pull the belt taut.
Working with elastic is pretty challenging when it's tensioned, so I had to attach it one section of a time, securing it with tape and clamps as I went. It looks a little gnarly on the inside but it works really well - the belt even stands up on its own while still having enough flex and stretch to move with me. I'm going to cover it up with a layer of 2mm foam cut to shape - this will not only help it look more "finished" but will help keep the elastic from popping as it pulls inward.
You can also see where I attached some 1 1/2" webbing and buckles for my harness.

.jpg")
.jpg")
.jpg")
Just for shiggles, I printed out TitlewaveDesigns' shoulder sleeves out of TPU. They fit fine and flex nicely, though I'm not entirely sold on using them just yet. I might cut it into segments and reattach with spandex or elastic so that it moves a little easier.

FWIW, my "mannequin" is just my tripod with a horizontal crossbar attached.
I also finished padding the shins. I added some more bulk on the front and elastic to help keep it tight. No swingin' around now.

Working with elastic is pretty challenging when it's tensioned, so I had to attach it one section of a time, securing it with tape and clamps as I went. It looks a little gnarly on the inside but it works really well - the belt even stands up on its own while still having enough flex and stretch to move with me. I'm going to cover it up with a layer of 2mm foam cut to shape - this will not only help it look more "finished" but will help keep the elastic from popping as it pulls inward.
You can also see where I attached some 1 1/2" webbing and buckles for my harness.
Just for shiggles, I printed out TitlewaveDesigns' shoulder sleeves out of TPU. They fit fine and flex nicely, though I'm not entirely sold on using them just yet. I might cut it into segments and reattach with spandex or elastic so that it moves a little easier.
FWIW, my "mannequin" is just my tripod with a horizontal crossbar attached.
I also finished padding the shins. I added some more bulk on the front and elastic to help keep it tight. No swingin' around now.
- Member DIN
- S410
Cod piece done with the elastic like that is a good idea!
The shoulder sleeves look rad! But you mentioned you're not entirely sold on them... Are they a bit restricting? How's the overall maneuverability?
Hey, if a tripod with a crossbar gets the job done then why get an actual mannequin right? XD
The shoulder sleeves look rad! But you mentioned you're not entirely sold on them... Are they a bit restricting? How's the overall maneuverability?
Hey, if a tripod with a crossbar gets the job done then why get an actual mannequin right? XD
pinoyfiasco
Jr Member
Yeah, it keeps it nice and solid so it can hold its shape, but can still deform when needed. They were already modeled with slots running through each segment specifically for this purpose, but they're a bit heavy (at least my prints are) and tend to get out of control so the second strap really helps rein everything in.Cod piece done with the elastic like that is a good idea!
The shoulder sleeves look rad! But you mentioned you're not entirely sold on them... Are they a bit restricting? How's the overall maneuverability?
Hey, if a tripod with a crossbar gets the job done then why get an actual mannequin right? XD
The shoulder sleeves are printed out of 95A TPU, so it can flex but it's on the tougher side. When I try to relax my arms the armpits want to deform inwards and really gets in the way. That's why I'm thinking of cutting it into sections and gluing them onto some stretch fabric so they can move around better.
And yeah, this thing makes a great scarecrow.
 I've already had a couple jump scares myself.
Last edited:
pinoyfiasco
Jr Member
I had a little time this morning to do a quick test fit of the improved rigging. Everything sits much better now. The thighs are hooked to the main harness so they no longer slide down. The elastic and extra padding in the shins keep them from dangling around. The belt stays in place now that it's not loaded, and the sections don't twist and sag like they did before. I was able to comfortably do a lap around the house.
No boots today since I'm still working on the soles, and I haven't hooked the bicep armor to the shoulder harness yet. Also waiting on some filament so I can print the knee guards. Hopefully I can get that done sometime this week - the perils of working full time/working from home part time/keeping a house/three kids.


For comparison, here's the previous setup:

No boots today since I'm still working on the soles, and I haven't hooked the bicep armor to the shoulder harness yet. Also waiting on some filament so I can print the knee guards. Hopefully I can get that done sometime this week - the perils of working full time/working from home part time/keeping a house/three kids.
For comparison, here's the previous setup:
Ben626
New Member
When you get the time could you post a picture of your harness with all it's attachments? I have the same one and have been having a little trouble figuring it out.
Also, how are you keeping the inner chest rig together, or is it just relying on the outer armor to hold it together? I split mine like a clam shell with nylon webbing acting like a hinge.
Also, how are you keeping the inner chest rig together, or is it just relying on the outer armor to hold it together? I split mine like a clam shell with nylon webbing acting like a hinge.
pinoyfiasco
Jr Member
When you get the time could you post a picture of your harness with all it's attachments? I have the same one and have been having a little trouble figuring it out.
Also, how are you keeping the inner chest rig together, or is it just relying on the outer armor to hold it together? I split mine like a clam shell with nylon webbing acting like a hinge.
Sure thing!

First, I removed the original swivel clips that came with it since they were too bulky. That involved cutting the strap at the loop that was originally sewn in. I replaced those with 1 1/2" side-release buckles on the front and rear (the rear buckles aren't in the image here, but it'd be the same story as the front). This is what clips to my belt.
For the thighs I attached a length of 1" nylon webbing to each of the four straps with 1" center-release buckles on each end, which attach to buckles that are glued to the inside of the thigh armor, shown below.

The two lengths of nylon webbing you see on the shoulder padding will be hooked to my bicep armor. That's a work in progress, but it'll be a similar setup to the thighs.
The inner chest rig is just being held together by the outer armor for now, yeah. The front half opens up like a vest, using elastic as hinges. The plan is to have snaps on the outside just under the outer armor where it won't be visible.

17 years?! That's crazy, I'm a little lost though. Are you making the whole undersuit out of eva foam? cuz that would be really warm in the summer.I’ve embarked on my first ever cosplay build, which I’ve only dreamed about doing for the last 17 years.
This is going to be mostly 3D printed, since that’s more my wheelhouse and I’m trying to keep my first outing as frustration-free as possible (though realistically you can’t avoid it sometimes). There will be some select parts that will be made from EVA foam, particularly parts of the undersuit. Nothing complex though, as I haven’t found a good solution for unfolding high poly geometries on macOS.
I’m using an Anycubic Kobra Max for all the large pieces, and an Anycubic Vyper and Sovol SV01 for the smaller stuff. Hoping I can finish upgrading my Ender 3v2 so it can take some of the workload.
The armor is from TitleWave Designs and the helmet is from Galactic Armory.
My primary goal is really getting the proportions looking good. I’m 5’10” and far from SPARTAN physique. I’m willing to take artistic liberties in pursuit of that as well as practicality/wearability.
Image/Text Wall incoming. Apologies if it’s an eyesore - I’m still learning the formatting here.
View attachment 347014
All the printed parts so far. At the time of this photo I was waiting on the left half of the chestpiece.
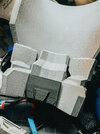
The teal/grey croptop acts as a core for the torso armor. The designer recommended making it out of EVA foam but that’s well out of my range right now. I tried printing half of it with the intent of using it to make a pattern, but that failed miserably. Instead I decided to just print the whole thing and open it up to make it easier to put on and take off. Works pretty well, just have to clean up the edges.
View attachment 347015
View attachment 347016
Everything primed. There’s still plenty of surfacing work to do but it helps me visualize the proportions of the entire suit when it’s all the same color. The visor in the helmet isn’t real, just a mockup for funsies. Can’t see through it. I will be vacuum forming my own visor but that’s down the road yet.
And a test fit:
View attachment 347017View attachment 347018View attachment 347019View attachment 347020
The belt is secured with a harness underneath the torso armor (which will be better hidden). The biceps are secured using 1” elastic strap on the inside. I’m definitely going to beef up the exposed shoulders with some padding, which I can also use to keep the biceps from drifting while I move.
That’s it so far. I’ll try to remember to take plenty of progress photos. I easily get hyperfixated on working.
Fun fact - I was completely blind wearing the helmet for these photos and just had to guess where the camera was.
pinoyfiasco
Jr Member
Oh, sweet lord, no. It's just a (breathable) compression shirt/pants set with some EVA foam where it's crucial/visible.17 years?! That's crazy, I'm a little lost though. Are you making the whole undersuit out of eva foam? cuz that would be really warm in the summer.
pinoyfiasco
Jr Member
Small, quick update.
Got the biceps strapped in so they don’t sag down anymore.
However, I’m not loving how much they collide with the chest piece - not a fault of the model, just my body.
I may cut a deeper notch on the inside and cover it up with foam so it has some give there and I can relax my arms a little more.
I also gave the TPU sleeves a shot and they work pretty well. I did cut a bit out of the underside for mobility. I’m going to section it up even further. The STL included slots around the edge for straps to run through which came in handy.
Still need to figure out how best to securely mount the CDO shoulder to the biceps - I’m thinking I’ll need to design some standoffs in Fusion to act as mounting points.
Proportionally everything feels really good, though. It’s comfortable enough to walk around in. Decided to throw the whole thing on to goof around in front of my kids. I was even able to do a little jig. It really feels like it’s coming together now.
Ben626
New Member
I ran into the same issue with the arms. Right now I don't have the armor that runs under the armpits in place and plan on replacing it with foam.
For my shoulder armor, I positioned it where I wanted it on the bicep and used the bicep as a negative model (hopefully that makes sense). Then I used two part epoxy to attach the shoulder to the bicep.
Everything is looking great and can't wait to see some color!
For my shoulder armor, I positioned it where I wanted it on the bicep and used the bicep as a negative model (hopefully that makes sense). Then I used two part epoxy to attach the shoulder to the bicep.
Everything is looking great and can't wait to see some color!
Last edited:
pinoyfiasco
Jr Member
That's exactly what I was thinking. I was going to do it in Fusion until I remembered I could just do it in the slicer. I used both the bicep and pauldron as negative volumes against a cube.For my shoulder armor, I position it where I wanted it on the bicep and used the bicep as a negative model (hopefully that makes sense). Then I used two part epoxy to attach the shoulder to the bicep.
I'm going to bolt this on for now - put some heat set inserts in the spacer and use screws and washers through the bicep so I can take it off when it's ready for paint. Then when I'm ready to make it permanent I'll slap some two-part JB Weld in there.