Durlaburban
Member
Ok well right of the bat a special thanks goes to everyone whos tutorials and pics i used. I know theres plenty of tuts on how to use this stuff but im gunna go ahead and put them all in a mixing bowl and hit the purree button!
How To Make pepakura Armor
Step 1: Using the pepakura program (unedited from Frizzlefry)
Part I: Downloading Pepakura
To download Pepakura, you will need to visit the URL below, which is Pepakura's website:
http://www.tamasoft.co.jp/pepakura-en/
From here, you will want to select "Download" from the left. Once on the download page, select Pepakura Designer. Once that is selected, follow the download and installation instructions on that page.
Part II: Downloading the Armor Files
Thanks to the hard work of JediFraz, all of the pieces of Mjolnir Armor are available for download right here. You will want to click all of the links below and save them to your hard drive in a place that you can easily find. Here are the pieces:
Helmet
Chest and Backpack
Left Bicept
Left Forearm and Hand
Right Bicept
Right Forearm and Hand
Crotch and Rear
Left Thigh
Left Calf
Left Foot
Right Thigh
Right Calf
Right Foot
Also, supplied to us graciously by Fraz is a model of The Monitor:
Large Monitor
Smaller Monitor
Part III: Opening a .pdo file
Open Pepakura Designer by selecting it from your Start Menu or double clicking the shortcut on your desk top.
Once the software is open, under the File tab select Open:
Find the Helmet file that we saved from above. Select it and click Open:
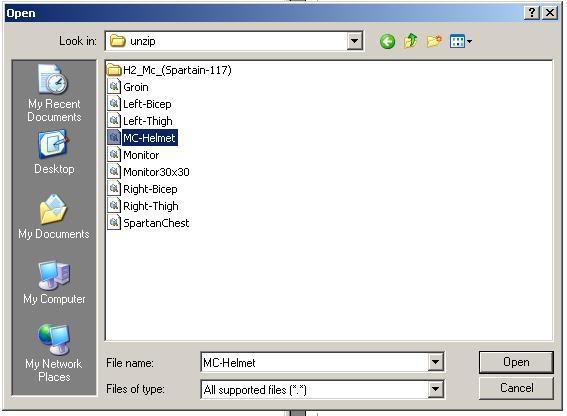
This will open the file. From here you should see two images.
On the left you will see the 3d version of the helmet assembled:
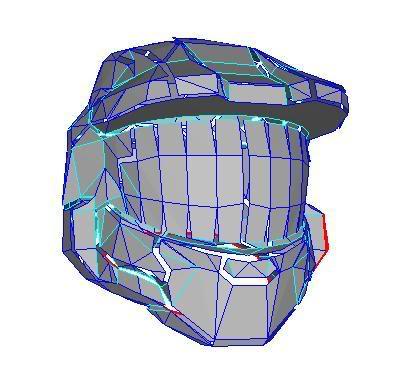
And on the right you will see the individual pieces mapped out to single pieces of paper:
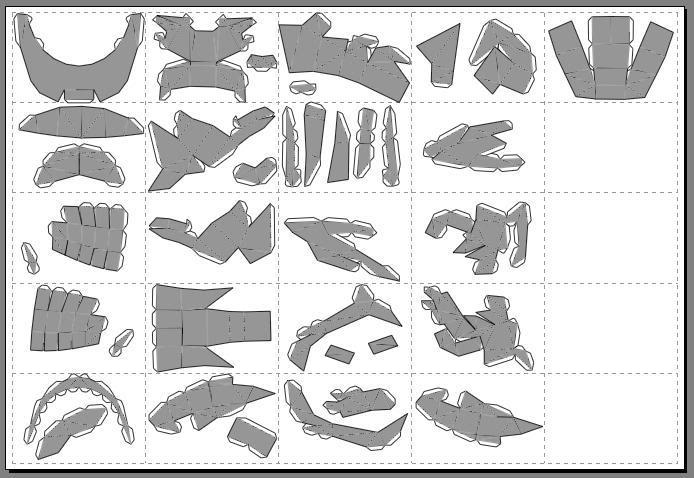
Part IV: Take away the grey
We'll start off by showing you one of the easier parts of the Pepakura software. A lot of people don't want to have their printer print out a grey version of the armor they are creating. It's not really necessary, and it sucks ink out of your printer. So to change this, we are going to remove the grey material used as a face.
To do this you will want to go under the Both Windows tab, and uncheck "Use Materials for Faces":

This should turn your helmet white, as well as all of the pieces shown on the right to white as well.
Part V: Changing the paper size
For those of you who are fortunate to be printing A4 sized paper, you are in luck because a JediFraz has organized all of the pieces on the paper for you. But for those of us using Letter sized paper (8.5 x 11) we will need to change the settings and reorganize all of the objects.
To do this, we will need to go under File and select "Print and Paper Configuration":
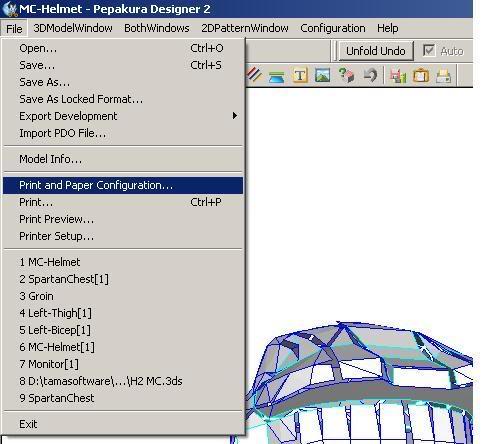
From here, you will want to change the paper size that is set at A4, to Letter:

Also, since Letter is not as long as A4 and we will want these pieces to successfully fit on the paper, you will want to reduce your Side Margin and Top/Bottom Margin to as low as possible (5):
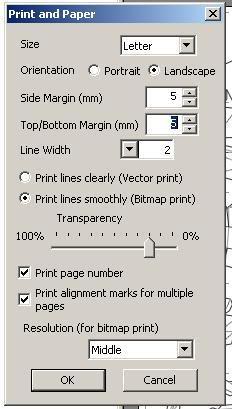
Once we've made this change, you will notice that your pieces on the right no longer fit on the pieces of paper. They are scrambled around and need to be re-aligned.
Part VI: Moving the parts
First what we'll want to do, in order to make things easier, is get rid of the 3d image window so that we can focus soley on putting our 2d pieces correctly onto single sheets of paper.
To do this, go under Configuration and select "ShowOnly2dPatternWindow":
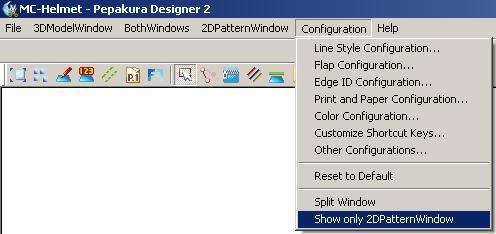
Now we should see only the 2d patterns (if you have a mouse with a scroll wheel you can use that to zoom in and out):
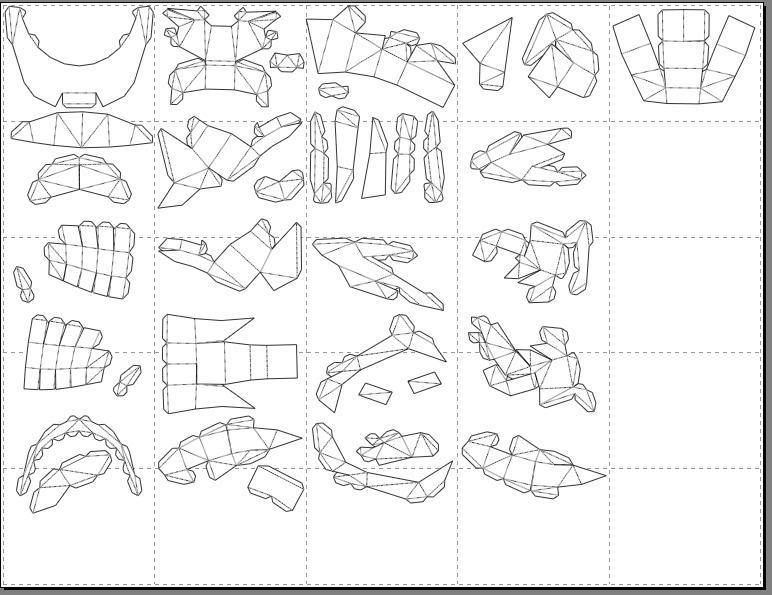
To space these patterns out, we will want to use the Select and Move tool located on the tool bar. The icon should look like this:
http://i165.photobucket.com/albums/u48/Fri...fry13/Tut11.jpg
Grab each pattern and spread it out so that it is fully within the dotted lines that indicate page breaks. Remember that it may be necessary to fully zoom in on a page in order to make sure that the pattern does not overlap or pass a dotted line.
Part VII: Using Part Rotate
Using the Select and Move tool one can successfully seperate each piece onto it's own sheet of paper. However, for the environment concious or people who just don't want to waste a lot of paper for monetary concerns, you can use the Part Rotate tool to "spin" the patterns around and make more fit on a page.
First, we'll select the Part Rotate tool from the toolbar. The icon looks like this:
http://i165.photobucket.com/albums/u48/Fri...fry13/Tut12.jpg
Once you've selected the Part Rotate tool, you should see circles show up on all of the vertexes for each pattern as so:
http://i165.photobucket.com/albums/u48/Fri...fry13/Tut13.jpg
To use this tool, I first suggest that you zoom in on the pattern so that you can get an easier view of the vertexes. Select the vertex that you want to pivot the turn of the pattern on. You should see a cross hair through that vertex now:
http://i165.photobucket.com/albums/u48/Fri...fry13/Tut14.jpg
Now you will want to select another vertex in order to spin the item around the first selected vertex. You can play around with this a lot to make many pieces fit on one sheet of paper. Overall I eliminated five sheets of paper that I otherwise would have wasted by pivoting patterns and placing multiple patterns per sheet.
Part VIII: Almost Ready to Print
You have the paper resized, and you have the patterns re-aligned to the new sized paper. And from now you may be able to print. But there are a few functions left in Pepakura that you may want to utilize before you waste a lot of paper.
Flap Configuration
With this tool, you can change whether or not there are flaps (which are used to tape or glue one pattern to the other), give the flaps colors, or change the width of the flap.
Edge ID Configuration
This is where you turn on or off the Edge ID. An Edge ID is a number that helps you put the puzzle together. If left on, you would connect Edge ID #1 to Edge ID #1. If turned off, you would essencially turn your patterns for your helmet into a bit of a 3 dimensional jigsaw puzzle, which is not recommended unless you have a lot of time to waste and enjoy a challenge. From here you can also Flip the ID position and change the font size of the ID.
Line Style Configuration
I highly suggest that you at least take a look at this configuration, even if you don't edit it. From here you can edit the way your line looks if it is a Cut Line, Mountain Line (outside fold) or Valley Line (inside fold). Knowing the overall look of your Mountain and Valley lines will help you to know whether you are folding out or folding in on all of the fold lines printed on your pattern. If you are not satisfied with the line types that came default, you can also edit them to your preference.
Other
There are several other tools that are useful in Pepakura, but for the most part they are used to manipulate the 3d object into different 2d patterns. Since JediFraz was kind enough to take most of the legwork out of this for us, we will skip these parts in the tutorial. But feel free to play around with them to get a better feel for the software if it suits you.
Part IX: Print
The first thing we'll want to do is check our Printer Setup. From the File menu select Printer Setup:
http://i165.photobucket.com/albums/u48/Fri...fry13/Tut15.jpg
From here we will want to make sure that we have the correct printer chosen, and that we are in the correct Orientation. If you did not change the Orientation from when you opened the file, your printer will need to be in Landscape. But if you have changed the Orientation when we adjusted the paper settings, make sure that your Printer Setup Orientation matches the Print and Paper Configuration Orientation. FAILURE TO DO SO WILL RESULT IN A RESCALE OF ALL OF YOUR PIECES OR YOUR PATTERNS WILL BE SPREAD OUT ACROSS MULTIPLE PAGES:
http://i165.photobucket.com/albums/u48/Fri...fry13/Tut16.jpg
Now that you've verified your Orientation, all that's left to do is Print! To do this, just go under File to Print and you are ready to rock!
Part X: Conclusion
In conclusion I hope that you have found that this tutorial makes using Pepakura easier for you. The software is really quite friendly, and for those of you that have $40 laying around, is probably worth registering. If you have any questions at all about how to use the software, feel free to ask them in this thread and I will do what I can to answer those questions in a timely manner.
Step 2: next post
How To Make pepakura Armor
Step 1: Using the pepakura program (unedited from Frizzlefry)
Part I: Downloading Pepakura
To download Pepakura, you will need to visit the URL below, which is Pepakura's website:
http://www.tamasoft.co.jp/pepakura-en/
From here, you will want to select "Download" from the left. Once on the download page, select Pepakura Designer. Once that is selected, follow the download and installation instructions on that page.
Part II: Downloading the Armor Files
Thanks to the hard work of JediFraz, all of the pieces of Mjolnir Armor are available for download right here. You will want to click all of the links below and save them to your hard drive in a place that you can easily find. Here are the pieces:
Helmet
Chest and Backpack
Left Bicept
Left Forearm and Hand
Right Bicept
Right Forearm and Hand
Crotch and Rear
Left Thigh
Left Calf
Left Foot
Right Thigh
Right Calf
Right Foot
Also, supplied to us graciously by Fraz is a model of The Monitor:
Large Monitor
Smaller Monitor
Part III: Opening a .pdo file
Open Pepakura Designer by selecting it from your Start Menu or double clicking the shortcut on your desk top.
Once the software is open, under the File tab select Open:
Find the Helmet file that we saved from above. Select it and click Open:
This will open the file. From here you should see two images.
On the left you will see the 3d version of the helmet assembled:
And on the right you will see the individual pieces mapped out to single pieces of paper:
Part IV: Take away the grey
We'll start off by showing you one of the easier parts of the Pepakura software. A lot of people don't want to have their printer print out a grey version of the armor they are creating. It's not really necessary, and it sucks ink out of your printer. So to change this, we are going to remove the grey material used as a face.
To do this you will want to go under the Both Windows tab, and uncheck "Use Materials for Faces":
This should turn your helmet white, as well as all of the pieces shown on the right to white as well.
Part V: Changing the paper size
For those of you who are fortunate to be printing A4 sized paper, you are in luck because a JediFraz has organized all of the pieces on the paper for you. But for those of us using Letter sized paper (8.5 x 11) we will need to change the settings and reorganize all of the objects.
To do this, we will need to go under File and select "Print and Paper Configuration":
From here, you will want to change the paper size that is set at A4, to Letter:
Also, since Letter is not as long as A4 and we will want these pieces to successfully fit on the paper, you will want to reduce your Side Margin and Top/Bottom Margin to as low as possible (5):
Once we've made this change, you will notice that your pieces on the right no longer fit on the pieces of paper. They are scrambled around and need to be re-aligned.
Part VI: Moving the parts
First what we'll want to do, in order to make things easier, is get rid of the 3d image window so that we can focus soley on putting our 2d pieces correctly onto single sheets of paper.
To do this, go under Configuration and select "ShowOnly2dPatternWindow":
Now we should see only the 2d patterns (if you have a mouse with a scroll wheel you can use that to zoom in and out):
To space these patterns out, we will want to use the Select and Move tool located on the tool bar. The icon should look like this:
http://i165.photobucket.com/albums/u48/Fri...fry13/Tut11.jpg
Grab each pattern and spread it out so that it is fully within the dotted lines that indicate page breaks. Remember that it may be necessary to fully zoom in on a page in order to make sure that the pattern does not overlap or pass a dotted line.
Part VII: Using Part Rotate
Using the Select and Move tool one can successfully seperate each piece onto it's own sheet of paper. However, for the environment concious or people who just don't want to waste a lot of paper for monetary concerns, you can use the Part Rotate tool to "spin" the patterns around and make more fit on a page.
First, we'll select the Part Rotate tool from the toolbar. The icon looks like this:
http://i165.photobucket.com/albums/u48/Fri...fry13/Tut12.jpg
Once you've selected the Part Rotate tool, you should see circles show up on all of the vertexes for each pattern as so:
http://i165.photobucket.com/albums/u48/Fri...fry13/Tut13.jpg
To use this tool, I first suggest that you zoom in on the pattern so that you can get an easier view of the vertexes. Select the vertex that you want to pivot the turn of the pattern on. You should see a cross hair through that vertex now:
http://i165.photobucket.com/albums/u48/Fri...fry13/Tut14.jpg
Now you will want to select another vertex in order to spin the item around the first selected vertex. You can play around with this a lot to make many pieces fit on one sheet of paper. Overall I eliminated five sheets of paper that I otherwise would have wasted by pivoting patterns and placing multiple patterns per sheet.
Part VIII: Almost Ready to Print
You have the paper resized, and you have the patterns re-aligned to the new sized paper. And from now you may be able to print. But there are a few functions left in Pepakura that you may want to utilize before you waste a lot of paper.
Flap Configuration
With this tool, you can change whether or not there are flaps (which are used to tape or glue one pattern to the other), give the flaps colors, or change the width of the flap.
Edge ID Configuration
This is where you turn on or off the Edge ID. An Edge ID is a number that helps you put the puzzle together. If left on, you would connect Edge ID #1 to Edge ID #1. If turned off, you would essencially turn your patterns for your helmet into a bit of a 3 dimensional jigsaw puzzle, which is not recommended unless you have a lot of time to waste and enjoy a challenge. From here you can also Flip the ID position and change the font size of the ID.
Line Style Configuration
I highly suggest that you at least take a look at this configuration, even if you don't edit it. From here you can edit the way your line looks if it is a Cut Line, Mountain Line (outside fold) or Valley Line (inside fold). Knowing the overall look of your Mountain and Valley lines will help you to know whether you are folding out or folding in on all of the fold lines printed on your pattern. If you are not satisfied with the line types that came default, you can also edit them to your preference.
Other
There are several other tools that are useful in Pepakura, but for the most part they are used to manipulate the 3d object into different 2d patterns. Since JediFraz was kind enough to take most of the legwork out of this for us, we will skip these parts in the tutorial. But feel free to play around with them to get a better feel for the software if it suits you.
Part IX: Print
The first thing we'll want to do is check our Printer Setup. From the File menu select Printer Setup:
http://i165.photobucket.com/albums/u48/Fri...fry13/Tut15.jpg
From here we will want to make sure that we have the correct printer chosen, and that we are in the correct Orientation. If you did not change the Orientation from when you opened the file, your printer will need to be in Landscape. But if you have changed the Orientation when we adjusted the paper settings, make sure that your Printer Setup Orientation matches the Print and Paper Configuration Orientation. FAILURE TO DO SO WILL RESULT IN A RESCALE OF ALL OF YOUR PIECES OR YOUR PATTERNS WILL BE SPREAD OUT ACROSS MULTIPLE PAGES:
http://i165.photobucket.com/albums/u48/Fri...fry13/Tut16.jpg
Now that you've verified your Orientation, all that's left to do is Print! To do this, just go under File to Print and you are ready to rock!
Part X: Conclusion
In conclusion I hope that you have found that this tutorial makes using Pepakura easier for you. The software is really quite friendly, and for those of you that have $40 laying around, is probably worth registering. If you have any questions at all about how to use the software, feel free to ask them in this thread and I will do what I can to answer those questions in a timely manner.
Step 2: next post
Last edited by a moderator:
