Halo 3 MK6 Armor Build

Status
Not open for further replies.

Hatake Cosplay

New Member
Hey all,
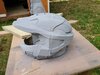
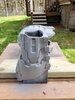
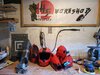
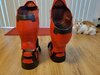
I wanted to share the progress of my first ever Halo Build. I've made plenty of foam armor builds from numerous video games and anime series but I have never done a full 3D armor print or a Halo Build before.

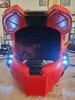
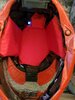
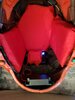
For the Helmet I used Rainyfire's 3D print files from Thingiverse.

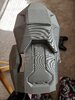
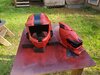
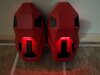
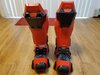
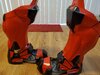
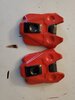
All other armor parts were printed from Moesizzlac files located on thingoverse.

Everything was printed on an Ender 3 pro. The helmet was printed out of Hatchbox PLA. All other armor pieces were printed using Overture PLA +. I opted to place a thin coat of Fiberglass resin on the inside and outside of the armor pieces for added strength and to help remove any layer lines. Gaps were filled with Bondo. Way more primer and sanding cycles than I would like to admit and this is where I am so far.

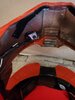
Since I enjoy adding electronics to my costumes I plan on wiring up LEDs to give that classic Halo 3 glow as well as a couple of fans and a microphone system in the helmet.
 

Attachments

  • 20200504_162734.jpg
    20200504_162734.jpg
    3 MB · Views: 315
  • 20200504_162751.jpg
    20200504_162751.jpg
    1.5 MB · Views: 306
  • 20200505_165452.jpg
    20200505_165452.jpg
    1.9 MB · Views: 318
  • 20200516_173532.jpg
    20200516_173532.jpg
    3.6 MB · Views: 307
  • 20200518_185044.jpg
    20200518_185044.jpg
    3 MB · Views: 317
Thanks!
I'm always super critical on my builds due to years of competing at conventions so hearing that makes me happy.
I'm normally using TNT cosplay EVA foam for armor. For seams with that I use contact cement and gap fill with Kwik Seal. A few coats of paint and the seam disappears. With this 3D print I used zap-a-gap CA glue, Bondo, Fiberglass resin and a LOT of sanding. Add a few coats of primer and sand that smooth and you end up with a seemless piece.
 
Large photo dump today. These photos catch us up to where I am in the build today.

Helmet had 4 White LEDs installed (2 circuits in parallel ) I used a double coin cell battery pack that runs through a locking push switch on the bottom of the helmet.

I followed Moesizzlac's tutorial on Simple Helmet Speaker to install a microphone and speaker into the helmet. I ran this through another locking switch on the bottom of the helmet. I used a larger speaker than the tutorial called for and as a result placed it in the back of the helmet to avoid feedback. It is connected by velcro so that I can move it to different locations as I tune it in.

Helmet padding is 1 inch upholstery foam covered in red broad cloth...probably thinker padding than I need but it fits nice and snug now. As an avid motorcyclist I understand how nice it is to have removable helmet lining so the padding is attached via velcro as well.

I added red LED stip lighting to the shoulders and used a double coin cell battery pack to power them.

Shins, hands,, and Boots were resin coated, sanded, primed, sanded, painted, sanded, and then painted again.
 

Attachments

  • 20200522_104246.jpg
    20200522_104246.jpg
    1.4 MB · Views: 282
  • 20200529_101522.jpg
    20200529_101522.jpg
    2 MB · Views: 283
  • 20200529_101532.jpg
    20200529_101532.jpg
    1.7 MB · Views: 260
  • 20200529_101527.jpg
    20200529_101527.jpg
    1.3 MB · Views: 271
  • 20200529_140126.jpg
    20200529_140126.jpg
    3.9 MB · Views: 276
  • 20200605_074344.jpg
    20200605_074344.jpg
    4.1 MB · Views: 265
  • 20200605_074421.jpg
    20200605_074421.jpg
    3.5 MB · Views: 258
  • 20200605_074440.jpg
    20200605_074440.jpg
    2.7 MB · Views: 267
  • 20200605_074620.jpg
    20200605_074620.jpg
    1.7 MB · Views: 255
these look great man i cant wait to see it finished and all together keep up the good work
 
This is looking really good! What size LEDs did you use in the helmet? Also any more details you could share about the switches you are using?
 
LEDs are standard 5mm white. I used a step drill to drill a hole and pushed the LED through until it was just sticking out the front.

The switches im using ive had for years so incouldnt find the exact ones on amazon but these are pretty close. 2 pin locking push switch. Again I used a step drill to cut a hole in the bottom, pushed the switch through and screwed on the top bevel.

Cylewet 12Pcs 12mm Self-Locking Latching Push Button Switch (Pack of 12) CYT1091 Cylewet 12Pcs 12mm Self-Locking Latching Push Button Switch (Pack of 12) CYT1091: Amazon.com: Industrial & Scientific
 
Well it's been an intestesting week of building. I had my first major print failure. It happened about 4 hours into printing the second half of the "buttplate". Of course I was printing overnight so it was a surprise to find a tangled mess in the morning.

That aside I got the thigh armor done and went ahead and added the leds to it. I got the COD piece glued up, resin coated, and primed using the same techniques as all the other pieces. I wired up some new blower fans to USB ends for the helmet. I also found out the seller i ordered my motorcycle visors from cancelled my order 2 weeks ago and the email was lot in spam folder...so had to order visors again.
20200606_153059.jpg
20200606_153107.jpg
20200613_102641.jpg

20200613_102700.jpg

20200612_085941.jpg
20200612_090140.jpg
[
Lastly when test fitting the shin armor and thigh armor together I discovered that the shin armor had a problem. I could not get my foot through! To be clear I had test fit the shin armor before I resin coated and painted them and I could fit my foot through. Thinking back on it there must have been just enough flex in the PLA that I then lost due to the hard resin coat. So I had to cut out the back of the calf and will have to use elastics to allow flexibility like I did with the bracers. It won't be as clean as I would like but I was planning to weather this armor anyways to cover up any crimes.
20200613_102855.jpg
 
It's time for another update!

20200623_104559.jpg

Finished the top coat on the front of the Cod piece.
20200623_104620.jpg


I assembled the butt plate as well as the chest plate using the same method I have been using for the whole build. Use CA glue to attach pieces, bondo as gap filler, and then coat both the inside and outside with fiberglass resin. Sand this smooth before applying filler primer. A copious amount of sanding later and it's time for painting.
20200623_103033.jpg

I also wired up the LEDs for the chest armor. I used pieces of an old plastic picture frame for the light covers. I sand the plastic with 320 grit sand paper to act as a diffuser for the strip LEDs. To stay consistent with the rest of the LEDs on the armor I am using 2032 coin cell batterys in a 6v pack.
20200623_103040.jpg

20200623_103057.jpg

Lastly I finished printing the 4 pieces that make up the back plate and glued them together.
20200623_103347.jpg

Next up is finishing the backplate, Attaching the middle torso pieces and adding the visor to the helmet.
 
The helmet is finished! Its amazing how happy putting a finished bucket on your head for the first time makes you feel.

20200625_175227.jpg

I made my visor in 3 layers. The innermost layer is a hex patterned flexible visor in "gold iridium" by icon props (NEW...HEX Pattern.......Flexible Visors.)

I then layed 2 sheets on flexible acrylic I harvested from a $5 walmart poster frame. Its a little unorthodox but is a cheap alternative that gives a decent look i think. It took me 3 attempts to glue the visor in place. Finally settled on a little bit of sanding to make a surface Hot glue would stick to. I then created the visor seal out of black air dry clay.

There is room for improvement and maybe some retrofits but I am so pleased with the progress of my first Halo build.
20200625_175214.jpg
 
Last edited:
Exciting news in today's post!

First let's catch up with the build progress. The back plate was resin coated, prined and painted in the same method as all thenother pieces. With the help of my brother I was able to get all the straps and padding added into the armor. I used a combination of velcro, nylon strapping, and clips for attachments. 1/2 inch and 1 inch upholstry foam was used for padding for friction fits. I used shock covers for the instep of the boots, which I anchored to the shoe with two small screws.

Now onto the exciting news! The build is complete!(well mostly) I was able to do.my first full body test fit. Everything fit together nicely but there are some adjustments I will have to make to the strapping/padding for a better fit. I also still need to clear coat and weather the armor. Here is a look at what the armor looks like now!
Resized_20200703_204112.jpeg

And with the helmet lights on!
Resized_20200703_204122.jpeg


I am so happy with how it has turned out so far. I learned a lot on this build. Once I have time to do the final touches, I will be sure to post update images.
 
I've started building the props to go with this armor set. The first is a 3D printed M6H2T Tactical magnum. I'm using Moesizzlac's 3D files that I found on Thingiverse.

The second is a MA5B assault rifle. I'm making the assualt rifle out of EVA foam using Andrew DFTs template as a base for the design.

20200725_154222.jpg


I know neither one of these weapons are from the same game as my armor but I plan on making the Halo 3 Varients in the future. The M6H2T magnum has magnets in the handle that will correspond with magents in the hip armor. This will allow me to essentially holster the prop when I gros tired of caring it. I put magnets in the magazine as well to lock it in place but still alow for some fun reloading photos/videos.

Why did I go with foam for the assualt rifle? Well I do a lot of foam builds and I find that I need to practice to keep my skills sharp. The armor build has made me fall in love with 3D printing but I can't argue with the speed and price of a good old fashioned foam build.
 
Status
Not open for further replies.
Back
Top