Hello all,
I'm trying to make a decent electronic sound and light Halo 4/5 energy sword using TheRaptorClaw's Halo: Type-1 Energy Sword Handle.

Most of this I'm making from leftover parts of other projects.
I'm using a 27mm Speaker
a 3.7v rechargeable battery
a Nano Biscotte Sound Module V4
18650 Battery holder
Neopixel Lights
8/32 Screws and nuts
Momentary switch
The first thing to do is split the model and create an upper and lower blank that I can work with. This took longer than I care to admit but below was the result:

Next, I needed to hollow out the interior for all the components, screws and wiring:

Print:

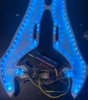
Dry fit components:


Sand and prime and paint handle:


and now I'm currently at the point of making the blade. I only got to outline the parts so far:


That's all for now. I still have to finish the blade shaping, internal wiring, sound font programming and then it'll be done. I'll share files if anyone wants them when the project is complete.
I'm trying to make a decent electronic sound and light Halo 4/5 energy sword using TheRaptorClaw's Halo: Type-1 Energy Sword Handle.
Most of this I'm making from leftover parts of other projects.
I'm using a 27mm Speaker
a 3.7v rechargeable battery
a Nano Biscotte Sound Module V4
18650 Battery holder
Neopixel Lights
8/32 Screws and nuts
Momentary switch
The first thing to do is split the model and create an upper and lower blank that I can work with. This took longer than I care to admit but below was the result:
Next, I needed to hollow out the interior for all the components, screws and wiring:
Print:
Dry fit components:
Sand and prime and paint handle:
and now I'm currently at the point of making the blade. I only got to outline the parts so far:
That's all for now. I still have to finish the blade shaping, internal wiring, sound font programming and then it'll be done. I'll share files if anyone wants them when the project is complete.