You are using an out of date browser. It may not display this or other websites correctly.
You should upgrade or use an alternative browser.
You should upgrade or use an alternative browser.
Halo Infinate 3D printed build
- Thread starter WolfS117
- Start date
- Status
- Not open for further replies.
WolfS117
Member
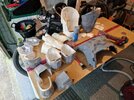
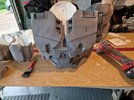
Lots of Printing is already done and I am starting the finishing phase.
Sadly the Shins and the Original Chest I printed were to small. so they are re-printing now.
So far the Process has been cover print in layer of XTC-3D Resin. https://www.benam.co.uk/products/epoxy/xtc-3d-high-performance-3d-print-coating/xtc-3d
This resin i would highly recommend, it is quite thick so paints a really nice layer without to much risk of it being drippy, and it really hides away those layer lines . And if you are lucky enough to get a really nice first layer minimal sanding is needed.
Sand quite smooth,
Then bondo where needed and sand some more.
Attachments

WolfS117
Member
Popping up my printer details for all,
Ender 3 V2
I have been using Creality's Own PLA filament, when buying 10 in bulk they are about £11 per kg which is solid value.
I print with a 0.8 Nozzle, and for the love of god everyone please use tree supports, I was not for a lot of my printing and it wastes so much plastic. I did use a lot of the plastic supports to test techniques for finish but its kgs of waste.
I also do no use any glue on my bed, as long as I level every time I knock the base or have wiggled it, it prints and sticks amazingly.
Tree support saves material, and so much time.

Ender 3 V2
- New Yellow Bed Springs
- BL Touch
- Creality Metal Extruder
- and this Mod for the stock Hot end
- And a filiment runout sensor (worth its weight in gold)
- I have also been using Creality's enclosure, to keep it thermally stable for the prints, also as insurance in case of a fire.
- I have App controlled Lights and Camera to check on the print when I am not in the garage
- Also I have a dehumidifier in the enclosure to help deep dampness at bay.
- And finally you can see a small spray bottle this has KOH cleaning spray in it, this is the best bed cleaning solution I have found
I have been using Creality's Own PLA filament, when buying 10 in bulk they are about £11 per kg which is solid value.
I print with a 0.8 Nozzle, and for the love of god everyone please use tree supports, I was not for a lot of my printing and it wastes so much plastic. I did use a lot of the plastic supports to test techniques for finish but its kgs of waste.
I also do no use any glue on my bed, as long as I level every time I knock the base or have wiggled it, it prints and sticks amazingly.
Tree support saves material, and so much time.
Last edited:
WolfS117
Member
I should post credit to the 3D files creators whose files I am using.
MoeSizzlac

 www.405th.com
The helmet I bought off etsy but the seller has taken it down.
I liked the MoeSizzlac helmet but the files I bought were more detailed and had all the fine details split out for finer printing.
MoeSizzlac
Halo Infinite - 3D Printable Files
Update: I think I'm done - Halo Infinite - Master Chief Inspired Armor Set - No visor by moesizzlac Hello all, I was working with marinesniper on trying to make PDO's from a file by Jonty Schmidt on Youtube. Jonty made a nice model of Master Chief in Blender. In the middle of trying to turn...
www.405th.com
The helmet I bought off etsy but the seller has taken it down.
I liked the MoeSizzlac helmet but the files I bought were more detailed and had all the fine details split out for finer printing.
WolfS117
Member
Helmet WIP.
Some trimming needed to make the hole big enough to get my head through.
Plans for helmet

Some trimming needed to make the hole big enough to get my head through.
Plans for helmet
- Noctua fan with neoprene mounting to prevent vibration noise
- 10mm white led lights mounted into custom 3d printed mount
- I saw a phone heads up display for motorcycle helmets if I can get one cheep enough why not
- Motorcycle visor with the hexigon stuff availible on etsy
WolfS117
Member
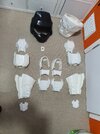
Right here it is undersuit items time.
Planning to use a motorcycle 1 peice breathable undersuit as the base layer.
I bought a stormtrooper neck seal off etsy, it's comfy and easy.
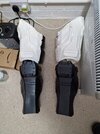
On the shins I am reckoning fitting comfy knee pads inside the shins with some additional padding to make them nice and snug.
On the torso I have had an idea which is a spin on the classic downhill bike armour everyone uses.
I found a molle belt as well as thigh straps for gun holsters. The thigh straps I plan to connect to the thighs to mount them nicely. And also I grabbed two molle pouches that will fit and be practical for stuff. Ammo, plasma nades. I then plan to connect the molle belt to the belt peice to the body armour to make it all nice and tight and secure.
I can also attach the cod peice parts to this belt. It think it will look right and be practical too.


Planning to use a motorcycle 1 peice breathable undersuit as the base layer.
I bought a stormtrooper neck seal off etsy, it's comfy and easy.
On the shins I am reckoning fitting comfy knee pads inside the shins with some additional padding to make them nice and snug.
On the torso I have had an idea which is a spin on the classic downhill bike armour everyone uses.
I found a molle belt as well as thigh straps for gun holsters. The thigh straps I plan to connect to the thighs to mount them nicely. And also I grabbed two molle pouches that will fit and be practical for stuff. Ammo, plasma nades. I then plan to connect the molle belt to the belt peice to the body armour to make it all nice and tight and secure.
I can also attach the cod peice parts to this belt. It think it will look right and be practical too.
WolfS117
Member
Cortana chip WIP (waiting for acrylic paints)
I thought the layer lines and defects would be an issue. However I feel they add to the effect.
Going to bronze paint the contacts and add some dark grey to some areas then dark wash the whole thing.
I also have a chain to hang it off.
Maybe will be another version with a small blue led ring in the middle.
- Member DIN
- S018
You're totally right, those layer lines actually add to the effect!
- Member DIN
- S128
Your suit is really coming along! Great work so far.
The later pieces seem to be a lot of bondo... Are you still using XTC-3D Resin and then adding the bondo?
I'm curious how much of the XTC-3D Resin it has taken so far for your suit.
The later pieces seem to be a lot of bondo... Are you still using XTC-3D Resin and then adding the bondo?
I'm curious how much of the XTC-3D Resin it has taken so far for your suit.
WolfS117
Member
Great question.Your suit is really coming along! Great work so far.
The later pieces seem to be a lot of bondo... Are you still using XTC-3D Resin and then adding the bondo?
I'm curious how much of the XTC-3D Resin it has taken so far for your suit.
So resin wise. The stuff is great it sets a thin layer and it adds a layer of protection. I would say (which is probably my application) it doesn't set that smooth; it could be possible I am being to liberal in my application.
Yes there is lots of bondo and this again I could be spreading on to thick.
I would continue to use a resin first it sands nicer than the pla.
If I was getting another resin I would get something from easy composites in the UK.
So far ibuave used 1 small 3d kit and about halfway through a medium one. I think a whole suit should take no more than 1 medium packet.
- Member DIN
- S128
OK, thanks. I wasn't saying you were using too much bondo. I was just surprised to seeing both bondo and resin methods used. But I understand the benefit to strengthening the print with the resin. Since bondo is brittle any sort of wiggle on seams will make it crack.
I have not looked into the resin coating before. I use Bondo Spot Putty to fill in layer lines. Premixed and easy to sand.
I have not looked into the resin coating before. I use Bondo Spot Putty to fill in layer lines. Premixed and easy to sand.
WolfS117
Member
No worroes bud. I dint think you were insinuating anything, it's more a realisation I have come too.OK, thanks. I wasn't saying you were using too much bondo. I was just surprised to seeing both bondo and resin methods used. But I understand the benefit to strengthening the print with the resin. Since bondo is brittle any sort of wiggle on seams will make it crack.
I have not looked into the resin coating before. I use Bondo Spot Putty to fill in layer lines. Premixed and easy to sand.
I did my first Cheif in fiberglass and I saw the benifits of resin the paperkura first. So I think I just wanted to do it on this. Also I printed 0.8 nozzle 0.32 layer hight so eliminating many of the lines was a priority.
I also fiberglassed the inside joins to prevent wiggle/breaks. Once set it's ace. Bit of a pain but I think it's worth it.
Also there is a lot of bondo at joins becasue my prints were not fantastic and they flared slightly at the print surface which means there was some bumps to get rid of.
Sanding I am using circular sanding disks ony drill mostly. Seems to be the best thing I have. And skme sanding pads of different grades too.
WolfS117
Member
So I had a side project to the main costume. Grabbed a MA40 nerf gun and repainted it. Very quick and easy way to do it. I would easily say the price of it is worth it when you get this much detail with zero fuss. 3d printing something similar would have been a pain.
I removed the motor I think some cons don't allow working nerf guns.
I have also added a a real flashlight into the plastic casing for the fake flashlight on the gun. The button for this is wired up to the motor spin trigger just below the fire trigger.
It works a treat and takes one aaa battery.
The paint job is not compleated need to add details and damage.
WolfS117
Member
The rifle is done. Nice to paint something.
Working light and I am particularly fond of the sooty effect on the muzzle to show gunpowder burn.
Just need to measure and 3d print a cap for the barrel for the cons.
A project down the line is that I may take and aduino and a little digital counter and make the ammo counter light up and count down from 32 to 0 when the trigger is pressed.
Paint used,
Black primer spray
Matt Black spray
Gunmetal silver spray
Graphite powder spray
Ford focus metallic blue spray (had it laying around not a special purchase)
Coloured acrylics
Yellow, red, and white for the fire mode switch
Gunmetal modeling paint for the rivets and dots, and chips and damage.
Then 1 wash with watered down black acrylic.
Then 2nd wash with Warhammer nuln oil matt
- Status
- Not open for further replies.
Similar threads
- Replies
- 84
- Views
- 4,714
- Replies
- 4
- Views
- 2,241