ravinousbunny
New Member
Hello everyone!!
I believe this post should hopefully serve as a possible introduction to my build and to me as well!! Hopefully this post will not be too much of a drag to read and hopefully will be the beginning of some more awesome experiences for me in costuming and especially costuming within the Halo universe.
I shall start with a little about me. My name is Austin. I am currently 23 years old and work in the IT field. As most here I am an avid gamer (not so much recently with my build taking up my time). My favorite among the Halo series would be Halo Reach and is what I decided to build my armor around. I would say I am a bit of a shy guy when it comes to being sociable sometimes though I do try my best to be an active part amongst communities! I do play on Xbox live on occasion and am on my PC a bunch, more gaming now since the bulk of my build is over and I essentially did nothing else except the build for two months haha. I am also current a 501st member with a Stormtrooper costume and will be working on the new ep7 armor shortly. I am absolutely in love with armor building and any armor related cosplays. I was accepted in to the 501st in January of 2014. I have always wanted to do a set of Halo Spartan armor but always nervously neglected pursuing that dream as I was not sure I would have the skills needed to get it done. After I was looking on etsy at helmets and bought one that essentially got this whole build off the ground.
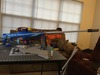
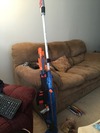
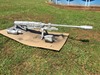
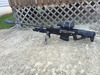
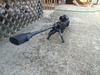
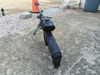
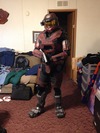
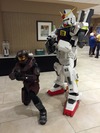
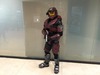
I have "finished" my base build for my Mark V Reach armor and am already working on my plans for upgrades and additions. I was hugely stressed to get the armor finished in time for a convention so I figured the base armor with no real flash or flare would be a good idea. The only real accessories I have set on my armor now are a camera mount on the helmet for a Sony AS20 action camera to go and a set up on the forearm for my phone to attach to act as a bit of a tac pad/gps. After wearing the armor I have found a few things I can tweak to better the overall suit up and suit down. I thought about incorporation some magnets into the build to possibly get forearms pieces that will close around my arm instead of sliding on as well as doing that with the shins also. I also had a bit of an issue with the paint on the chest armor, not sure if my bad painting or a possible bad can of plastidip, but the chest armor has some roughness to it that is only really noticeable when you are about an inch from the armor and hardly noticeable even then. It is like little rubber bumps that just would not come off. I was only able to have one weapon ready for the con I went to which is essentially the boom co halo pistol painted up. I am working on a sniper rifle and that is on my to do list. I used pep files located on the archives here on the site and cannot express how thankful I am to those who made and modified the files as well as having access to such crucial information!
As a note my under suit include a set of fox dirt bike armor (logos are colored in black now as photos below showed white), a set of football pad pants, under armor padded elbow sleeves, airsoft gloves, and the normal compression undersuit. The boots are also wolverine work boots from one of my old jobs with the pieces glued on to it. All the padding helps bulk me up as I am 5' 8" and 135 lb.
------My upgrades/additions list------ (probably forgetting some things)
-Checking over seams from troop and reinforcing fractures with E-6000 (love this stuff)
-Recon Shoulder armor (left)
-Para Shoulder armor (right)
-Tactical case (left thigh)
-Magnet closure for forearms
-Magnet closure for shins
-Magnet closure for boot strap
-LEDs for chest, biceps, thighs, and helmet
-Build upgraded chest armor
-Build upgraded forearm armor
-Knife
-Grenadier knee pads (on the fence if I do or do not want these)
-Finishing my sniper build that does not have much progress
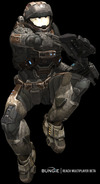
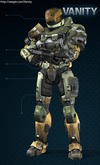
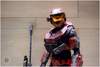
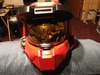
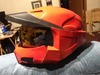
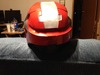
Now for my build. I sort of started the build in March with my Mark VI helmet which is a resin cast helmet and visor from BranfuhrStudios. The original build was going to be a normal banner red and was what I actually went ahead and painted the helmet up as. I was waiting until I got some armor built before I did any weathering or other mods to the paint and was quite happy with the way it turned out. I painted the helmet up roughly the way it shows in Halo Reach.


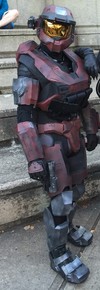
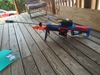
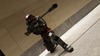
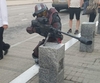
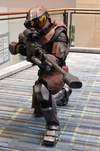
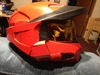
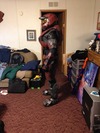
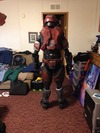
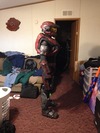
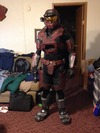
After the Helmet build in March I put the whole armor build on hold to get ready for another con and for school and work. I picked everything back up at the end up May and began my long and what seemed to never end foam cutting, gluing, and assembly. The armor build I decided to go with EVA foam for the build. This is my first EVA foam armor build with a few hiccups, but overall everything in my opinion turned out pretty good! The paint color modified after the chest paint hit a bit of a snag and it kind of accidentally turned into this darker rust kind of red color which I absolutely love so I modified the helmet color to match. These are a few of the finished photos, only had one troop in armor and waiting for some awesome photos to come in so these will have to suffice for now. I have a decent number of build photos but I do not want to clog this post up to much with a million photos.


I believe this post should hopefully serve as a possible introduction to my build and to me as well!! Hopefully this post will not be too much of a drag to read and hopefully will be the beginning of some more awesome experiences for me in costuming and especially costuming within the Halo universe.
I shall start with a little about me. My name is Austin. I am currently 23 years old and work in the IT field. As most here I am an avid gamer (not so much recently with my build taking up my time). My favorite among the Halo series would be Halo Reach and is what I decided to build my armor around. I would say I am a bit of a shy guy when it comes to being sociable sometimes though I do try my best to be an active part amongst communities! I do play on Xbox live on occasion and am on my PC a bunch, more gaming now since the bulk of my build is over and I essentially did nothing else except the build for two months haha. I am also current a 501st member with a Stormtrooper costume and will be working on the new ep7 armor shortly. I am absolutely in love with armor building and any armor related cosplays. I was accepted in to the 501st in January of 2014. I have always wanted to do a set of Halo Spartan armor but always nervously neglected pursuing that dream as I was not sure I would have the skills needed to get it done. After I was looking on etsy at helmets and bought one that essentially got this whole build off the ground.
I have "finished" my base build for my Mark V Reach armor and am already working on my plans for upgrades and additions. I was hugely stressed to get the armor finished in time for a convention so I figured the base armor with no real flash or flare would be a good idea. The only real accessories I have set on my armor now are a camera mount on the helmet for a Sony AS20 action camera to go and a set up on the forearm for my phone to attach to act as a bit of a tac pad/gps. After wearing the armor I have found a few things I can tweak to better the overall suit up and suit down. I thought about incorporation some magnets into the build to possibly get forearms pieces that will close around my arm instead of sliding on as well as doing that with the shins also. I also had a bit of an issue with the paint on the chest armor, not sure if my bad painting or a possible bad can of plastidip, but the chest armor has some roughness to it that is only really noticeable when you are about an inch from the armor and hardly noticeable even then. It is like little rubber bumps that just would not come off. I was only able to have one weapon ready for the con I went to which is essentially the boom co halo pistol painted up. I am working on a sniper rifle and that is on my to do list. I used pep files located on the archives here on the site and cannot express how thankful I am to those who made and modified the files as well as having access to such crucial information!
As a note my under suit include a set of fox dirt bike armor (logos are colored in black now as photos below showed white), a set of football pad pants, under armor padded elbow sleeves, airsoft gloves, and the normal compression undersuit. The boots are also wolverine work boots from one of my old jobs with the pieces glued on to it. All the padding helps bulk me up as I am 5' 8" and 135 lb.
------My upgrades/additions list------ (probably forgetting some things)
-Checking over seams from troop and reinforcing fractures with E-6000 (love this stuff)
-Recon Shoulder armor (left)
-Para Shoulder armor (right)
-Tactical case (left thigh)
-Magnet closure for forearms
-Magnet closure for shins
-Magnet closure for boot strap
-LEDs for chest, biceps, thighs, and helmet
-Build upgraded chest armor
-Build upgraded forearm armor
-Knife
-Grenadier knee pads (on the fence if I do or do not want these)
-Finishing my sniper build that does not have much progress
Now for my build. I sort of started the build in March with my Mark VI helmet which is a resin cast helmet and visor from BranfuhrStudios. The original build was going to be a normal banner red and was what I actually went ahead and painted the helmet up as. I was waiting until I got some armor built before I did any weathering or other mods to the paint and was quite happy with the way it turned out. I painted the helmet up roughly the way it shows in Halo Reach.


After the Helmet build in March I put the whole armor build on hold to get ready for another con and for school and work. I picked everything back up at the end up May and began my long and what seemed to never end foam cutting, gluing, and assembly. The armor build I decided to go with EVA foam for the build. This is my first EVA foam armor build with a few hiccups, but overall everything in my opinion turned out pretty good! The paint color modified after the chest paint hit a bit of a snag and it kind of accidentally turned into this darker rust kind of red color which I absolutely love so I modified the helmet color to match. These are a few of the finished photos, only had one troop in armor and waiting for some awesome photos to come in so these will have to suffice for now. I have a decent number of build photos but I do not want to clog this post up to much with a million photos.


Attachments
-
 IMG_0562_zps7tkalf0x.jpg234.4 KB · Views: 598
 -
 IMG_0563_zpsxkgz4ue4.jpg233 KB · Views: 452
 -
 IMG_0564_zpsgb3nk1yp.jpg182.2 KB · Views: 402
 -
 IMG_0565_zps3ybnhcig.jpg238.4 KB · Views: 481
 -
 IMG_0958_zpsjrbt6qh4.jpg367.1 KB · Views: 473
 -
 IMG_0957_zpspq8gv5rh.jpg396.2 KB · Views: 437
 -
 IMG_0956_zpsf1srph8l.jpg371 KB · Views: 439
 -
 IMG_0955_zpss5axjjrv.jpg348.1 KB · Views: 453
 -
 IMG_0954_zpsloe1swzg.jpg322.8 KB · Views: 492
 -
 IMG_0968_zpspvqzg1vq.jpg71 KB · Views: 434
 -
 IMG_0964_zpsvixz9cl2.jpg294.3 KB · Views: 498
 -
 IMG_0967_zpsgvexmnhj.jpg140.2 KB · Views: 484