Halo Reach Sniper Rifle (3D print)

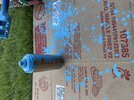
Part 6 of the build:
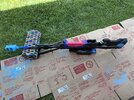
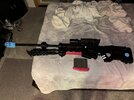
Rifle is fully assembled! currently working on prepping everything for paint. still need to do some more sanding, fill in the seams with more JB weld, and im still working on a solution for a sturdier bipod. I tried using magnets close to the rotator cuff and they were just barely too big for the legs to move. i could potentially cut a small divot to set the magnets and get it working that way, but ill come back to that idea later. (the walls of my print are only around 3 layers thick so im afraid i would damage the part).
View attachment 361538
View attachment 361539
velcro would be another solution that could work just fine, but feels a little inconvenient, i think ill still give it a go though as a temporary solution.
if i were a 3d modeler, i would look into making the bipod a little more practical for real use, but that's a little beyond my skillset right now.
dude its looking awesome!! if only there was a way to get that sweet sound lol
 
part 7:
JB welded all the gaps and seams of the gun. i've used just under 3 tubes of JB weld now, so i feel pretty confident this thing wont be making any *Lego brick break* sound effects. i am working on sanding the whole gun today and likely tomorrow to prep for paint sometime over the weekend!
another fun addition was this nice gun strap which will be great when im tired of carrying around the gun all day. its not that the gun is super heavy, but rather its massive and a little awkward to hold in a shooting position for long periods of time. I also love how it adds to the tactical theme that my ODST build has. cant wait to take pictures in full suit when this bad boy is painted.
sniper weld.jpg
sniper strap.jpg
sniper holstered.jpg
 
part 7:
JB welded all the gaps and seams of the gun. i've used just under 3 tubes of JB weld now, so i feel pretty confident this thing wont be making any *Lego brick break* sound effects. i am working on sanding the whole gun today and likely tomorrow to prep for paint sometime over the weekend!
another fun addition was this nice gun strap which will be great when im tired of carrying around the gun all day. its not that the gun is super heavy, but rather its massive and a little awkward to hold in a shooting position for long periods of time. I also love how it adds to the tactical theme that my ODST build has. cant wait to take pictures in full suit when this bad boy is painted.
View attachment 361544View attachment 361545View attachment 361546
This is so sick! Absolutely love the size, looks like you plucked right out of the game haha
 
Part 8 of the build:
I did another sanding pass on the whole rifle, hitting it with 600, 800, and 1000 grit. Definitely needed a second sanding pass. Im foregoing filler primer on this prop, instead im just trying A paint primer.
this is kinda an experiment on my part to see how well the rifle turns out using just sanding to a higher grit and good paint, (montana gold brand) rather then the full dry sanding, filler primer, wet sanding, filler primer, wet sand to finish method i used on my 3d printed odst helmet. (I was gonna do bondo spot filler as well but bought the wrong brand back in the day and ended up skipping that step).

This whole build has been a great learning experience actually for my 3d printing in general. Many of the parts are slightly warped or never printed level as i dealt with mild calibration, support. And bed sticking issues through the printing process. Now that im aware of what to look for in printing, i think future weapons will turn out a lot better, and depending on how well this rifle turns out, i might refine the process more in the future and use more tried and true methods.

Here are some clips of the primer painting process! Hit it with 3 light coats of montana gold paint primer (white) and we will give this 24 hours to cure before painting the black tomorrow!


Great build log! I have this exact file saved on my Etsy for future fun times. Need to finish my suit before I make more toys This confirmed that as a buy for me though. Thanks for sharing your experience!
 
Part 9: still plenty of painting to do. after getting the primer on, it was time for the base black coat. unfortunately i underestimated how much paint i would need for this project. i assumed since i used 2 cans of primer i would only need 2 cans of black, but there were several spots that were undercoated which ended up either showing white primer speckles, or had a pretty bad powdery texture. some areas turned out great though! i just ordered another can of black which will be here this week and ill go back through and recoat everything.
I also found that the gray secondary color was a little too gray for my taste, but im going with it anyways since i should be able to darken it and help it blend in with the black through a black wash later on when we weather everything.

here is the taped off sections that i wanted to keep white for the color we would paint on later to help it pop more.

here is a clip after the black spray paint, you can see the parts that were not well covered, but i should be able to fix this soon, word of advice to anyone following along, buy extra cans everytime! hehe.
 

Attachments

  • IMG_0681.MOV
    11.6 MB
  • IMG_0680.MOV
    41.7 MB
  • IMG_0687.MOV
    42.1 MB
  • IMG_0683.MOV
    53.2 MB
  • IMG_0682.jpg
    IMG_0682.jpg
    7.6 MB · Views: 1
  • IMG_0684.jpg
    IMG_0684.jpg
    12.6 MB · Views: 2
part 10: after a day to let the black paint set, we retaped the gun and added the blue and magenta neon colors. this was a super fun step! but it was not without problems. unfortunately the blue can was damaged during shipping. i was hoping it would work well enough to still use, and while i was able to cover a couple spots, it left quite a mess. tahu505 called it grunt splatter, and that got me thinking of other future projects hehe.

let this dry for another full day, then this weekend, retaped some spots and applied the gray secondary color. and again let it set for a full day. you can start to see the pattern here haha. its a long paint process, but has been pretty fun planning, prepping, and getting ideas for the design as we go.

all thats left to do now is tape off all the colored spots, hit it with another coat of black, then once that cures, we will go in and hand paint small spots of color to several spots i have picked out. after that we will do a wash and then get to work on adding some scope details and possibly some decals in the future. plenty more to do!
IMG_0682.jpg
IMG_0684.jpg
IMG_0688.jpg


Attachments

  • IMG_0665.MOV
    76.2 MB
  • IMG_0678.MOV
    123.2 MB
  • IMG_0685.jpg
    IMG_0685.jpg
    2.2 MB · Views: 1
Part 11:
Finished with the painting!
I hit everything with another can of black and that fixed most of the issues i had earlier, looks much better now. Lesson i learned, always have extra paint

I like how it turned out, but i may come back to this and do a new paint job in the future too. I was such a fan of the white coat the primer had, it got me thinking of other things i can do related to that. But for now i am pretty satisfied. The last step, add a little character to the rifle. Planning on making a red tinted scope, possibly some decals, some wires for scope details, and of course the magnets for the mag and bipod to make those more functional


Your message may be considered spam for the following reasons:

If you wish to reply despite these issues, check the box below before replying.
Be aware that malicious compliance may result in more severe penalties.
Back
Top