Hey everyone! In my attempt to become more active on this forum, I'd like to include bits of my build that I take pride in so that I can document my progress and help anyone else out that may need it. This helmet was a challenge for me, and I learned a lot from it! This build log contains materials, time invested, detailed step by steps, and my commentary. Thanks for reading!
Captain Veronica Dare ODST Recon Helmet

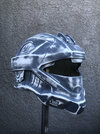
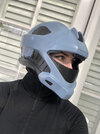
Here's the finished product, minus the visor (which is currently being chromed.) Obviously not in costume, as I'm redoing my whole suit!
How it began:
This helmet, which I started December 27, 2020, took me about a month realistically to complete. However, that "one month" of work was spread out over the course of about 4 due to my obligations as a student. I ordered this helmet from 2Player Creations and it arrived as a raw cast.


This was a high quality cast that had every detail on her helmet embossed into the form. Nothing was missing, as far as I could tell, and it fit my head perfectly.
I was able to get started on this helmet almost immediately. I consulted NobleofDeath16 for some advice on how to go about starting, and he was honestly my biggest help.
First, I started off by checking for any bubbles in the cast. Luckily, there were none that needed to be filled, so I started with the following steps:
1. Sand with 200 grit so the first layer of primer sticks.
2. Spray primer.
3. Wet sand with 320 and 400 grit.
4. Prime again!
5. Wet sand with 600 grit.
6. Wet sand 800 grit.
7. Paint!
8. Add details, weathering, decals, anything else, then gloss coat.
Obviously, it's not as easy as "follow steps 1-8, then you're done!" I'll be going into each step, according to how I did it. I'm not an expert, so don't expect everything to be 100% perfect!
The Process:
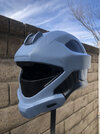
The first step was to sand the initial cast to get rid of any imperfections or raised surfaces. I wet sanded with 200 grit. After that, I used Krylon Ultra Cover 2x in gray, and the same primer in dark gray to alternate colors so that way the primer layers were visible. I was careful not to prime too much, as the goal here was to create a glossy mirror like surface that would be smoother than...something that's really smooth. I primed 3 times over the course of my process: the initial layer, and twice during my wet sanding. I used toothpicks to get into the cracks / lines of the helmet and some tough to reach spaces so that way the primer wouldn't jam up and remove all the details.

Here's the second layer of primer after 400 grit wet sanding.


Huge difference after 600 and 800 grit.
Painting:
After sanding the helmet up to 800 grit, it was time to paint. Let me tell you that painting is stressful. A bad paint job ruins everything.
I custom ordered the color from My Perfect Color, a website that sells custom spray paint. It was expensive.

A problem I ran into during my search for Dare's color is - What exactly is her color? Is she gray? Is she light blue? Is she dark gray? Will ODST's lighting ever truly let us know? I took screenshots in the game and grinded through 50 levels in MCC to unlock her model for Firefight. Still, the lighting was too intense for me to see what color she was. These were the references I had. Good enough for me! I figured if I had to stick to a color, I had to be consistent and do it everywhere.


First, I painted the whole thing black. Then I taped off all the parts that were supposed to remain black, and I painted the rest of the helmet in her signature blue.


Picture 1: Whole thing painted with Krylon ColorMaxx in black.
Picture 2: Taped off the parts that remain black, then paint all the exposed parts.
Picture 3: Blue spray paint over everything!
Picture 4: Finished with the base colors!
Picture 5: Me and my sweet bucket
And BOOM! Everything turned out alright. Next came the details.
Detailing, Weathering, Fans, Oh my!
After painting, I added some basic weathering. Unfortunately I forgot to take pictures of that part. You can see the weathering in the finished helmet! I then added helmet fans from Henry's Helmet Fans. I snagged the double fan kit.


My fan setup!
As you can see, I added one fan above the visor and one below. They're both aimed at my mouth / nose. I used small clasps to hold the wires in place. I also added bicycle helmet pads in a formation that comfortably sat around my head. This thing doesn't budge. I can whip my head around with no movement. These fans are usb powered and connect to a small rechargable battery pack that I'll have in my chest armor.
The next step was to add Dare's ONI sticker, her name, and service number to the front of the helmet. If you've played MCC, you know about the inconsistencies between stickers, logos, and textures. The ONI sticker was sadly flip flopped and reversed multiple times throughout ODST. Next time you play it, look for which side of the ONI triangle is black. On Dare's helmet, the right side of the pyramid is black.
Finally, I was able to call this thing done (well, 99% done, but the visor is coming in soon.) Please ask questions if you have them, and congrats for getting to the end of a very long build post!

Captain Veronica Dare ODST Recon Helmet
Here's the finished product, minus the visor (which is currently being chromed.) Obviously not in costume, as I'm redoing my whole suit!
How it began:
This helmet, which I started December 27, 2020, took me about a month realistically to complete. However, that "one month" of work was spread out over the course of about 4 due to my obligations as a student. I ordered this helmet from 2Player Creations and it arrived as a raw cast.
This was a high quality cast that had every detail on her helmet embossed into the form. Nothing was missing, as far as I could tell, and it fit my head perfectly.
I was able to get started on this helmet almost immediately. I consulted NobleofDeath16 for some advice on how to go about starting, and he was honestly my biggest help.
First, I started off by checking for any bubbles in the cast. Luckily, there were none that needed to be filled, so I started with the following steps:
1. Sand with 200 grit so the first layer of primer sticks.
2. Spray primer.
3. Wet sand with 320 and 400 grit.
4. Prime again!
5. Wet sand with 600 grit.
6. Wet sand 800 grit.
7. Paint!
8. Add details, weathering, decals, anything else, then gloss coat.
Obviously, it's not as easy as "follow steps 1-8, then you're done!" I'll be going into each step, according to how I did it. I'm not an expert, so don't expect everything to be 100% perfect!
The Process:
The first step was to sand the initial cast to get rid of any imperfections or raised surfaces. I wet sanded with 200 grit. After that, I used Krylon Ultra Cover 2x in gray, and the same primer in dark gray to alternate colors so that way the primer layers were visible. I was careful not to prime too much, as the goal here was to create a glossy mirror like surface that would be smoother than...something that's really smooth. I primed 3 times over the course of my process: the initial layer, and twice during my wet sanding. I used toothpicks to get into the cracks / lines of the helmet and some tough to reach spaces so that way the primer wouldn't jam up and remove all the details.
Here's the second layer of primer after 400 grit wet sanding.
Huge difference after 600 and 800 grit.
Painting:
After sanding the helmet up to 800 grit, it was time to paint. Let me tell you that painting is stressful. A bad paint job ruins everything.
I custom ordered the color from My Perfect Color, a website that sells custom spray paint. It was expensive.
A problem I ran into during my search for Dare's color is - What exactly is her color? Is she gray? Is she light blue? Is she dark gray? Will ODST's lighting ever truly let us know? I took screenshots in the game and grinded through 50 levels in MCC to unlock her model for Firefight. Still, the lighting was too intense for me to see what color she was. These were the references I had. Good enough for me! I figured if I had to stick to a color, I had to be consistent and do it everywhere.
First, I painted the whole thing black. Then I taped off all the parts that were supposed to remain black, and I painted the rest of the helmet in her signature blue.
Picture 1: Whole thing painted with Krylon ColorMaxx in black.
Picture 2: Taped off the parts that remain black, then paint all the exposed parts.
Picture 3: Blue spray paint over everything!
Picture 4: Finished with the base colors!
Picture 5: Me and my sweet bucket
And BOOM! Everything turned out alright. Next came the details.
Detailing, Weathering, Fans, Oh my!
After painting, I added some basic weathering. Unfortunately I forgot to take pictures of that part. You can see the weathering in the finished helmet! I then added helmet fans from Henry's Helmet Fans. I snagged the double fan kit.
My fan setup!
As you can see, I added one fan above the visor and one below. They're both aimed at my mouth / nose. I used small clasps to hold the wires in place. I also added bicycle helmet pads in a formation that comfortably sat around my head. This thing doesn't budge. I can whip my head around with no movement. These fans are usb powered and connect to a small rechargable battery pack that I'll have in my chest armor.
The next step was to add Dare's ONI sticker, her name, and service number to the front of the helmet. If you've played MCC, you know about the inconsistencies between stickers, logos, and textures. The ONI sticker was sadly flip flopped and reversed multiple times throughout ODST. Next time you play it, look for which side of the ONI triangle is black. On Dare's helmet, the right side of the pyramid is black.
Finally, I was able to call this thing done (well, 99% done, but the visor is coming in soon.) Please ask questions if you have them, and congrats for getting to the end of a very long build post!
Attachments
Last edited: