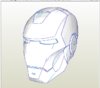
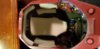
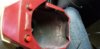
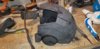
Well here it is, the beginning of 2020 and I had done a little work on transforming 1.05 Iron Man MkVII Helmet by Darkside501st pepakura from a paper item:

to a printable 3D Item.


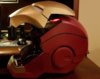
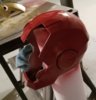
Need to separate parts out so that I can get my fat head in and out easily

OK, so let's get a rundown on the parts list for this build. You will need:
1) Wire
2) Diffused White LED's
3) Arduino Nano
4) SG90 Servos
5) Foil Tape to cover the back of the eyes
6) Gaffers Tape to cover the foil tape
7) Piano Hinge
8) Wire Shrink Wrap Tubing
9) Resistors - 2@ 56 ohm (LED lights) and 1 @ 47K Ohm (actually the last one is used for the switch and can technically be any value but the higher the value you use the better the battery life)
10) Clear and Whatever color filament you want for your 3D printing. I went through 1 spool for the helmet.
11) Hot Glue gun and small Zip Ties (Cable management)
12) 8/32 screws and 8/32 T-Nut Connectors
13) Latching Switch
14) Momentary Switch
15) Piano Hinge
16) Black Chicago Screws
17) Battery (anything that can output more than 5 volts DC) I chose a rechargable 7.4 volt but you can use a 9 volt battery if you like. No more than 12 volts.
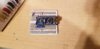
18) Perma Proto 1/2 sized breadboard
Printing: There is nothing new here. Just position the items on the tray and hit print. When they come out raw, sand and glue them like crazy.


Use filler to fill in the holes you come across. Some people use a bondo substance, I use a 3D pen with the same filament and snad again. For overall smoothing, I use readypatch.

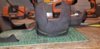
The back is secured using a hinge I made from a long piano hinge and some really strong magnets. Secure the hinge with chicago screws. Be careful to leave enough space between the main helmet and the back so that it can swing open. It won't swing 180 degrees but it will swing enough for your head to get in.

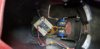
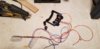
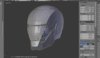
Electronics: So I used the wiring techniques of WF3d on Youtube to put together the servo and eye lights wiring but his instrcctions were unclear. I eventually designed my own system and here is a 3D picture of how it is supposed to look like from the inside:

There. I just saved you an hour of work with this one picture. You're welcome.
Anyway, basically take six 8/32 screws and cut them down to about 5/8". Now look at the left most hinge in grey in the picture above. You want to secure a t-nut to each spot where there is a large hole.
My cheat? Assemble the hinge, 2 screws and 2 T-Nuts together, hold the mask closed (preferably with tape) and grab some 5 minute epoxy. Secure the hinge in place and wait till it fully cures. Repeat on the other side.

I had to create a 3D object to house the 2 servos together.
Unfortunately, I don't have the eyes pictured but my advice:
1) Sand the clear abs eyes (or whatever you used to make them) with some 80 grit sand paper inside and out until it is good and opaque.
2) wire up the 3 LED's in each eye parallel
3) secure with some hot glue on the base of each LED
4) 5 use a piece of tin foil tape and run it from the slit where your eye sees out to the top of the inside of the eye. (this will help reflect the light all around the inside of the eye)
5) Use gaffers tape or just paint with a flat black paint, the rest of the eye that is exposed on the inside.This will stop the light from shining against your face and you should be able to see out nicely.
6) Secure inside the helmet.
 Creating the circuit board and getting it prepped for 2 switches, power, servos and lights was fun. This has to hide inside the helmet. If the picture is not clear enough, please look at This Schematic to help.
The programming was off on the arduino nano and so I had to scrap a quarter of the code I got from youtube.
1) Instead of the lights flashing 3 times, I just wanted an On/Off position.
2) The servos were going too far and I limited the travel of the spin.
3) I left the servos attached so that they stay open and close and don't sag or move depending on which way I was looking (Up or down)
4) The rest was just a honing the timing of the lights and servos.
Here is my final programming.

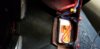
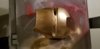
Here is a 7.2 volt rechargable battery hooked up with a latch switch. The other switch is a momentary one that tells the mask to open or close.

And the results:

Inside with padding.

Showing the extent of the back of the helmet and how far it can open.

Closed side.

Open side.

And finally, showing how it opens and closes using the switch.
That's all for now.
Thingiverse Link: Iron Man Mark VII - Wearable Helmet and Working Hinge System by moesizzlac
to a printable 3D Item.
Need to separate parts out so that I can get my fat head in and out easily
OK, so let's get a rundown on the parts list for this build. You will need:
1) Wire
2) Diffused White LED's
3) Arduino Nano
4) SG90 Servos
5) Foil Tape to cover the back of the eyes
6) Gaffers Tape to cover the foil tape
7) Piano Hinge
8) Wire Shrink Wrap Tubing
9) Resistors - 2@ 56 ohm (LED lights) and 1 @ 47K Ohm (actually the last one is used for the switch and can technically be any value but the higher the value you use the better the battery life)
10) Clear and Whatever color filament you want for your 3D printing. I went through 1 spool for the helmet.
11) Hot Glue gun and small Zip Ties (Cable management)
12) 8/32 screws and 8/32 T-Nut Connectors
13) Latching Switch
14) Momentary Switch
15) Piano Hinge
16) Black Chicago Screws
17) Battery (anything that can output more than 5 volts DC) I chose a rechargable 7.4 volt but you can use a 9 volt battery if you like. No more than 12 volts.
18) Perma Proto 1/2 sized breadboard
Printing: There is nothing new here. Just position the items on the tray and hit print. When they come out raw, sand and glue them like crazy.
Use filler to fill in the holes you come across. Some people use a bondo substance, I use a 3D pen with the same filament and snad again. For overall smoothing, I use readypatch.

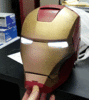
For the paints, I used Rust-Oleum colonial red and a metallic gold. Topcoat was valspar flat finish. Always prime first.
The back is secured using a hinge I made from a long piano hinge and some really strong magnets. Secure the hinge with chicago screws. Be careful to leave enough space between the main helmet and the back so that it can swing open. It won't swing 180 degrees but it will swing enough for your head to get in.
Electronics: So I used the wiring techniques of WF3d on Youtube to put together the servo and eye lights wiring but his instrcctions were unclear. I eventually designed my own system and here is a 3D picture of how it is supposed to look like from the inside:
There. I just saved you an hour of work with this one picture. You're welcome.
Anyway, basically take six 8/32 screws and cut them down to about 5/8". Now look at the left most hinge in grey in the picture above. You want to secure a t-nut to each spot where there is a large hole.
My cheat? Assemble the hinge, 2 screws and 2 T-Nuts together, hold the mask closed (preferably with tape) and grab some 5 minute epoxy. Secure the hinge in place and wait till it fully cures. Repeat on the other side.
I had to create a 3D object to house the 2 servos together.
Unfortunately, I don't have the eyes pictured but my advice:
1) Sand the clear abs eyes (or whatever you used to make them) with some 80 grit sand paper inside and out until it is good and opaque.
2) wire up the 3 LED's in each eye parallel
3) secure with some hot glue on the base of each LED
4) 5 use a piece of tin foil tape and run it from the slit where your eye sees out to the top of the inside of the eye. (this will help reflect the light all around the inside of the eye)
5) Use gaffers tape or just paint with a flat black paint, the rest of the eye that is exposed on the inside.This will stop the light from shining against your face and you should be able to see out nicely.
6) Secure inside the helmet.
The programming was off on the arduino nano and so I had to scrap a quarter of the code I got from youtube.
1) Instead of the lights flashing 3 times, I just wanted an On/Off position.
2) The servos were going too far and I limited the travel of the spin.
3) I left the servos attached so that they stay open and close and don't sag or move depending on which way I was looking (Up or down)
4) The rest was just a honing the timing of the lights and servos.
Here is my final programming.
Here is a 7.2 volt rechargable battery hooked up with a latch switch. The other switch is a momentary one that tells the mask to open or close.
And the results:
Inside with padding.
Showing the extent of the back of the helmet and how far it can open.
Closed side.
Open side.
And finally, showing how it opens and closes using the switch.
That's all for now.
Thingiverse Link: Iron Man Mark VII - Wearable Helmet and Working Hinge System by moesizzlac
Attachments
-
 Untitled01.jpg67.5 KB · Views: 3,234
 -
 20200104_194739.jpg539.8 KB · Views: 565
 -
 20200107_114710.jpg667.7 KB · Views: 559
 -
 20200107_114716.jpg639.2 KB · Views: 522
 -
 20200108_204543.jpg500.8 KB · Views: 529
 -
 20200108_204530.jpg379.7 KB · Views: 521
 -
 20200108_204507.jpg416.2 KB · Views: 616
 -
 20200108_214655.jpg259.2 KB · Views: 588
 -
 Untitled-1.gif8.1 MB · Views: 1,907
 -
 20200104_194730.jpg538.2 KB · Views: 607
 -
 20200107_114725.jpg575.9 KB · Views: 527
 -
 Untitled02.jpg93.8 KB · Views: 762
 -
 Untitled03.jpg115.8 KB · Views: 750
 -
 Untitled04.jpg110.7 KB · Views: 639
 -
 20191230_204842.jpg828.6 KB · Views: 509
 -
 20191230_204849.jpg895.9 KB · Views: 508
 -
 20191230_204855.jpg806 KB · Views: 514
 -
 20200104_194710.jpg239.5 KB · Views: 577
 -
 20200104_194714.jpg504.7 KB · Views: 515
Last edited:


