Jester-19's ME3 rebreather helmet - First time builder DONE (pics within)

Status
Not open for further replies.
Do you have a link for the website that supplied the carbon fibre decal? While I have nothing needing it now it's always good to know where it is when I do need it.
 
This is coming along so beautifully. I admire your attention to detail, and am envious that you have so many reference pictures to work with. I am really looking forward to the finished product. That carbon fiber sticker set you got is really nice looking also. I am really hoping that it lays down nice and smooth with no creases or bubbles. :) Also, I like the idea that you are letting your paint dry and cure completely between coats, as I have seen all too often (and I am guilty of it myself!), that some people either get in too much of a hurry due to excitement for progression, or are just not knowledgeable about cure times, and end up messing up on what otherwise would have been a close-to final step in the creation process. I expect this will be quite epic when finished!
 
Ooooooh very nice work coming along here. I really like the fact that you're incorporating the carbon fiber into it. Good luck :]
 
Thanks for the encouragement guys! And for providing inspiration through your own builds too...

@EVAkura - the reference pictures have certainly been very helpful. I actually bought a PC copy of the game before I started so I could grab whatever angles I might need (I didn't hurt that I got to play it again a better resolution than the 360). I feel like I've got a good shot at a smooth install with the decals; they're made for use on car exteriors which aren't too much different than what I'm doing here, geometry-wise. Plus the youtube videos I've seen make it look pretty straightforward. I'll find out firsthand soon enough though ;)
 
Bit of a minor update here: most of the paint work is done and I tested the sample of the carbon fiber decal. And the results look pretty respectable, if I do say so. I'll let the pictures do the talking...

Below, is a montage of painting pictures. Masked out for the black, stencils in action, a picture post-stenciling and a final with all of the smaller details painted in.

20140113_zps13b0de9e.jpg

Next up was the test of the decal...

IMG_3882_zps0da2d0e2.jpg

I am really pleased with the way this decal worked out. It couldn't have been any easier and the result is exactly what I was shooting for. My little sample piece was big enough to cover the chin area. I peeled away the backer and stuck it in place lightly. Then I hit it with a short blast of heat from the heat gun and what had been a fairly rigid sticker was instantly flexible enough to stretch around multiple edges. The adhesive is strong enough to be pulled up and reset repeatedly and the few bubbles under it were quite easy to work out with a hard plastic edge. Took less than five minutes. I plan on using it on the three silver top sections as well as the upper rear silver area.

Now I am in a bit of a holding pattern waiting for the balance of materials. I want to lay down the rest of the decals before going ahead with the very slight weathering work I plan on with paint/scuffing. Then a few clear coats, install the LED's, fan, padding and visor and this project will be done!

As always, thanks for checking out my build!
 

Attachments

  • 20140113_zps13b0de9e.jpg
    20140113_zps13b0de9e.jpg
    123.3 KB · Views: 222
  • IMG_3882_zps0da2d0e2.jpg
    IMG_3882_zps0da2d0e2.jpg
    80.5 KB · Views: 213
Done!

20140214_zpsbb11750b.jpg

I've had all the parts in my possession for a few weeks now but finding the time to squirrel myself away in my shop has been hard to come by.

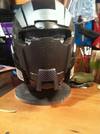
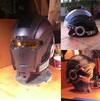
First up was to wrap the rest of the parts with carbon fiber, which went just as smoothly as the tester piece went. After that I gave it the slightest hint of normal wear and tear; scuffs with sand paper along edges and a light blackwash to add a touch of grime. Then two coats of clear matte top coat for a bit of protection.

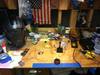
Then came cutting some frosted plexi to diffuse the light from the LEDs. Once those were installed, it was on to assembling the electronics. I learned that I've got a lot to learn when it comes to electronics (the picture below can attest to the mess I can make when trying something for the first time). There is a lot of wiring jammed in here: 7 LEDs with their own resistors, a 3 AAA battery case, a 5v fan, a small switch and almost 13 feet of wire. And there's still room for my head too! One sage piece of advice I can pass on: test early and test often! I mis-wired the LEDs first and then after I corrected that I had a bit of a puzzle when only the front of the helmet would turn on with the switch while the rear was constantly on. I figured out my problem when I found a piece of wire on the floor that belonged in the helmet. A few minutes later and the whole thing worked like a charm!

IMG_3959_zps76134005.jpg

Once I had the wiring harness sorted and mostly installed, I reinstalled the visor and added some padding. Neatly tucked away the nest of wires and promptly wore the thing around the house for a while :)

This has been a very fun process; lots of new skills, problem solving and making a good mess. I'm looking forward to moving on to other projects: Halo 4 armor? A suit of ME3 armor to complement this helmet? Weapon peps? So many choices...

Thanks again to the 405th community as a whole for providing inspiration and know-how and to anyone who has taken the time to check out my build!
 

Attachments

  • 20140214_zpsbb11750b.jpg
    20140214_zpsbb11750b.jpg
    125.6 KB · Views: 228
  • IMG_3959_zps76134005.jpg
    IMG_3959_zps76134005.jpg
    95.5 KB · Views: 211
Done!

... and promptly wore the thing around the house for a while :)

That looks AWESOME! I love how the decals came out... sheer epic-ness. And don't we all do that when we finish a piece? :) If you were like me, you strutted around the house... maybe even a bit of duck-and-cover bounding movements over couches and under coffee tables!
 
Status
Not open for further replies.
Back
Top