MBD's Praetor Suit (Doom 2016) Build Log

Status
Not open for further replies.

MrBlueDot

Jr Member
Hello all! I'm new to the forums, but I've known about the 405th for a long time, and love all the armor here. I finally decided to dig into my own armor build, so I thought I would start a build log as well :)

I've loved the Doom 2016 Praetor suit ever since I saw the promo images. Doom Eternal's suit is awesome, but, I mean... short sleeves in space? It's a little vacuum-y out there. I'm going to be printing most of the armor plates, and sewing an undersuit together, with EVA foam to build it up to Doom Guys heroic proportions. I have an old pleather jacket that I'm going to scrap for undersuit. But before that happens I need to get a sewing machine again. I can get a Singer 4423 right now, but I've been trying to find a decent used machine to save a bit of money. I'll get one or the other soon, I want to have as much time as possible to work on sewing, because it's not something I've done a lot of.

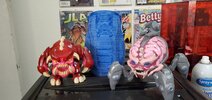
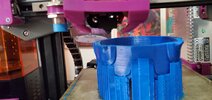
I've been printing a ton of stuff out. So far I'm working on the helmet and I've almost printed all the pieces for the right hand glove. The files I'm using are currently a mix of files from 2 different modelers: Geeky Gardens on Etsy, and Brendan Lautissier on Thingiverse. GG's helmet is an amazing model, and I'm currently printing it in 7 parts. Heres a couple pictures of progress so far.

doom helmet 1.jpg

doom helmet front.jpg


Theres a lot of ringing/ghosting here because I've turned up speed to get the prints out quicker. I will be using bondo or milliput to to fill, and sanding everything smooth, so the ghosting isn't going to show thru in the end. The helmet is printed in ABS which allows me to acetone weld the pieces together. I'm currently printing piece 5/7, and hopefully I will have all the helmet printing done by next weekend. After everything is acetone welded together, I'm going to line the inside with fiberglass for strength.

I still need to figure out how I'm going to do the visor. I have a buck I can print and do a pull on, but I think I would like to commission some one with a vacuum form machine to do it for me instead. Only problem with that is, I don't know anyone offering those services. I could build a cheap vacuum form myself, but I only need to do the one pull so doesn't really seem like a good option.

I'm also printing up glove pieces on my resin printer. That's coming out amazing. I'm using Brendan Lautissier's files for these prints, and using a padded mechanics glove as my base. I might paint the camo on the back of the glove to be like an olive green, but I'm going to leave all the leather on the palms, and the rubber on the knuckles/fingers as they are.

doom glove all fingers.jpg
doom glove thumb 2.jpg
doom glove thumb.jpg


I have to sand down some pieces in order to get some more mobility in the fingers, and so the pieces sit better next to each other. But so far I love these gloves turned out. They are very satisfying. Here, have some clacking:


But yeah, thats what it be. The plan is to update this build log at least once weekly. The goal is to be done in time for Halloween, which should be enough time, but right now I got a lot of printing, crafting, and painting ahead of me. Wish me luck!
 
Whos ready for some ugly fiberglass work?

I printed all the pieces for the helmet, and acetone welded them together. So... Funny thing about FDM 3D printing, it's not really precision manufacturing like a CNC machine, or laser cutter. The printed pieces line up alright, but there are gaps between the Y axis edges of the pieces.
gaps.jpg


I was expecting little gaps, but these were bigger than I thought they would be. Not a problem really, just going to take a little more bondo and dremel work than I originally planned.

I put two layers of fiberglass on the inside of the helmet. The first layer was just some strips covering the seams from the inside, and the second layer was for full coverage.
Fiberglass1.jpg

Fiberglass2.jpg


The helmet is very strong now. I was debating adding a third layer of fiberglass, but then I dropped the helmet. Didn't scratch or crack, came out fine, so I decided it didn't need the 3rd layer.

The next steps are a dremel to carve out a few details near the seams that got filled in with fiberglass resin, then sanding the seams down, and bondo.

Helm1.jpg

Helm2.jpg


The gloves are going slowly however. I'm fairly new to resin printing and I'm having problems printing ABS-like resins. From the reading I've done, it seems that the UV in the printer I have is over powered, and going off of manufacturer recommendations for layer times just isn't going to work. I keep getting results like this:
Resin.jpg


This is even happening with the grey abs resin in my last post. Hopefully I can get the resin dialed in here soon, but every failure takes a long, gooey time to clean up and reset from, so I've been concentrating other places to avoid that lol.

I have another 3D printer on the way! This one has a 400x400x400mm (almost a 16" cube) build volume, so after some modifications I should be able to print full armor panels without having to slice them apart like I did for the helmet. One thing I'm going to try is printing the shoulder padding in TPU so it will be flexible. With the new printer I can easily fit the model on the bed and print it in 1 piece :)
shoulderTPU.jpg


This next week is probably going to be a lot of printer maintenance and building for me. Once the resin printer is back on track I'll be able to continue working on the gloves. My Ender 3 is currently printing out parts and modifications for the new printer coming in. So I'll try to get the helmet all the way up to primer by next week, but we'll see. If only I didn't have to go to work, I would have so much time to work on this! :lol: :lol: :cry:
 
Not to much to update on the state of the suit. I did not get to primer the helmet. I'm still in the filler stage. And not that far into it either unfortunately:
bondoHelmSide.jpg


My new printer came in, and all the upgrade parts as well, so I've been building that. This thing is HUGE! I got a TronXY x5sa-400 for a good price, and also got an aftermarket hotend/extruder, as well as mainboard. I printed out a bunch of 3D parts that fix issues with the stock machine as well. This is going to be an awesome printer once it gets going!

printer2.jpg


Such a large print volume!

printVolume.jpg


Can't wait for the week long prints this thing is going to do :lol: For the most part it is mechanically together. I need to do one slight modification to hotend gantry because a part I printed is blocking a very important hole. The electronics are a different matter entirely. I have to configure the firmware for the new mainboard, I have to mount that board somewhere, as well as the powersupply, and then wiring everything up, which will require me making custom cables because nothing that came with the new parts is long enough to use on this beast. So still have a ways to go.

Also, my cat Pixel does not approve of me using her play space in the gym
PIXDNA.jpg


I started printing the fore arm armor last night. It's a 34 hour print, and it's only 25% done at the moment, but it's looking good. I'll update when it's done!
 
So much for 1 update a week, oops.

I've been fighting my printers a lot lately. The big printer is not complete yet, but it's getting there. It's mostly a matter of wiring everything now, and configuring Marlin firmware. I also found out that I will need to install a buck converter in my resin printer in order to lower the power of the UV LEDs. I would just return it and go with an Elegoo model, but I'm outside of the return window, so I guess I'll just fix it myself. I sent an email to Creality support to see what the LEDs should be at, because when I tested with my multi-meter I was getting a reading of 30v, and I'm pretty sure these are supposed to be 24v *shrug*

My Ender 3 has been having issues with it's extruder stepper. 8 times while printing the bicep the extruder just stopped extruding mid-print. Finally woke up today to the bicep completed on the 9th attempt. I printed the elbow, and fore arm a while ago. Elbow turned out great! Fore arm is a little meh for the print quality. I used a new brand of filament and I should of tuned it first, but I was being lazy.

Also, my Bed head is awesome, and I'll fight anyone who says otherwise:

WeirdFace.jpg

ArmLaidOut.jpg

Fore1.jpg

Fore2.jpg


I got some work done on the helmet too, but I'll take pictures of that tomorrow since I have the day off work. I'll try to get better with actually updating. For the most part I've been working on the new printer, and I wouldn't want to bore anyone with a post on that since it's not exactly cosplay/prop content.

Till next time!
 
Hah, yeah time gets away from ya. Looks good! I'm tempted to mess more with 3D printing seeing how good the results can be... then I remember I'm too lazy and/or cheap to coax my bratty Ender into functioning.
 
Last edited:
Oh wow, I found this all the way back on page 2. Guess I haven't updated in a while. Working 60 hour weeks doesn't leave a whole lot of time to work on the suit, but I have been finding a few hours here and there to get some stuff done. Today I'm gonna talk about the helmet and the visor since that has the most interesting update.

The helmet has finally been smoothed to the point where I'm happy with it. I mostly used Bondo spot putty to smooth everything out and fill in layer lines and seams from gluing the parts together. I used "Green Stuff" to fill in major gaps that the spot putty couldn't handle along the seams in a few places. Then the whole thing was sprayed with duplicolor sandable filler primer, sanded to 1000 grit, then sprayed with it again, because I was out of my regular white primer. I'm pretty happy with the results, but I'm happier that I don't have to keep carving bondo out of the detail lines along the helmet lol.

1.jpg

2.jpg

3.jpg

4.jpg


So now that the helmet is at this stage, I need to start working on the visor and the helmet electronics. I'm planning on a hearing system that uses internal headphones and external microphones. I have a retired pair of Skullcandy Crushers that I'm going to use for the headphones because the headband snapped on them, and their battery life is amazing. I'm also thinking that I can place the mics in the neck vents on the helmet, but I'm going to wait on further painting until I have drilled the holes needed for the mics. I'm planning on a mic in the mouth piece that will transmit to a speaker in the chest plate. Also, I have a neopixel LED strip that I am going to mount around the visor to light it up. I'm pretty sure I can get a raspbery pi zero w to fit inside the neckseal, as well as a battery pack (or 2), and that weight should help to balance the helmet if I space everything out evenly. I'm getting a raspberry pi in a day or two so I can play with it and see how I could use one to run the helmet electronics.

So that leaves the visor! The helmet file I used came with a buck for the visor. It's meant to be used with a vacuum form table, but I wanted to see if I would be able to hand form a visor with a heatgun. Short answer: Yes, but it's going to be difficult. Long answer:

I printed out the buck and went about smoothing it out. I figured the smoother the buck is the better the results will be. Here is the buck fresh off the printer. It was printed in ABS with 4 perimeters and a 50% infill:

5.jpg

6.jpg


I then sanded it down with 60 grit sand paper:

7.jpg

8.jpg


Then came the first coat of bondo spot putty. This coat only went over the visor part of the buck. I then sanded it down with 100 grit, then 500 grit:

9.jpg

10.jpg


I then did a second coat first to get any pinholes/scratches/whatever in the visor part, but also this time I covered the sides of the buck as well. The reason the sides only get one coat is because they only have to be smooth enough to get the plastic off the buck after it's done being formed. I sanded the sides with 100 grit and called it a day. The visor was sanded with 100 then 500, then finally 1000 grit:

11.jpg

12.jpg


With the buck ready I grabbed a scrap piece of polycarbonate and my heat gun. I set it to high then kept the sheet moving over the heat gun to heat the whole thing up evenly. When it would start to get a little bendy I would press it down over the buck and hold it there. This was looking promising for a while, not only was I getting the right curves I was even getting the indent around the visor that serves as the cut line.

After 3 cycles of this I noticed a couple little bubbles. Polycarbonate and acrylic should really be dried before trying to thermoform them, they absorb water, and the water evaporates causing bubbles long before PC or AC gets up to workable temperatures. So I backed away from the heatgun a bit to avoid getting bubbles in my sheet. Unfortunately 2 cycles later, the entire sheet snapped in half, but hey! I didn't get anymore bubbles smh...

14.jpg


You can see the shadows from the bubbles in the last pic.

So now I'm thinking about what to do with the visor. I really REALLY want to be able to make it out of polycarbonate, even though I know it's going to be super difficult to do it right. But on my next paycheck I'm going to get myself a shopvac and the items to make a small vacuum form box, as well as a sheet of petg. In the mean time I'm going to do some research into what it would take to make a drying oven for a single small sheet of polycarbonate. I don't suspect that making an oven will be hard, but making a safe oven that can be ran for 48 hours at a time without burning down my apartment might be a challenge, and if the fire risk seems unmanageable, well, I guess I'm back to petg, or finding some one to commission a visor from who can work with polycarb.

BTW, if you are reading this and you can do it, or know some one who can, help me out let me know! I would much rather pay someone to do this than make DIY tools and do it myself.

Other suit updates: Argent and Whatever6 posted on their slayer build threads about mobility in the arms and shoulders, so that got me looking at the arm pieces I printed out, and I came to the realization that I'm going to have mobility problems as well if I don't resize some parts now. So I'm currently setting up reprints of the forearms and elbows. One of the forearms needed to be reprinted anyway, because I forgot to mirror it, and I currently have two right forearms. After measuring what I have, I decided that the elbow should be 90% scaled, and the forearms 95% scaled. This should give me full range up to my elbow at least without the two armor plates knocking into each other every time I extent my arm. I will post comparison pictures after I print the new pieces, but If you want to see how the old pieces fit currently (kinda) I have a picture in a previous post.

I have decided that I'm going to use a MOLLE/PALS style webbing to attach the armor to the undersuit. After digging into the DIY molle scene, it seems like it will be easy enough to sew, and will provide a much more secure way of attaching the armor plates than something like velcro. Since the webbing will keep the armor from moving side to side it should also help keep plates where they should be when I move, keep them from sagging, ect. We'll see. The sewing machine is a week away from arriving, and it's a new skill for me, so I might be planning more than I'm actually capable of at the moment.

Other than that, I have been gathering a palate of colors, but haven't really found a bright green that I'm happy with yet. I think I got all the tans and browns I need though, and an awesome dark olive green. I'm going to try some techniques I've been seeing used on warhammer minis for the silver/chrome parts. But painting is still a little ways off.

And that's everything on the suit I think I can update currently. My other major project has been the 400mm 3D printer. It's printing, or it was till last weekend when I decided that I should switch from Marlin firmware to Klipper. I've been battling ghosting and ringing on my Ender 3 since I got it, and the new printer has the same problem. In Marlin I could have setup linear advance, but I have set that up already on the Ender and the results are only so-so. I'm going to try input shaping with Klipper instead, which uses an accelerometer on the print head to do the same thing, but with much more precision. So if anyone was wondering what was sucking time away from the suit build, it's this. So far this printer has needed a lot of attention.

Let me know what you think!
 
Last edited:
I noticed that with my arm pieces, the lower front part of the bicep actually gets squished in a bit by the forearm when I bend my elbow. I guess this is why all the movie suits are made out of flexible urethane, otherwise nothing plays nice. I wish I knew of a better way to scale prints like that, but I think "Guess and check" is pretty much it unless you have a full-body 3D scan of yourself to model off of.

While you're doing the helmet stuff, I'd think about how it's going to fog up. On mine, I put in a nose-guard thing to block air from rushing up the visor. Also had to cut straight through all the venting on the front, and back it with the outer layer of a black paper facemask. I didn't need to put in a fan, it might help with the heat but my torso will be roasted long before my face anyway. Hopefully the plastic will be considerably less insulating.

I have little bubbles in my acrylic too. The moisture thing definitely makes sense, since the sheet was sitting in a basement for a full decade before I started heat treating it. And I snapped my visor as well haha, only difference is that I just glued it in anyway and pretended it was intentional... Boy, if any Weta recruiters snoop around these forums, I bet I'm building a great case for myself.

Once the 3D printer woes are done with it'll be cool to see stuff really start to come together, for all of their inconveniences they sure are fun once they work right. The helmet looks great already, so smooth...
 
Visor fog is something I've been thinking about. The plan is to have a 5015 blower fan in each of the 3 vents. Currently I'm working on the fan shroud for the top vent.

My idea is to create a plate for each fan to sit on that has a duct built in to direct air where I want it inside the helmet. The two side vents will have ducts blowing air across the visor, the top vent will blow air down the back of the helmet. The plates are going to be printed in TPU, to help reduce fan vibration noise.

Here's some work I've done so far for the top vent. The first iteration didn't fit the fan. The second iteration is very close, it fits the fan, but only if the blower is facing the wrong way. I'm working on the third iteration now, then I'm going to start adding the air duct and fan mounting points. Since these are just fitting test pieces I've been printing them in vase mode, and each one only takes around 30mins to print out.

15.jpg


17.jpg

16.jpg


The 5015 fan in the pics is not the one that I'm going to use in the helmet, it's a spare for my printer. I'm going to order some 5015s that are 5v and PWM controlled to go in the helmet, and adafruit sells super tiny thermometer break out boards for like 6$ each, and the plan is to have the fans controlled automatically based on ambient temp inside the helmet.

And I think I just heard Amazon drop off a goody box for my printer. Fingers crossed by the time this weekend is over I'll actually have klipper up and running with a touchscreen display.
 
I am not an airflow engineer, but I do play one in my workshop! Got a quick update about the helmet.

This is the fan vent/cover for the top of the helmet. It takes a 5015 blower fan, and when glued in place should seal it off so my hair won't get caught in it. Fingers crossed, I got a lot of hair :lol:

These first few pictures are just of the vents by themselves. The short wide vents point towards the back of the helmet, the long skinny vents point towards the sides, kind of behind the ears. Or that was the idea anyway, honestly I haven't run a fan in this yet, just fitted one. They could be aimed directly at my eyeball for all I know haha.

3.jpg1.jpg2.jpg

It's probably not a very effective airflow design, but the goal is sort of to have a showerhead of fresh air in the top of the helmet.

I combined the vent with the cover plate, and ended up making this pretty neat little UFO:

4.jpg5.jpg6.jpg7.jpg

And I'm currently printing a "final" part in TPU. We'll see how final it is though. It's gonna take the rest of the day, it's almost a 9 hour print. Next time I post I'll put a fan into it and power it up to see how the air flow is. I really hope I haven't accidently created a whistle.

8.jpg

I just wanted to share this small bit of progress. I did pick up another sheet of poly carbonate, but I have to cut off an electronics cover for the big printer before I can give another whack at a PC visor. I have my PETG sheet here. It's a lot thinner than I would prefer. It will definitely work and get me the shape I need, but it feels like it's going to have the durability of a soda bottle. I'd prefer not to use it, so I'll save it as a last resort. Part of the problem is how hard it is to find 1/4" thick sheets of PETG or even 1/8", without having to make a custom order with a 200$ minimum. Grumble grumble, complain, grumble!
 
Last edited:
Wow, your helmet will be pretty cool once it finished (pun intended ;)). Fogging up is a big problem of the helmet, which I got in the doom eternal collectors edition. It is very comfortable to wear and even resizable, but instead of LEDs they should have put in a fan too :D. Well I guess it is made for showcase and not for excessive wear purpose, but if I ever go to an cosplay event I basically can not wear the helmet for more than a few minutes. So your idea with the fan is pretty awesome (y) .
 
Small update today. The top fan cover is done, I installed a fan and powered it on to make sure I didn't create a whistle or a duck call lol. It doesn't exactly blow air like I imagined it would, but it will definitely flood the top of the helmet with fresh air.

fanCoverBack.jpgfanCoverTop.jpg

I've started modeling the side vent covers as well. Those are going to be complicated. I want to design a vent all along the bottom of the visor, but the more I'm thinking about it, the more it looks like this vent will just have to hold the visor, as well as the LEDs, and the sides are probably going to be far enough back that I'm going to have to design them to hold the headphones as well.

I'm going to take a trip down to the hardware store this weekend and get some appropriate bolts for the fan. I'm not going to glue it into the helmet yet though, I'm going to get the rest of the electronics and make sure everything is working together before I permanently install anything. Speaking of electronics, my hearing assistance package should be in today or tomorrow! I ordered a Velleman MK136 Stereo Ear kit. It has stereo microphones, so I should (fingers crossed) have stereo hearing while wearing the helmet.

I took another try at the visor. This time instead of doing the cycles of heating, I just tried to get the polycarb as hot as I could before bubbles formed. The results were super promising! ....until I realized my scrap of polycarb was about 2mm too short and was just barely unable to cover the entire visor form. I'm going to try this again with a longer piece. Hopefully third time will be the charmer, and I'll have my visor!

PCVisor1.jpgPCVisor2.jpg
 
Slow progress is still progress, amirite?

I took a third shot at thermoforming a visor by hand, but ended up with some pretty bad results. Couldn't get the sides quite where they needed, and ended up with a huge bubble patch right in the middle because I got it too close to the heat gun. So I decided to take the visor from my last post, cut it out and see how/where it can be improved. Cutting it out sucked lol. I used my dremel on a pretty low speed and a cutoff wheel. Only took about an hour and a half to cut it out.
20220130_151735.jpg20220130_151743.jpg20220130_151805.jpg

I sanded the edges down and to "fit" with a sanding drum, but didn't completely fit it because I started seeing problems that are probably gonna require me to form another visor. This one really hurts because it *almost* fits perfectly. I need to leave more material around the edges for starters, because this one has gaps, but also because I plan on edge lighting the visor and need a bigger lip to hide the LED strip. But man...

20220131_223050.jpg


It looks so good with a formed visor in doesn't it?
As long as you don't look to close that it haha. Those gaps are big enough people could slide folded dollars thru, and... You know, I think I just talked myself out of making another visor :lol:

20220131_223103.jpg20220131_223058.jpg

I don't remember if I mentioned the resin printing problems I was having, but I fixed my LD002h and now I'm getting nothing but perfect prints. I reprinted probably 75% of the glove pieces again. I took the opportunity to make all the fingertips 5% bigger so they wouldn't be so tight, definitely recommend that to anyone else using the same files as me! So much more comfortable now. I hot glued everything on to get an idea of what this will look like when it's all together.


Have I mentioned I plan on having the glove and forearm as a single piece? I have some pleather here to play with, but it was fabric store scraps, and not the right color for the under suit. Since I'm brand new to sewing I'm going to play with that for a bit and see what I can learn.

I've also started getting paint processes worked out. I found that the duplicolor filler primer I use doesn't appear to bond well with resin prints. Tried hitting a few test pieces with a coat of white Krylon plastic fusion, then laying down the first coat filler primer. This seems to work great, it looks good. The real question will be durability, but with the way Krylon fusion bonds, I really don't think it's gonna be a problem later. After I worked the process out on some test pieces I finally painted the first parts of the suit, the index finger :)

20220120_215011.jpg20220120_215020.jpg

So far the process is 1 coat Krylon plastic fusion, 2 coats duplicolor sandable filler primer sanded with 500 first coat, and 1200 second coat, 3 coats duplicolor hunter green, then 2 coats of Rust-Oleom semi gloss clear lacquer. The silver accents I tried using a paint pen but, I think for everything else I'm just going to use a brush. The results with the pen are weird, but I'm sure I'm using it wrong.

Also, thought I'd share a painting tip I've been doing for a while. I use these bamboo skewers, because they come in a pack of 100 for 3$, and you can find them in any grocery store. Break the skewer to size, and hot glue the piece to the end of it. The styrofoam was just packaging from my sewing machine. To get the hot glue off at the end, just a quick dab with an alcohol wipe, just like you'd do with a circuit board, and it comes right off. Cheap, easy and flexible, since you can break/cut them to any size you need.

My goal for this weekend is to make a final visor. My goal for February is to get one gauntlet completed and prgress on the next. Wish me luck!
 
Well yes your progress might be slow, but your results are pretty awesome. Your helmet and the gloves are soo smooth :love:. And honestly your visor looks great, I would just fill the gaps between the helmet and visor with silicone and it would be fine. It sounds like your already spent very much time and material on the visor ^^, but I am a perfectionist myself, so I wont stop you ;).

I think your idea to connect the arms with leather is great. I basically had the same idea, but I suck at sewing. So I was thinking of cutting up and using the sleeves of a leather jacket. Unfortunately I don't have an old leather jacket, I'm annoyed with myself because I threw away one that I could have used just 2 years ago.

But anyway It would be cool to see your results. And if sewing is easy I might try it as well.
 
Hah, I'd just glob up some oil paint grime into the gaps and call it "weathering," but that helmet is far neater than mine in the first place. How's the clarity? I'm wondering if mine clouded up a little from the heat gun. Might be worth it to sand the outer edges a little bit to diffuse the light a little better. The in-game suit has a similar look too, to my eye the visor frosts up a bit where it meets the helmet.

I'll look forward to seeing how you do the arms, it does suck to pull on the armor over a sleeve so combining the two would be a good idea. Might do that with the legs and end up with Doom capris + knee high boots, just for the sake of keeping cool. Everything seems to wear off of painted 3D prints except for Rub'n'buff, I gave up on detailing the fingers and just slopped blood paint on before a layer of clearcoat.

I was told something about poly-carbonate and acrylic being dangerous to use with fiberglass cutoff wheels, but so far I haven't had one shatter. Still a good idea to maintain a hardy safety squint, I think, if only for the sake of vigilance.

And I just left gaps at the hips for loose bills. I figure it's a good idea to stick with what works.
 
I know that extruded acrylic will chip, and that combined with high speed tools is definitely dangerous. I've never heard the same about polycarbonate or cast acrylic, a quick search doesn't show anything, but I'll ask around on r/diy and whatever plastic reddits I can find. It was very unpleasant to cut, that's for sure. It kept throwing hot shreds of melted plastic in my face, but I had my safety squinters :lol: and a dusk mask on. Felt like I had to brush a pound of it out of my hair afterwards lol.

Plastic is a pain to paint in general. The common advice I see everywhere is to use a filler primer first to smooth out the print, but I'm starting to question that. I had a mask I printed recently that had a piece fall off. I had glued it to the paint itself, which you don't do for this exact reason, but it was just decorative so whatever. The paint came clean off of the print, hardly a spec left behind, so that tells me that filler primer doesn't bond to plastic very well. I've tried Duplicolor, and Rustoleum brand filler primers for the record, might be some other manufacturer/formulation that does a better job.

So that's how I landed on Krylon Plastic Fusion paints for a first coat. It goes on thin, and my understanding of how it bonds is that it slightly melts the surface of the plastic. I could be very wrong on that, I'm no chemist! I'm just hoping this creates a better surface for the filler primer to bond with, maybe it can be my little contribution to the 3D printing community.

As far as the visor being cloudy, it's not really. I gave it a quick cleaning with the glass cleaner by my printer and took these pics for you:
20220204_221239.jpg20220204_221337.jpg

Visibility is excellent in the helmet. really the only obstruction is if I try to look extreme left/right, a little bit of view gets blocked by the "cheeks" but when I say extreme, I mean like

I'm sorry. A BUNCH of gunshots just went off next door. I'm going to finish this post some other time I think. Cops are just now arriving.
 

Attachments

  • 20220204_221653.jpg
    20220204_221653.jpg
    4.9 MB · Views: 156
  • 20220204_221534.jpg
    20220204_221534.jpg
    4.8 MB · Views: 166
I'm sorry. A BUNCH of gunshots just went off next door. I'm going to finish this post some other time I think. Cops are just now arriving.
WTF :oops:

So that's how I landed on Krylon Plastic Fusion paints for a first coat.
Well yes I always use some some sort of "Plastic Fusion" for my 3D prints. It is very common when you paint plastic parts of cars and I had some left overs after my last car paint job. But to be honest I sometimes for get it, and my paint still holds pretty well. Sometimes I do not even use filler and just spray my acrylic paint directly on 3D Prints. The military spray which I got for my project really holds well onto any surface so maybe its a matter of the spray paint as well, but I also never painted resin prints before, maybe that stuff is different to PLA or PETG.
 

Yeah, that was pretty intense. I'm going to leave that post as is, never live-journaled a crime before. The apartment building next door is a place for low income mothers and families, and I don't think I'm emotionally equipped to handle the details of that story, so I told police what I heard, gave them contact info, but I'm kinda hoping that's the end of it for me.

I should get a job painting cars, that seems like it would be fun. I painted cabinets for a couple years out of high school. I've got some great results from painting 3d prints, but still have the itch to experiment and mix things up. Keeps it fun!

20201230_193955.jpg20210130_230711.jpg

20210412_022026.jpg20220204_221653.jpg

Also, everyone, meet Pinky and The Brain. Pinky was the 3rd thing I ever printed, first thing that wasn't a calibration print. Eventually I'll print all the Doom Eternal collectibles :love:

Also got the final left forearm printed and sanded there. That's what I was trying to say last night. I decided to resize the forearm down to 95%. It's definitely not as chunky as the 100% model, but I'm only 5'6", and it looks appropriately chunky on me. I'm not going to repost the other pic from the last post, but the right fore arm got a clog while I was at work, and ended up air printing a inch or two before I got home. I could measure the printed part with calipers, and print the remainder, but every piece that I glue together, I'm also going to reinforce with fiberglass. That will make the right arm heavier than the left. So I think I'm just going to eat the failure and use the rest of this roll to reprint it as a solid piece.

Oh, and about the visibility: So pretty much the only obstructions to vision happen when you turn your eyes so far to the side that it would just be more comfortable to turn your whole head. I'll eventually obstruct a little more view as padding and vents are put inside, but I don't think it will be much at all. The Praetor suit probably has one of the better visor designs for visibility when it comes to armored peeps in space. Some of those Halo and Star Wars helmets, my gosh, you'd have better visibility wearing an actual bucket.
 
So the clog was actually the extruder stepper motor/driver/both dying. I have a full replacement sitting here waiting; motor, driver, and cable. Just waiting till the weekend to get that repaired. My big printer is... well, I'll talk about that in a minute. Just a little progress on the helmet, but exciting and important progress! I finally got my Velleman MK136 stereo ear kit! I also took apart my old Crusher Wireless headphones and am coming up with a way to mount them inside.

mk136.jpgcrshr.jpg

The plan is a short aux cord from the mk136 to the Crushers. The crushers have a beefy battery, headphones will have power for 12 hours at least by them selves. Also, the haptic bass still works in the headphones, so if I find someone with a particularly deep voice they can vibrate my head for a little bit :lol:

The other part of the plan is this:

mic.jpg

It's a tough choice. The circular detail on the ear vent would be the best place to put the microphones for hearing purposes, but I can hide them better in the neck vents by drilling a hole from the inside and mounting them recessed. I think I'm going to wait on drilling until I get the unit running and can test out how good the hearing is on it. It's amplified, and other people that have used the mk136 for cosplay say that they can hear fingers rubbing together from six feet away, so I'm thinking it will be ok to hide them in the neck vents, because really the goal is to just hear when people are talking to me clearly. But just to be safe, I'll wait till I can test things myself.

Now that I have a hearing solution, all that is really left is a speaking solution, and I'm thinking I would like a single battery pack/bank in the helmet hooked up to everything, with a USB charging circuit. I'm looking at a wireless mic in the front of the helmet transmitting to a speaker in the chest plate. I'm not sure how I can accomplish the singular battery, so I still have some research to do there. I may end up just dealing with having to use more than one cable to charge the helmet *shrug*

My progress on this suit has been a snails pace, and I'm kinda coming to terms with the fact that I have just too many projects going on at once, and progress on all of them has been a snails pace. Right now, unfortunately, the suit is on the back burner. Fortunately, it's on the back burner because I've decided to knuckle down on getting the big printer actually printing, and I'm getting real close to finishing that up now.

I bought a TronXY X5SA-400 back in November. Definitely not a kit for beginners! Do not read this as a buying recommendation for this kit! Basically I bought it because it was cheaper to buy this kit than to buy the aluminum extrusion, heatbed, and steppers by themselves. I used almost nothing else from the kit than that. The motherboard is a BTT Octopus, the brains are a raspberry pi 4, got rid of the screen because I'm running this headless. Changed the hotend and titan clone extruder out for a Biqu H2. Started designing a reverse bowden setup for the filament detector that came with it... but then I got lazy and bought a BTT Smart Filament Sensor because 20$ seemed reasonable for the amount of time I would have spent modeling up something.

printBrains.jpgprintH2.jpgSFS2.jpg

Then there's all the parts I had to print because HOLY CRAP the x5sa is a bad kit! There's no way to tension the belts, so I printed motor mounts that had a built in tensioner. They stacked the X and Y belt pulleys on top of each other at the corners, so I had to print new corner brackets that actually keep the belts parallel. The original X gantry was just a piece of acrylic with two holes in it, it did nothing to square the gantry, so I printed a new set of those. The cable chain was laid on it's side for some reason, and it would droop under it's own weight, so I printed this cable chain mount that keeps the chain upright, and rotates. I also printed hats for the z steppers that house pulleys and a g2 belt so they stay in sync.

printMotorMount.jpgprintGantry.jpgprintCableChain.jpgprintZstop.jpg

At this point there are 2 more things that I need to do to the printer before it will be fully up and running. The first is to replace the crappy inductive sensor that came with the kit out for a capacitive sensor so I can use a glass build plate, because man, this bed is big and WARPED. Then I need to install a second power supply and mosfet for the heat bed, because it currently takes over 20 minutes to get up to 110*, which is what I print ABS at. I would like to reduce the time to heat up to no more than 5 minutes, tops.

The new sensor is on it's way right now, I'm going to wait till after rent is paid to get the other things for the heat bed (A 400mm glass build plate is like 80$!). After the sensor is installed though I should be able to at least get started with calibration and tuning. Fingers crossed, I'm hoping to print the first benchy on it this weekend.

With this printer I will still have to cut the chest plate in half to print it, but I can print both halfs on the same plate. And since that's the biggest part of the suit aside from the helmet, all the rest of the suit build should be single piece prints. It's very tempting to reprint my helmet as a single piece, but no, I will restrain myself lol.

Another project that has been competing for my time is my body jewelry stuff I have been doing. I've been designing plugs and tunnels for stretched ears. Still testing things out, made some samples for my lab rats *cough* coworkers, excuse me. So far things are looking good, and there's some interest, so I'm going to start taking some to piercers in my area and get some professional opinions.

itMe.jpgHeartPlugSide.jpgHarleyTunnel.jpgglow1.jpgglow2.jpgglow3.jpg

But this is also a back burner project, because now I can start registering for spring classes at my community college. They have a composite materials course that I've been dying to take. I wanna make stuff out of carbon fiber so bad! Soon, soon...

So that's what's going on over here in MBD land. Sorry the update about the suit was just tiny. But at least you guys know that if I'm not working on the suit, then I'm working on something else that's just as interesting haha.
 
Your helmet will be pretty awesome with all the tech inside when it is all done. I mean fans, speaker and voice amplifier? What comes next a head up display and J.A.R.V.I.S as OS :D?

Your printer sounds like a lot of work, maybe I can recommend my printer after all. I got the Creality CR-10 V2 and I had some troubles too, like a broken motherboard, but it still sound like a lot less work than your printer. It is not as huge as yours but with 300x300x400 it is still pretty big and enough to print the chestplate in 2 pieces. But I guess it is too late for you to buy another printer ^^, so good luck with yours and your other projects ;)
 
Status
Not open for further replies.
Back
Top