MJOLNIR Powered Assault Armor/Mark VI (3D PRINTED)

Status
Not open for further replies.

Dan99

New Member
Hi everyone, Daniel here.

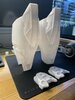
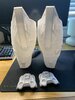
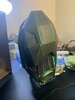
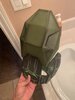
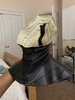
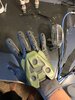
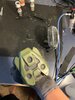
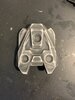
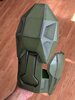
Though I would start my first build thread today. Ive built two suits in the past, a halo 4 chief and a desert ODST, both out of EVA. Wanted to try something different over summer and thought I would 3d print a mark VI suit. Big thank you to Moe for all the files. This would not be possible without his hard work and generosity. Stay tuned for updates!

Equipment List

-Anycubic Chiron FDM printer
-FLSUN QQ-S Delta Printer
-Various PLA and ABS Fillaments (1.75mm)
-Tons of sandpaper
-Primer/filler
-Neodymium magnets
-50mm Blower fans
-LEDS
-2 Gold Mirrored Visors (Amazon)
-Motorcycle Protective gear (Amazon)
-Airbrush and assorted acrylic paints
-Acetone
-Much more ill add when I remember it

--EDIT--
After build completion I ended up using lot more materials than I thought! Below is the remainder of things I used

-CR10s Pro v2 3d printer
-DIY vac form machine
-PETG sheets
-IDYE Poly, orange
-Alclad chrome II or Spazstix chrome
-10mm LEDs
-Wireless LED receiver and remote
-12V Battery
(I also created a mold for helmet casting but this is not required or recommended)
 
Last edited:
So far, I have the forearms and the hand plates printed. I was eager to see how they would come out and printed both out of PLA. Since then, I decided ABS is probably a better way to go for the rest of the suit (durability and heat resistance). Ive just spent the past few days modifying my printers to properly print ABS.
 

Attachments

  • IMG-9037.jpg
    IMG-9037.jpg
    1.3 MB · Views: 337
  • IMG-9036.jpg
    IMG-9036.jpg
    1.3 MB · Views: 334
Update on the prints. Has anyone used the acetone vapor Method to smooth their ABS armor pieces? It seems fairly simple to do with amazing results. I am trying it out on a benchy now
 

Attachments

  • 41DFD0F2-A488-49A2-BC1F-1CB6CC45A6AC.jpeg
    41DFD0F2-A488-49A2-BC1F-1CB6CC45A6AC.jpeg
    1.8 MB · Views: 271
Update on the prints. Has anyone used the acetone vapor Method to smooth their ABS armor pieces? It seems fairly simple to do with amazing results. I am trying it out on a benchy now

on my pla prints i give it a rough sanding to knock off the sharp ends then spray it with resin and it comes out smooth. dont know if that will work on abs or not.. im still new to this my self
 
As of now, ive got both forearms printed, both biceps, hand plates, working on the shins and chest now. I was going to wait until all the pieces were done to paint but I was eager to try out my new air brush. This thing is amazing, I have never used one before, these armor pieces are the first things I have ever painted with an airbrush. I am having a small problem getting the paint to stick though. I may have sanded it too smooth before painting!
 

Attachments

  • IMG-9210.jpg
    IMG-9210.jpg
    1.1 MB · Views: 321
  • IMG-9212.jpg
    IMG-9212.jpg
    988.1 KB · Views: 320
  • IMG-9207.jpg
    IMG-9207.jpg
    1.2 MB · Views: 301
  • IMG-9209.jpg
    IMG-9209.jpg
    1 MB · Views: 320
Last edited:
As of now, ive got both forearms printed, both biceps, hand plates, working on the shins and chest now. I was going to wait until all the pieces were done to paint but I got eager to try out my new air brush. This thing is amazing, I have never used one before, these armor pieces are the first things I have ever painted with an airbrush. I am having a small problem getting the paint to stick though. I may have sanded it too smooth before painting!
i know this will most likely sound goofy but did you use a primer before you painted it? if so did you seal the paint job after painting? if you dont want it to shine use a matte sealer. i coat all of my part with resin and it lets me skip a lot of sanding and the paints stick really good.
 
i know this will most likely sound goofy but did you use a primer before you painted it? if so did you seal the paint job after painting? if you dont want it to shine use a matte sealer. i coat all of my part with resin and it lets me skip a lot of sanding and the paints stick really good.

I used a sandable body filler / primer combo on these. I think I may have made a mistake assuming it was WET sand able though. I wasnt aware there was a specific type of filler primer for wet sanding until I went to lowes the other day. Wet sanding this one caused the primer to soften up, it might be the issue thats causing the paint to come off. I am going to leave them to dry for a few days and hopefully the paint and primer hardens up. As far as clearcoats go, do you recommend basic matte clear coat or something like 2K clear? (clearcoat with a hardening agent)
 
I used a sandable body filler / primer combo on these. I think I may have made a mistake assuming it was WET sand able though. I wasnt aware there was a specific type of filler primer for wet sanding until I went to lowes the other day. Wet sanding this one caused the primer to soften up, it might be the issue thats causing the paint to come off. I am going to leave them to dry for a few days and hopefully the paint and primer hardens up. As far as clearcoats go, do you recommend basic matte clear coat or something like 2K clear? (clearcoat with a hardening agent)

just a basic matte or satin which ever type of sheen you are wanting but i use kylon matte clear it work pretty good for me. one tip if you want any spray paint to spray really good set them in a shallow pan of hot water let them set for about 5-7 mins that make it spray really good...
 
Update on a different part of the suit. Besides sanding, the only downside of 3D printing is waiting for your parts to finish lol. I have just about finished up the prep work for the neck seal though. I saw a post a while back of someone using the neck portion of a Marvel Flash mask. I used the same thing and just trimmed the top portion off. The rest was painted black using acrylic paints and an airbrush. The paint seems to stick well with no real preparation and is flexible, showing no cracks or stress marks when the latex is bent.
 

Attachments

  • IMG-9221.jpg
    IMG-9221.jpg
    1.1 MB · Views: 325
  • IMG-9220.jpg
    IMG-9220.jpg
    1.7 MB · Views: 326
  • IMG-9219.jpg
    IMG-9219.jpg
    1.7 MB · Views: 327
Update on a different part of the suit. Besides sanding, the only downside of 3D printing is waiting for your parts to finish lol. I have just about finished up the prep work for the neck seal though. I saw a post a while back of someone using the neck portion of a Marvel Flash mask. I used the same thing and just trimmed the top portion off. The rest was painted black using acrylic paints and an airbrush. The paint seems to stick well with no real preparation and is flexible, showing no cracks or stress marks when the latex is bent.
that is a good idea can you share where you got it..... and i like the way you think out problems and get a solution ...
 
Update on a different part of the suit. Besides sanding, the only downside of 3D printing is waiting for your parts to finish lol. I have just about finished up the prep work for the neck seal though. I saw a post a while back of someone using the neck portion of a Marvel Flash mask. I used the same thing and just trimmed the top portion off. The rest was painted black using acrylic paints and an airbrush. The paint seems to stick well with no real preparation and is flexible, showing no cracks or stress marks when the latex is bent.
I am pretty sure the first place I saw that was JGPenland 's build - Looks good!
 
that is a good idea can you share where you got it..... and i like the way you think out problems and get a solution ...

Thanks, here is the link to where I purchased this one.

 
This is looking great.

For my 3d prints (PLA +) I've been using a thin coat of fiberglass resin follwed by several coats of rustoleum sandable primer that i found in the automotive section of Walmart. It hardens up nicely and I've had no issues wet sanding it. For paint I'm using plastic bonding rattle cans like Krylon Fusion or Rustoleum. It has stuck just fine. I then go back and use an airbrush for highlights or detail work.

I generally use satin or semi gloss finishes for anything I want to look metal, gloss for platic look, and matte for organics.

Keep up the great work. I'm currently building my mk6 and I'm defiantly going to follow your progress!
 
Purchased a new compressor for my airbrush. Getting much more consistent spraying and a much higher paint saturation with this one! I finished up the base layers of the right bicep as well as the base layers for one of the hand plates. Unfortunately there are a few layer lines visible, but most of them are gone. The bicep portion was rough sanded (not wet sanded) with 220 grit and it left a pretty neat texture after paint. I like the roughness and grit that the rough sanding leaves, it gives the armor extra grit and depth.
 

Attachments

  • IMG-9338.jpg
    IMG-9338.jpg
    2 MB · Views: 298
  • IMG-9337.jpg
    IMG-9337.jpg
    1.9 MB · Views: 286
  • IMG-9336.jpg
    IMG-9336.jpg
    2.2 MB · Views: 272
  • IMG-9334.jpg
    IMG-9334.jpg
    1 MB · Views: 281
  • IMG-9333.jpg
    IMG-9333.jpg
    1.1 MB · Views: 254
  • IMG-9331.jpg
    IMG-9331.jpg
    1 MB · Views: 274
  • IMG-9332.jpg
    IMG-9332.jpg
    1 MB · Views: 272
  • IMG-9330.jpg
    IMG-9330.jpg
    1 MB · Views: 279
Purchased a new compressor for my airbrush. Getting much more consistent spraying and a much higher paint saturation with this one! I finished up the base layers of the right bicep as well as the base layers for one of the hand plates. Unfortunately there are a few layer lines visible, but most of them are gone. The bicep portion was rough sanded (not wet sanded) with 220 grit and it left a pretty neat texture after paint. I like the roughness and grit that the rough sanding leaves, it gives the armor extra grit and depth.
Very nice dan i like the way you paint the items you got airbrush skills buddy...
 
What do you have on the inside of your prints? (Looking at the one pic of the inside of the bicep)
 
Status
Not open for further replies.
Back
Top