MJOLNIR Powered Assault Armor/Mark VI (3D PRINTED)

Status
Not open for further replies.
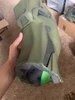
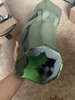
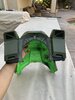
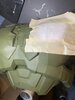
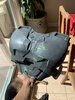
What do you have on the inside of your prints? (Looking at the one pic of the inside of the bicep)

I saw a tiny bit of layer separation on the bicep and it was concerning, I dont want this thing to split during use. I made a ABS glue slurry out of leftover ABS (same green filament used in the bicep) and acetone. Since the acetone dissolves ABS, it literally melts the layers together when its applied directly to the print. Once the acetone evaporates, the glue turns into a very hard and durable sheet/coating of ABS plastic. This should solve any potential layer separation issues.
 
Boots are nearing completion. These were tricky, I wanted to make them mobile and easy to put on and take off, as well as structurally sound. I have had issues with the boot portion of my other builds and wanted to make this one much more solid. I ended up using drywall screws and small bolts to keep everything together. The screws go right into the midsole of the shoes and the bolts through small strategically placed holes. I still need to weather and paint the screws but here is an overall picture of the progress. I used a small piece of corrugated pipe for the mid section of the shoes. These are also bolted to the shoe. The upper portion of the shoes are pretty rough, as they were my first ever ABS prints and I was still in the tuning process. They might be replaced with better ones down the line but for now they will do.
 

Attachments

  • IMG-9341.jpg
    IMG-9341.jpg
    1.6 MB · Views: 274
  • IMG-9353.jpg
    IMG-9353.jpg
    2.6 MB · Views: 243
Did you use shock covers for the mid section of you boots (like I've seen in a few other builds?)
 
I used a small section of corrugated garden tubing I picked up at Lowes. I couldn't find the correct diameter shock covers for my shoes. These work well enough and are a bit cheaper as well.
I should see if I can use this for my power armor joints...
 
First shin is almost completed. Initially I thought the scale was way off, it seemed huge off the printer. After putting it on and comparing it with the boots, it looks much more proportional. It was airbrushed the same method as everything else. I cut and used rectangular strips of acoustic foam panels for the seals, it looks and feels great and is very easy to do. It provides some pinning force against my leg as well as makes the armor much more comfortable.
 

Attachments

  • IMG-9363.jpg
    IMG-9363.jpg
    2.4 MB · Views: 256
Dan99 - This build is looking amazing! I am blown away at how fast you are getting through it.

Were you able to get your feet through the shins, or did you have to modify them at all?
 
Dan99 - This build is looking amazing! I am blown away at how fast you are getting through it.

Were you able to get your feet through the shins, or did you have to modify them at all?

I was able to get my foot through just fine. I printed V2 of Moe's shin file, the bottoms are much wider than the V1. I scaled them up by around 7% to compensate for the difference in Moe and I's height.
 

Attachments

  • IMG-9369.jpg
    IMG-9369.jpg
    1.8 MB · Views: 231
  • IMG-9368.jpg
    IMG-9368.jpg
    1.8 MB · Views: 234
I've run into an issue, maybe someone can help me out. To get the chest portion of the suit printable, I had to slice it into many smaller parts using Meshmixer. Though when I put the parts in Cura, some of them are missing portions. Im getting a "Model errors" message stating that the model is not manifold. The highlighted areas indicate either missing or extraneous surfaces. Anyone know how to fix / repair this?
1591894832685.png

1591894853235.png
 
I was able to get my foot through just fine. I printed V2 of Moe's shin file, the bottoms are much wider than the V1. I scaled them up by around 7% to compensate for the difference in Moe and I's height.

Dang that airbrushing looks amazing! Would you be up for describing it in more detail? I have an airbrush and doing it similar to this would save so much time!
 
I've run into an issue, maybe someone can help me out. To get the chest portion of the suit printable, I had to slice it into many smaller parts using Meshmixer. Though when I put the parts in Cura, some of them are missing portions. Im getting a "Model errors" message stating that the model is not manifold. The highlighted areas indicate either missing or extraneous surfaces. Anyone know how to fix / repair this?

MoeSizzlac has files out there that are already cut into smaller pieces. Did you try using those?
 
MoeSizzlac has files out there that are already cut into smaller pieces. Did you try using those?

I did not. I found a file on thingiverse that compiled the detailed portions of Moe's chest STLs all into one model. That is the one I was working on separating myself. I did find a solution after an hour or so of tinkering. Meshmixer was not able to handle the complexity of the files when trying to solidify the objects so I had to move to another program. Microsoft has a free 3d editing program called 3D Builder, it worked extremely well and was very simple to use. It even recognizes corrupt portions of a 3D model and prompts the user with an option to repair the model. It was able to repair the whole model without crashing. The STL now slices like a dream in Cura
1591899361804.png
.
 
Dang that airbrushing looks amazing! Would you be up for describing it in more detail? I have an airbrush and doing it similar to this would save so much time!

Definitely! I can probably do a short tutorial in the next few days or so.
 
Recently finished assembly and first base coat of paint on the back portion of the suit. It seems to be correctly sized. I tried covering the seams up the best I could but you can only do so much. I used a 3d pen to fill the gaps, along with blades and sand paper to level things as best I could. The back portion was sliced into 8 sections to make it easier to print. Still need to clean things up with the airbrush, install the LED's and diffusing filters, weathering, and mounting system. This thing is 100% ABS, 1.2mm walls, 25%infill its heavy and very solid. Once my final layer of ABS glue sets on the inside, im pretty sure this thing could take a solid punch no problem.
 

Attachments

  • IMG-9482.jpg
    IMG-9482.jpg
    1.6 MB · Views: 212
  • IMG-9490.jpg
    IMG-9490.jpg
    2.1 MB · Views: 195
  • IMG-9503.jpg
    IMG-9503.jpg
    1.6 MB · Views: 201
  • IMG-9502.jpg
    IMG-9502.jpg
    1.6 MB · Views: 204
  • IMG-9501.jpg
    IMG-9501.jpg
    1.5 MB · Views: 189
  • IMG-9500.jpg
    IMG-9500.jpg
    1.6 MB · Views: 199
  • IMG-9499.jpg
    IMG-9499.jpg
    1.3 MB · Views: 203
Finishing up the base coat of the chest, spent more time sanding this one down and this one came out much better. Definitely dont skimp on sanding and prep work. I liked the idea of doing a white 117 so I made my own tape stencil and airbrushed it onto the suit. I will likely add white stripes to one of the biceps (similar to the forward unto dawn suit) as I want to integrate this into the mark VI armor. Overall im happy with how it came out
 

Attachments

  • IMG-9558.jpg
    IMG-9558.jpg
    1.1 MB · Views: 195
  • IMG-9555.jpg
    IMG-9555.jpg
    1.4 MB · Views: 183
  • IMG-9548.jpg
    IMG-9548.jpg
    1.5 MB · Views: 199
  • IMG-9567.jpg
    IMG-9567.jpg
    1.6 MB · Views: 178
  • IMG-9566.jpg
    IMG-9566.jpg
    1.9 MB · Views: 179
  • IMG-9565.jpg
    IMG-9565.jpg
    1.7 MB · Views: 191
Status
Not open for further replies.
Back
Top